Sourdough Danish


You can make honest to goodness Sourdough Danish at home. The recipe takes more than 12 hours, but the vast majority of the time is hands-off.

You’ll see lots of Danish recipes that use puff pastry dough or even phyllo dough as a shortcut. Those are not bad options, but true Danish pastry is made with a special type of dough.
Like puff pastry and croissants, Danish dough is laminated (layered with butter).
There aren’t as many layers in this dough as there are in a classic puff pastry, but the addition of sugar, milk and an egg yields a rich, slightly cakey dough that is a little different than its laminated cousins.
The addition of sourdough starter gives the Danish that special flavor and texture we sourdough bakers know and love.
By the way, if you don’t have a sourdough starter yet, make this Quick Danish Dough using yeast. The results are wonderful and the process is quite easy to follow.)
Ingredients
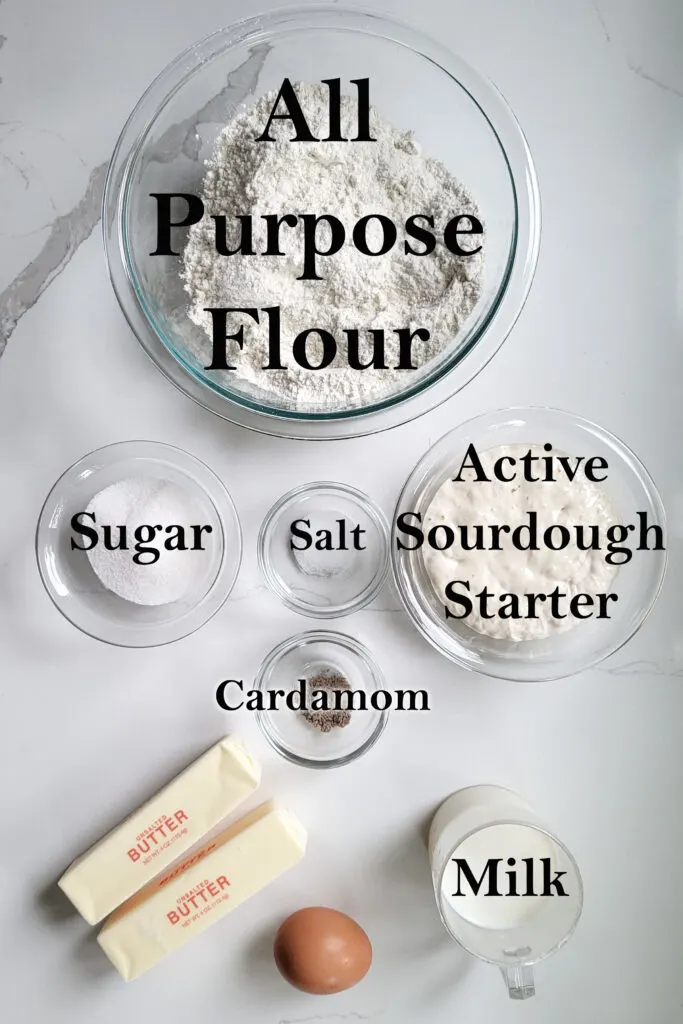
Ingredient Notes
- Active Sourdough Starter – Your starter should be well-fed and at peak activity when you make the Danish dough.
- All Purpose Flour – Medium protein ap flour makes a dough that is strong enough to hold in the layers of butter, but soft enough to make a tender pastry.
- Sugar – Just a hint of sugar tenderizes and sweetens the dough.
- Milk – Scalding then cooling the milk alters the protein in the milk which can interfere with gluten development. Don’t skip the scalding step.
- Cardamom- The spice is a traditional flavoring for Danish pastry.
How to make Sourdough Danish
Here’s what the recipe process looks like at each stage. Refer to the recipe card below for measurements and exact instructions.
- After several hours of fermentation, the dough is ready for the butter.
- Pat the fermented dough into a square.
- Arrange the cold butter cubes over half the dough.
- Fold the dough to enclose the butter.
- Press on the dough to flatten the butter cubes.
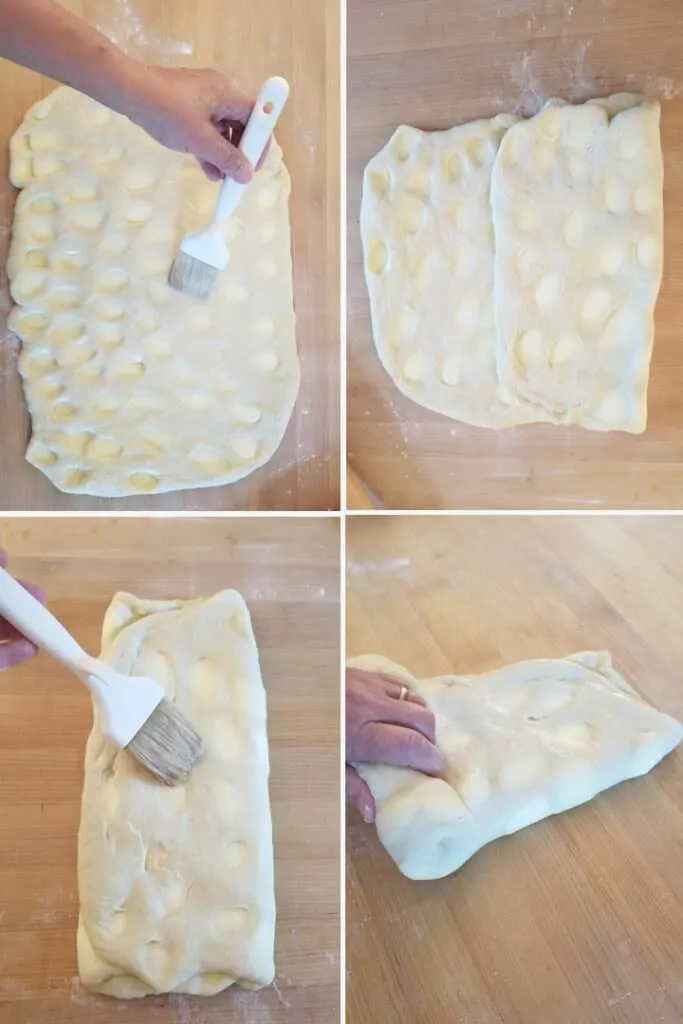
- Roll the dough to a 12″ x 16″ rectangle and brush lightly with cold water.
- Fold the dough into 3rds, like a letter.
- Brush with cold water again.
- Roll the dough into a tight log and refrigerate.

- Roll the chilled dough into a 12″ x 16″ rectangle.
- Brush with water and fold into 3rds.
- Brush with water.
- Fold in half and chill for at least 3 hours before using in your favorite Danish recipe.
Pastry Chef tips for making Sourdough Danish Pastry:
- If your starter needs feeding, do that the night before or early in the morning of the day you want to make the dough.
- When your starter is ready and active, mix the dough. Allow it to ferment at room temperature for 3-5 hours.
- In the afternoon or early evening begin laminating the dough. This will take a couple of hours with a 1 hour rest between folds.
- Refrigerate the dough for several hours or up to a day before using. I like to let the dough sit a full night in the refrigerator before rolling. At this point the dough can be frozen for a couple of weeks.
- The dough is ready for your favorite Danish recipe after chilling for several hours or overnight. Do not unfold the dough before rolling.
- This dough will need a longer rising time than yeasted Danish pastry. For best results I like to allow the assembled, unbaked Danish pastries to rise overnight in the refrigerator before baking for breakfast in the morning.
- Allow 1 1/2 – 2 days from feeding the starter to baking the finished pastries. For example; feed your starter early Thursday morning, make the dough in the early afternoon. Laminate the dough Thursday evening and refrigerate the dough. Friday afternoon you can shape the Danish and refrigerate overnight. Bake the Danish Saturday morning.
- You can shorten the timeline as you need. Just make sure to give the dough a rest any time the butter becomes too soft or the dough becomes tough.
Ok, now you’re ready to make a gorgeous Apple Danish Bread, Bear Claws, or some luscious Cheese Danish.
I think you’ll like these other breakfast and brunch treats: Sourdough Croissants, New York Bagels, Onion & Poppyseed Bialys, Sourdough Coffee Cake, Apple Cider Donuts and French Crullers.

If you love this recipe as much as I do, I’d really appreciate a star rating and a quick comment. Ratings and comments help my recipes show in search results. Thanks!

Sourdough Danish Recipe
Ingredients
- 8 oz active sourdough starter (1 cup, 100% hydration)
- 4 oz whole milk (½ cup, scalded and cooled to 105°F)
- 1 egg (room temperature)
- 11 ¼ oz all purpose flour (2 ¼ cups, see note)
- 3 oz granulated sugar (⅓ cup)
- ½ teaspoon table salt
- ½ teaspoon ground cardamom
- 8 oz unsalted butter (cold, cut into ½" cubes)
Instructions
- In a measuring cup, mix 8 oz active sourdough starter, 4 oz whole milk and 1 egg.
- Place 11 ¼ oz all purpose flour,3 oz granulated sugar, ½ teaspoon table salt and ½ teaspoon ground cardamom in the bowl of a stand mixer with a dough hook or into a large mixing bowl.
- With the mixer running on low, add the starter mixture all at once and mix until it is absorbed. If working by hand stir the liquid in until it’s mostly absorbed.
- Mix until the dough gathers on the hook and clears the sides of the bowl. If working by hand stir in as much flour as you can with a wooden spoon, then finish kneading in the rest of the flour by hand.
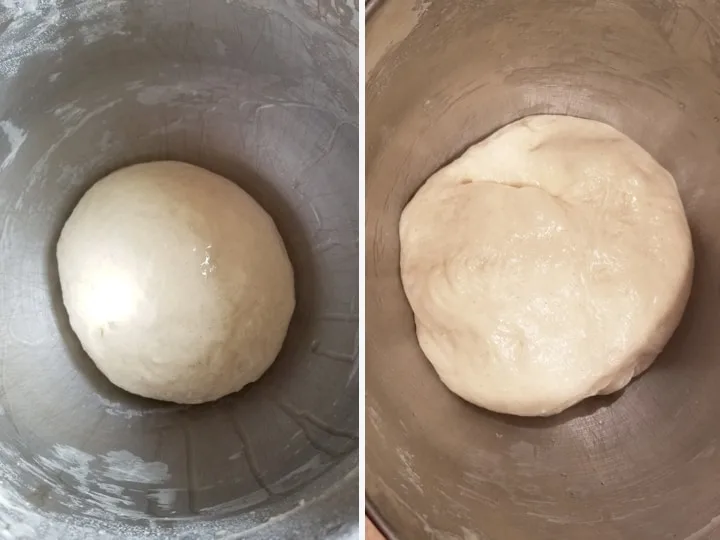
- Transfer the dough to a lightly oiled bowl, turning once to coat the dough. Cover the bowl and set it aside at room temperature. After 30 minutes uncover the bowl, lift one side of the dough over into the middle of the dough. Repeat with the other three sides of the dough then flip the dough over. Cover the bowl and after 30 minutes repeat the procedure. Cover the bowl and after 60 minutes repeat the procedure. Cover the bowl and after 60 minutes repeat the procedure one last time. By now the dough should be lively, elastic and airy. If the dough is still sluggish give it another hour or two at room temperature.
- Turn the dough out onto a lightly floured surface. Do not knead out the air. Use your hands to pat the dough into a rough 12” square. Distribute 8 oz unsalted butter cubes evenly over 1/2 of the dough. Fold the other half of the dough over to encase the butter. Pinch the seam to enclose the butter.
- Use a rolling pin to press down along the dough to flatten the butter and the dough. Roll the dough to a 12” x 16” rectangle. Lightly brush the surface of the dough with cold water. Fold the dough into thirds, like a letter. Brush the surface of the dough with cold water. Roll the dough up from the short side. You’ll now have a short log. Wrap the dough and refrigerate for at least 1 hour to give the dough time to rest and to keep the butter cold.
- Press on the log to flatten and roll into a 12” x 16” rectangle. Brush the surface of the dough with cold water. Fold the dough into thirds, like a letter then brush the dough with water again and fold in half to make a square.
- Wrap the dough and place it in the refrigerator for at least 3 hours, preferably overnight, or up to 2 days.
- The dough is ready to use in any recipe. When you use the dough in a recipe, do not unfold before rolling. Sourdough pastry may need a longer rising time than that called for in a recipe using yeasted danish pastry. I prefer an overnight rise in the refrigerator for sourdough danish.
Would you like to save this recipe?
Equipment


As an Amazon Associate and member of other affiliate programs, I earn from qualifying purchases.

I am on my second round of making these danishes. This is a time consuming yet easy recipe, however the flavor is well worth every minute. This is a worthwhile recipe that serves many purposes. Making this is a great way to de-stress and eating it puts smiles on every face!