Perfect Vanilla Butter Cake
This is the only Vanilla Butter Cake recipe you’ll ever want or need. Mixing technique can make a big difference when making cake batter. Find out the best way to get a light and tender cake.
Table of contents
Why this is the best Vanilla Butter Cake Recipe
First of all this is a great recipe because it is a balanced recipe.
Professional bakers use the “Baker’s Percentage” to balance the ingredients in a recipe. With this knowledge I worked for months developing the best vanilla cake.
In fact, this exact recipe was the base for hundreds and hundreds of wedding cakes I sold when I had my wedding cake business.
You can find the percentages for this Vanilla Butter Cake recipe in this all-encompassing post describing how to create the best cake recipes.
Once you have a balanced recipe you need to think about mixing technique.
I make my butter cakes using the “reverse creaming” method of mixing. Reverse creaming makes a cake with a soft and tender crumb. You can see side by side comparisons of reverse and traditional creaming below.
Recipe Ingredients
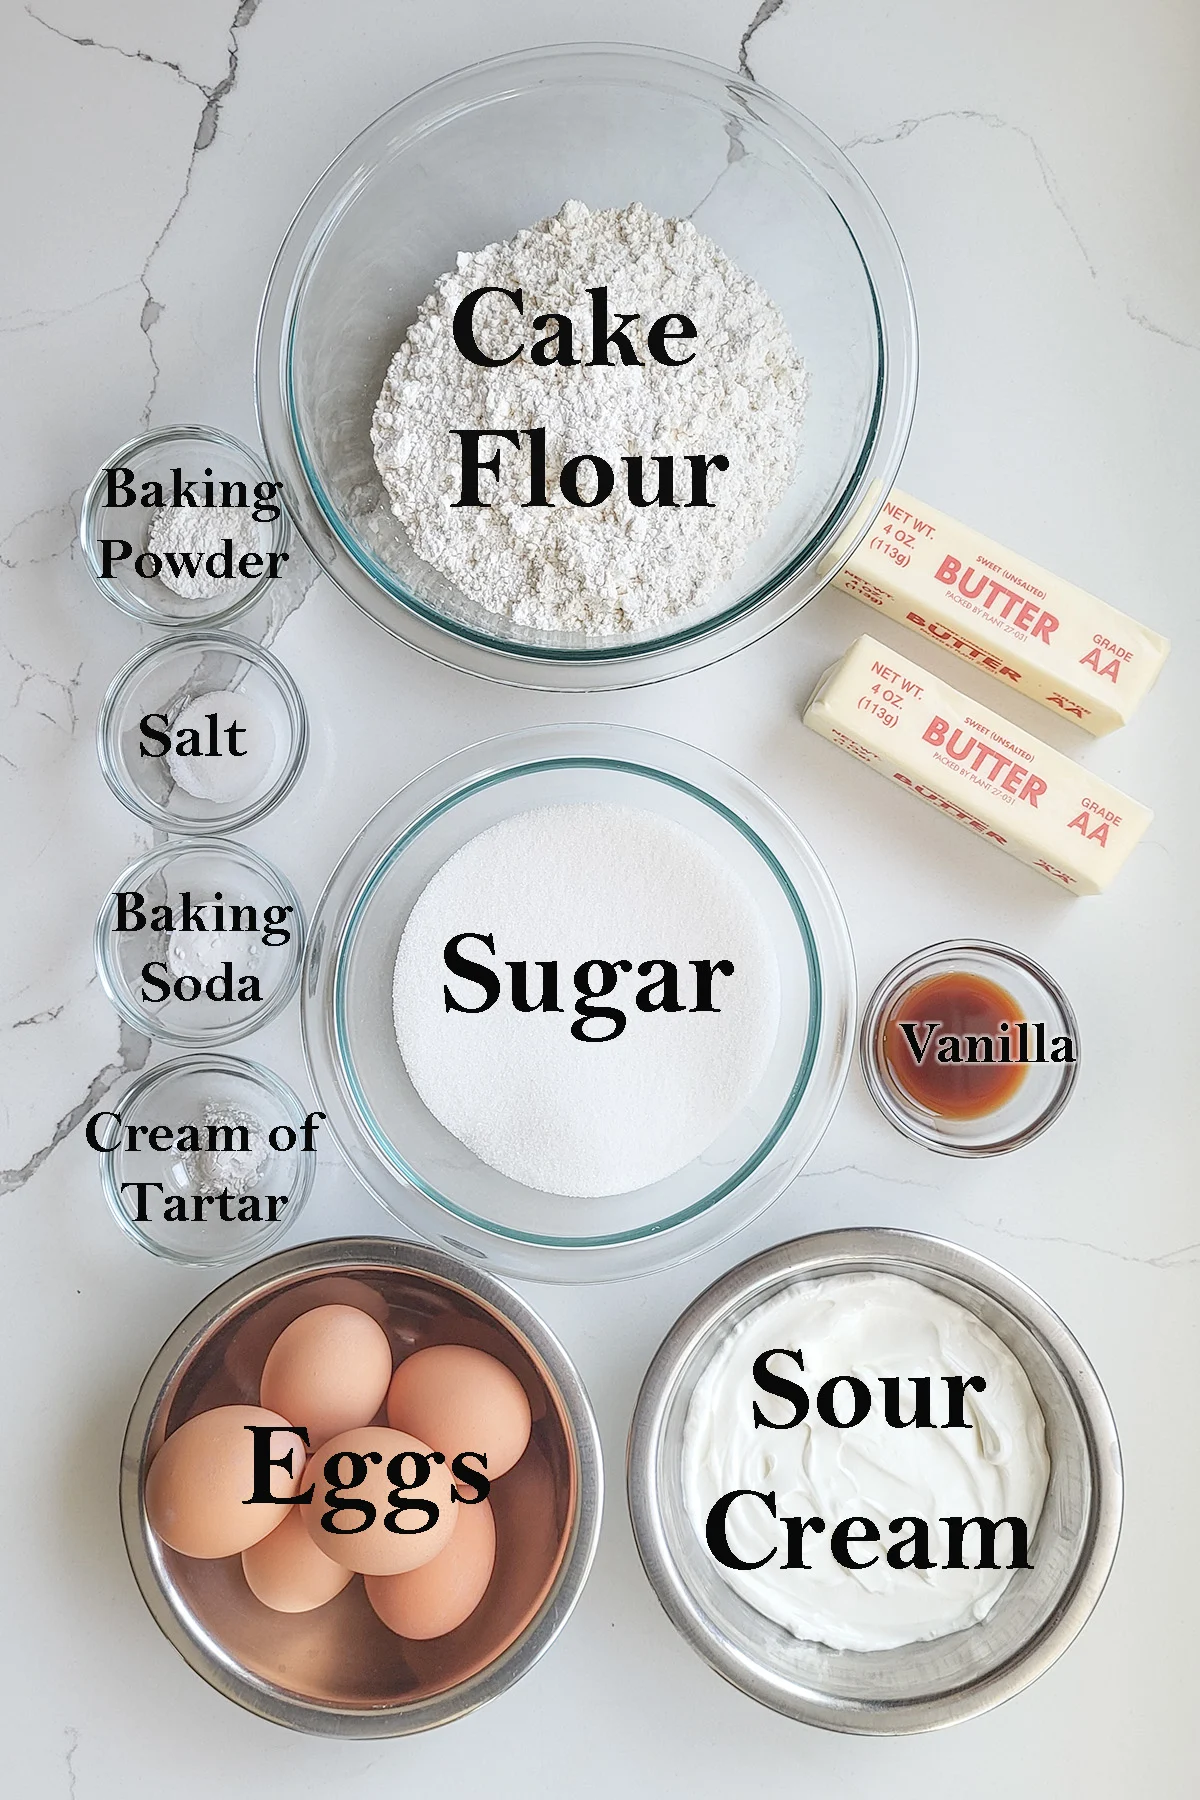
Ingredient Notes
- Cake Flour – Has a lower protein content than all purpose flour so it makes a softer cake. I prefer bleached cake flour. Bleached cake flour is acidic which tenderizes the cake and allows the batter to absorb more liquid for a moister cake.
- Sour Cream – Is used instead of milk as the “liquid” in this batter. Because sour cream is acidic it tenderizes the crumb of the cake and the added fat enriches the batter.
- Eggs – Extra egg yolks in the batter enriches the cake and emulsifies the batter for an even and soft crumb. The whites are whipped and folded into the batter for an extra light and soft cake crumb.
- Cream of Tatar – This acidic ingredient stabilizes the whipped egg whites and acidifies the batter for a softer crumb.
Process Photos
See the recipe card for detailed instructions and measurements.
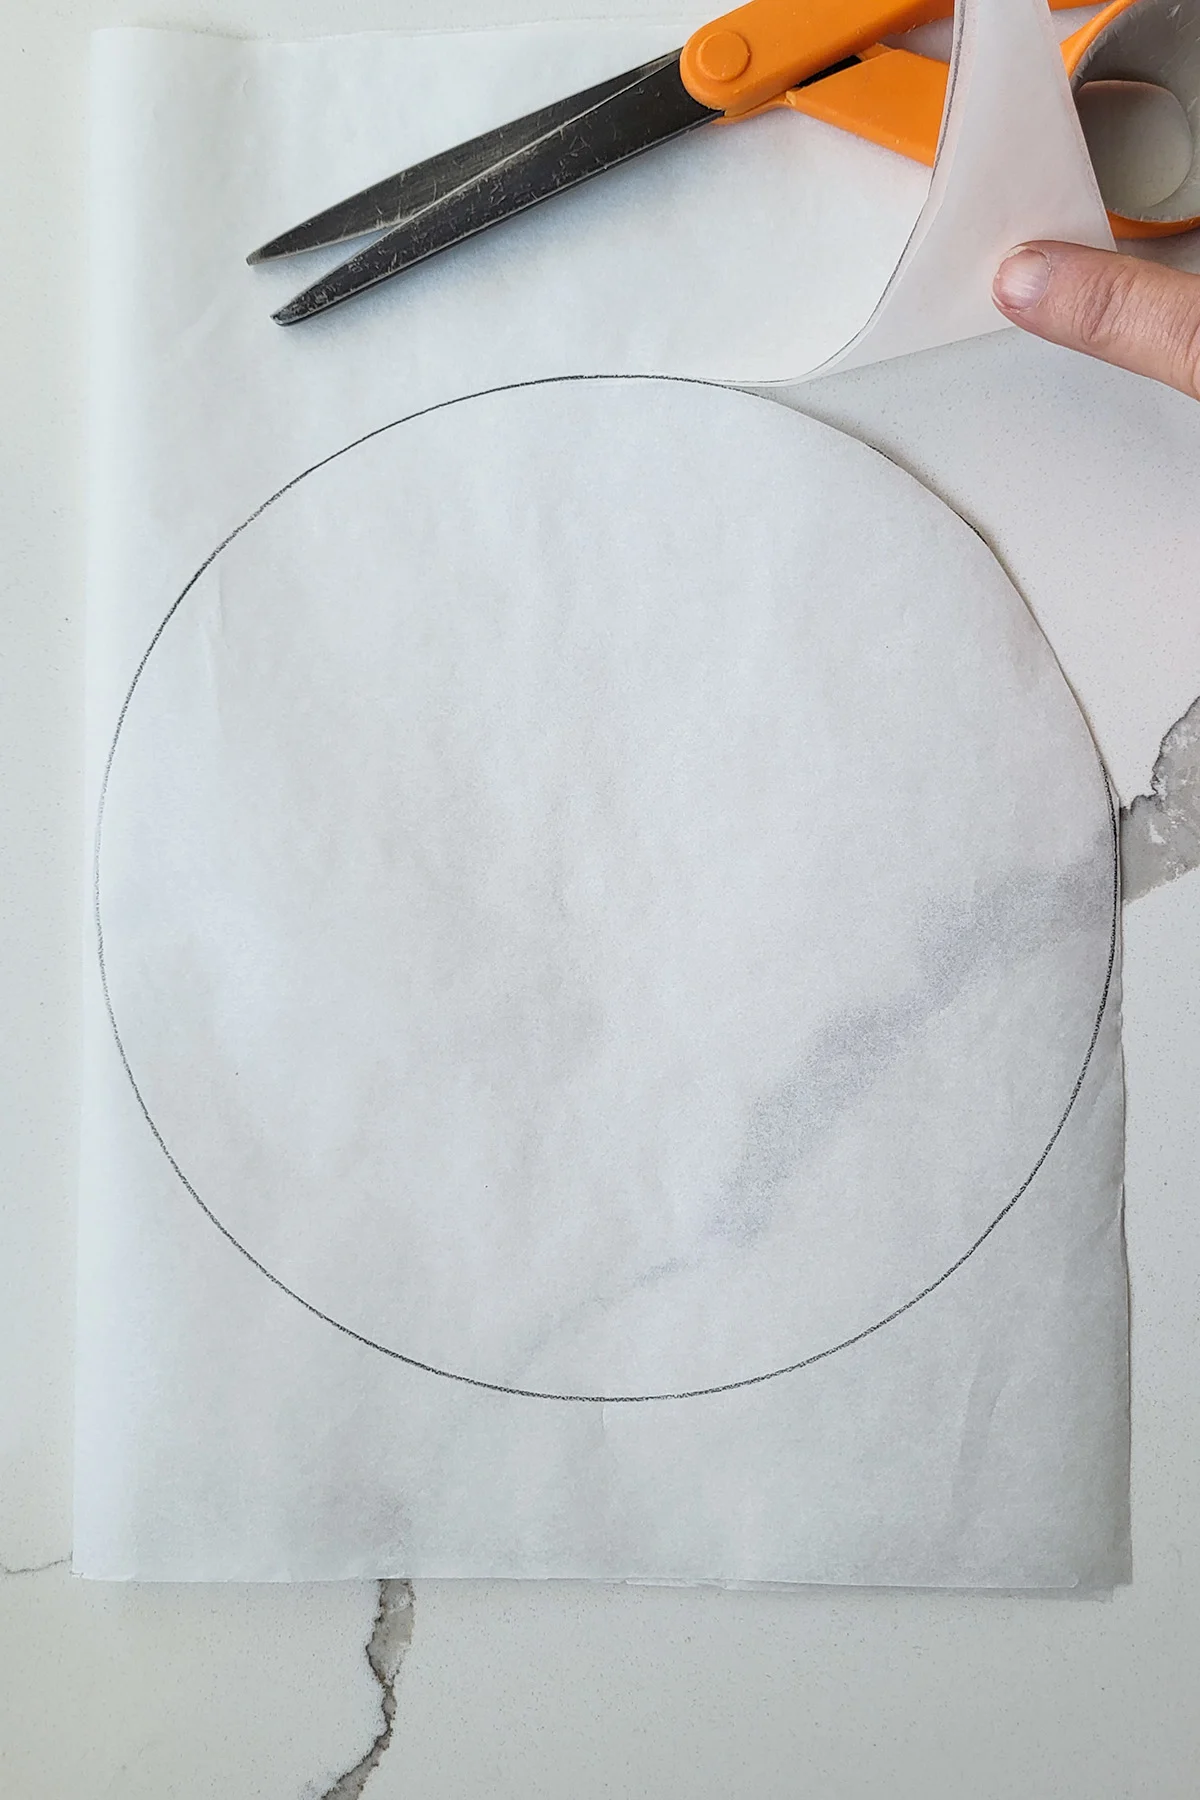
- Draw an 8″ circle on parchment paper using your cake pan as a guide. Cut out two circles and use them to line your cake pans.
- If you don’t have parchment paper butter and flour the bottom of the cake pan only, not the sides.
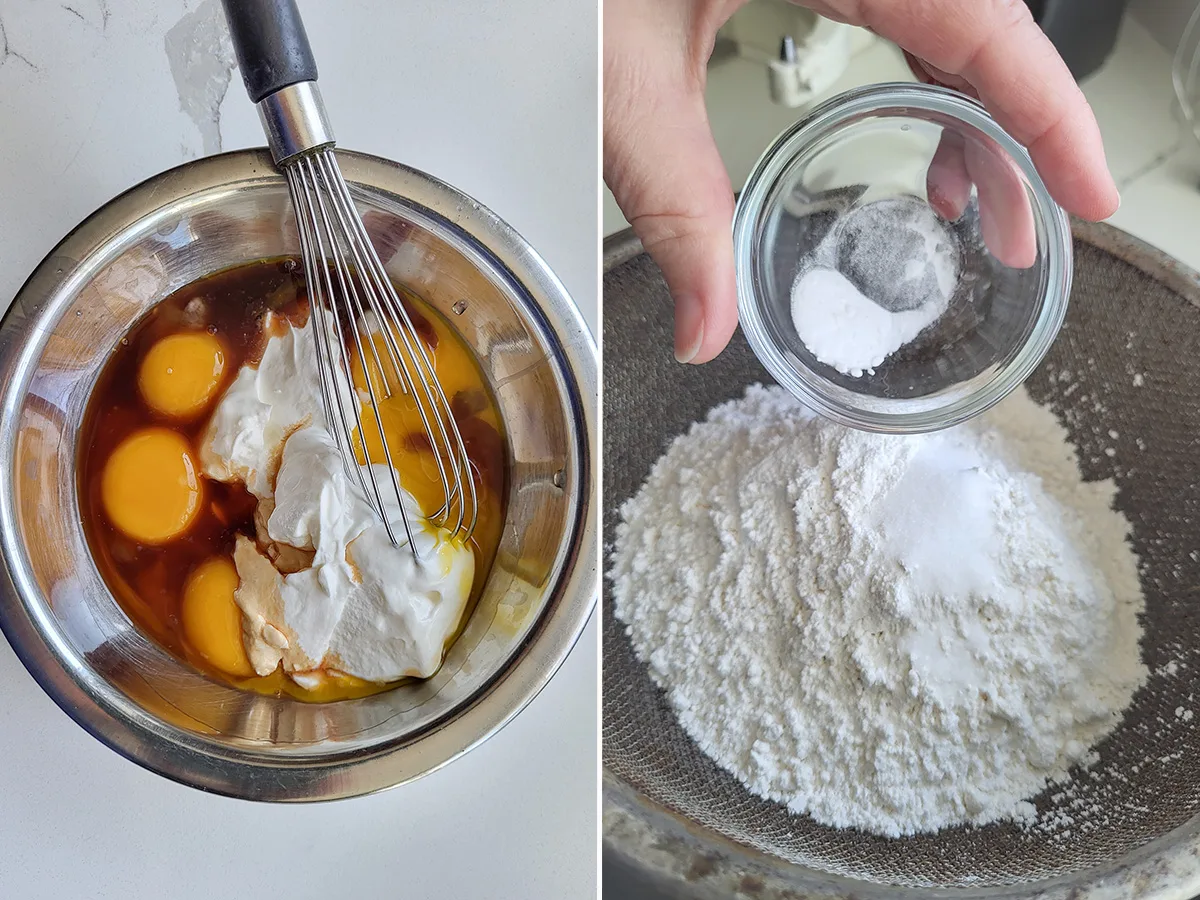
- In a small bowl whisk together the yolks, sour cream and vanilla.
- Sift the dry ingredients into a mixing bowl.
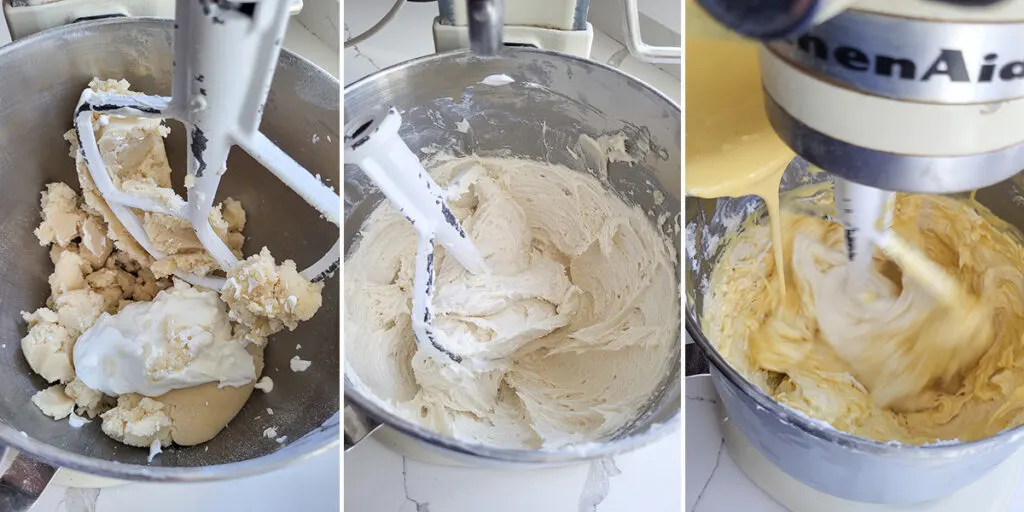
- Mix the dry ingredients on low speed and add the butter. Mix until it forms a thick paste. Add the reserved sour cream.
- Mix the batter on high speed until it is light and aerated. Scrape the bowl and beater.
- With the mixer running on low, add the yolk mixture. Mix until combined.
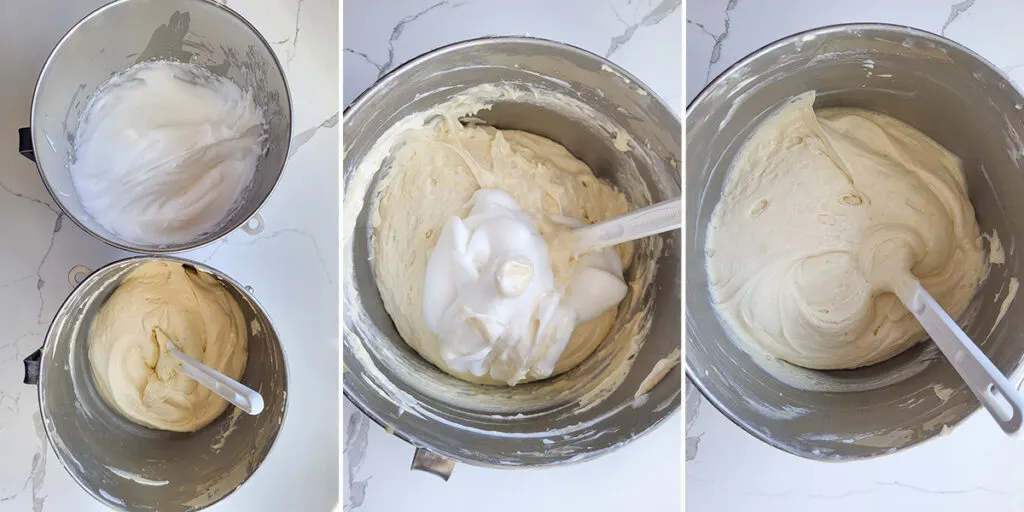
- Whip the whites with the cream of tarter and the remaining sugar. Do no overwhip the whites.
- Fold the whites into the batter in two batches.
- Fold just until there are no streaks of whites.
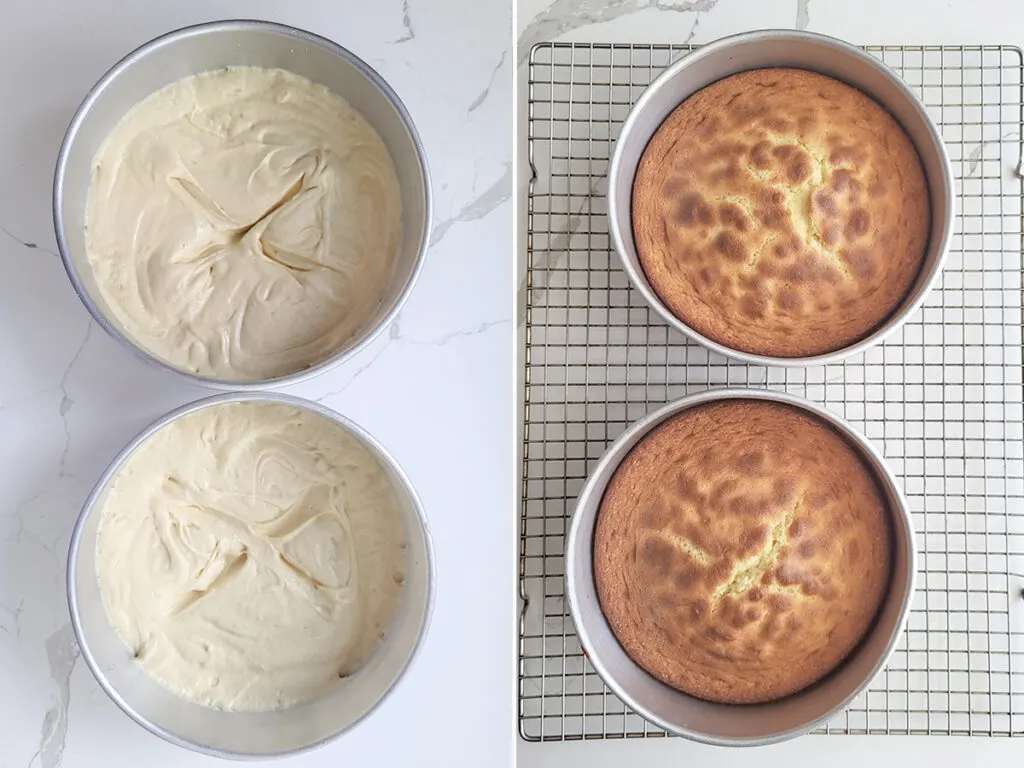
- Evenly divide the batter between the two pans. Smooth to even level then use the tip of your spatula to make an “X” in the center of each cake. This will help the cake rise more evenly in the oven.
- Bake until the center of the cake springs back when lightly pressed. Cool in the pan for 20 minutes then cool completely before icing.
What’s the difference between vanilla cake and yellow cake?
Most people use the terms “vanilla cake” and “yellow cake” interchangeably. Vanilla is the flavoring in the cake. The cake is yellow because of the eggs in the cake.
That being said, not all vanilla cakes are yellow cakes. If you eliminate the egg yolks in the cake and make white cake flavored with vanilla, it too is a vanilla cake.
Reverse Creaming vs. Traditional Creaming
Before posting this recipe I decided to do a quick kitchen experiment to back up my claims that reverse creaming is the way to go for this cake.
I used the same ingredients and mixed them with traditional creaming, reverse creaming and reverse creaming with the eggs separated and the whites whipped and folded in.
There were distinct differences between the three cakes.
- Cake 1 (traditional creaming method) had an open and regular crumb, but was not as tender as I would like and it had a slightly oily mouth-feel.
- Cake 2 (reverse creaming) was very tender, velvety and soft.
- Cake 3 (reverse method with whipped whites) had a slightly irregular but very tender crumb. It was not quite as velvety as cake 2, but it was lighter and quite tender. This was my favorite cake!
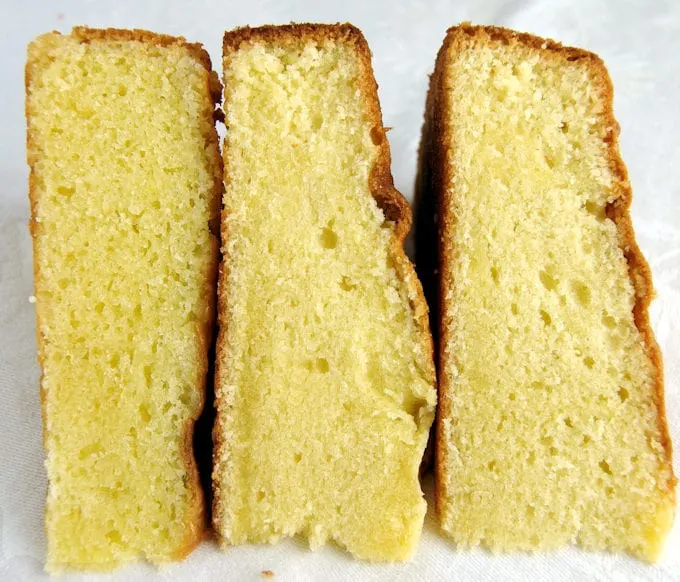
Three cakes with the exact same ingredients, but different mixing methods. Left=Traditional Method, Middle=Reverse Creaming, Right=Reverse with Whipped Whites
This is a really great all purpose yellow cake that is tender yet strong enough for stacking or carving. For more information about cake batter, visit the Baking School page.
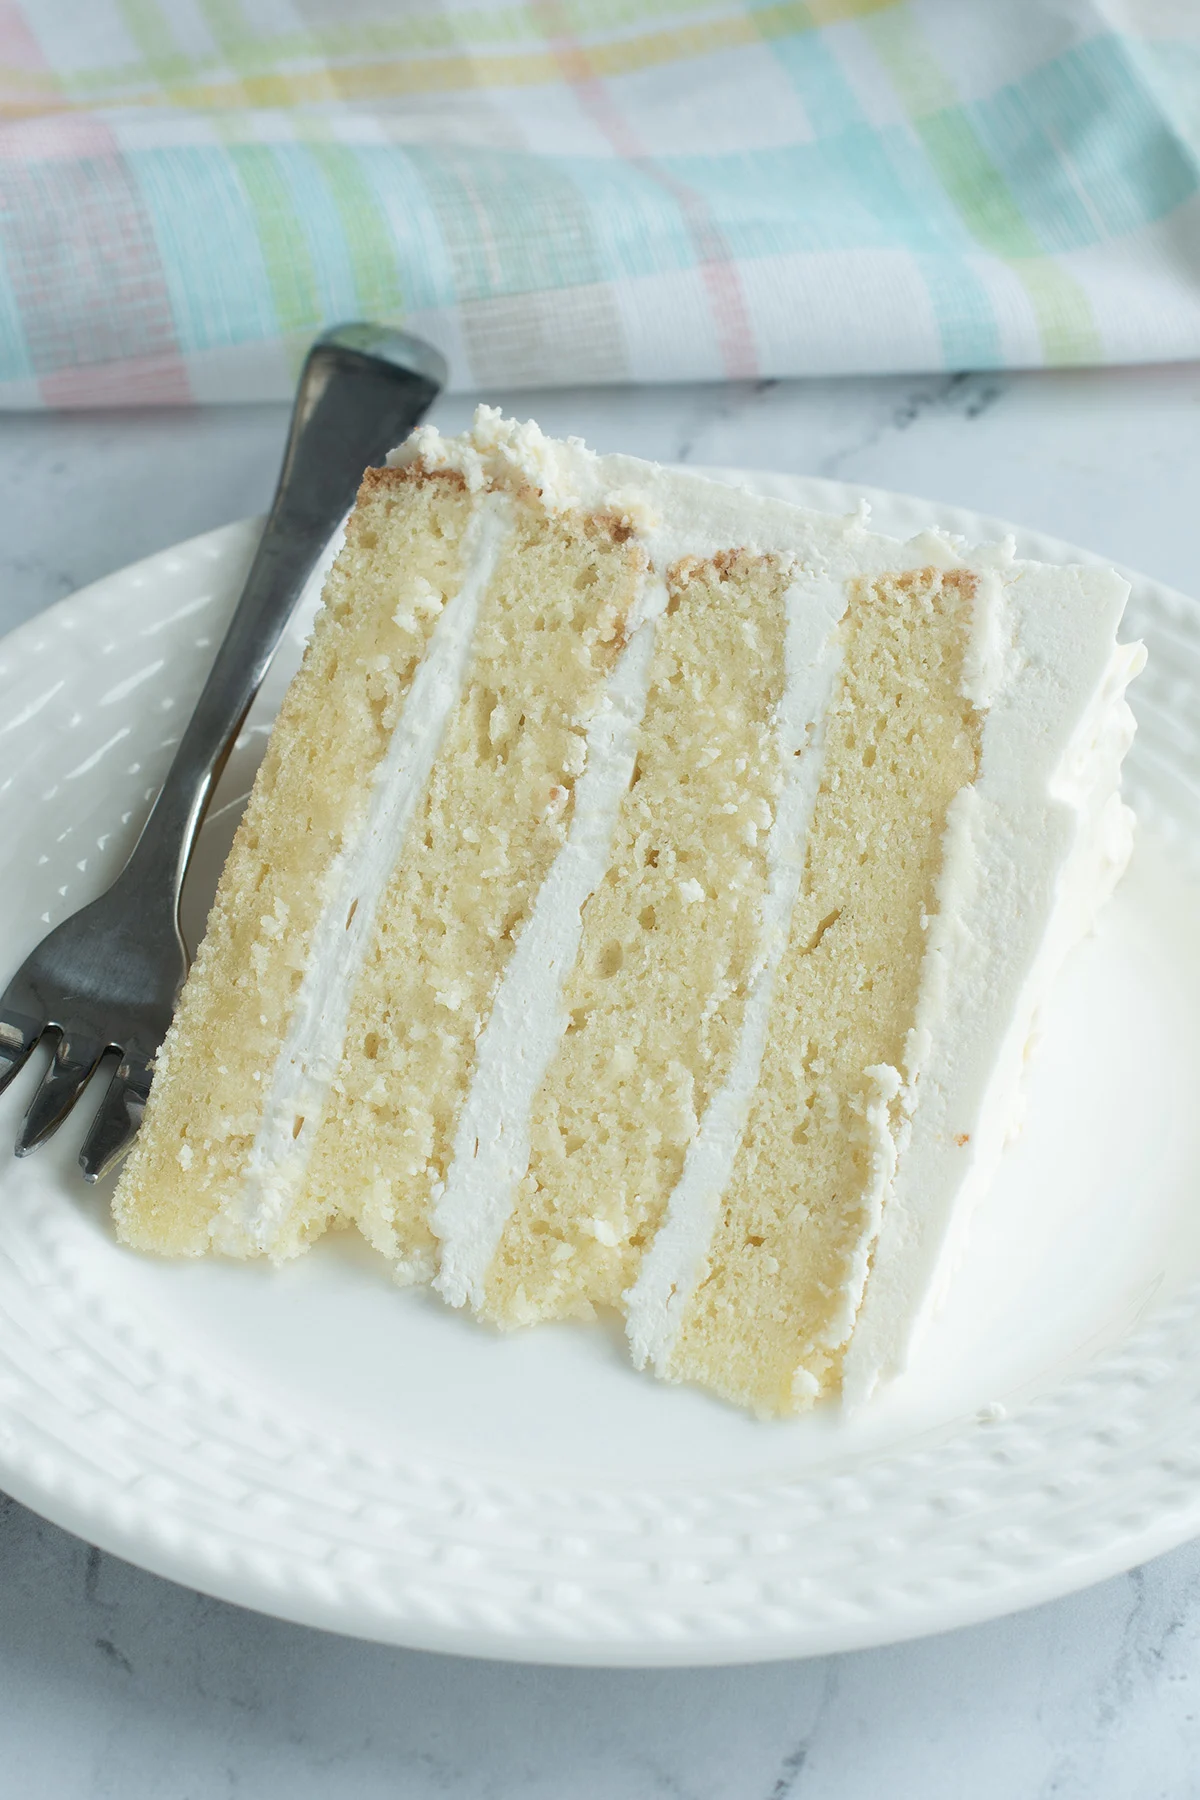
Frosting your Cake
I like this recipe filled and iced with Italian Meringue Buttercream or Swiss Meringue Buttercream.
American Buttercream is slightly sweeter than meringue buttercream and is also nice with this cake.
Storage
The uniced cake can be stored for 2-3 days at room temperature for up to 2 months in the freezer. Do not refrigerate the cake unless it is filled or iced with a perishable frosting.
More Cake Recipes
Now that you’ve made this recipe what should you do with all the extra egg whites? Check out this collection of recipes that use extra whites for some great ideas.
If you love this recipe as much as I do, please consider leaving a 5-star review.

Vanilla Butter Cake Recipe
Video
Ingredients
- 6 large egg yolks (room temperature)
- 8 ounces sour cream (1 cup, room temperature, divided)
- 1 tablespoon vanilla extract
- 12 ounces granulated sugar (1 ½ cups, divided)
- 9 ounces cake flour (2 cups, see note)
- ¾ teaspoon baking powder
- ¾ teaspoon salt
- ¼ teaspoon baking soda
- 8 ounces unsalted butter (room temperature)
- 3 large egg whites (room temperature)
- ¼ teaspoon cream of tarter
Instructions
- Preheat the oven to 350 °F. Line two 8"x3" round cake pans with a circle of parchment paper or butter and flour the bottom of the pans only, not the sides.
- Combine 6 large egg yolks, 1/2 the sour cream and 1 tablespoon vanilla extract in a small bowl, whisk to combine, set aside.
- Into a mixer bowl put 1 ¼ cups of the sugar, sift in 9 ounces cake flour, ¾ teaspoon baking powder, ¼ teaspoon baking soda and ¾ teaspoon salt. Mix on low speed for 10 seconds to distribute the leavening. Add 8 ounces unsalted butter to the flour mixture. Mix on low until the butter is incorporated and the batter looks like a paste. Add the other ½ of the sour cream to the flour and butter mixture. Increase the speed to medium and mix about 3 minutes until the batter lightens in texture. If you're using a hand mixer add another minute or two to the total time.
- Scrape the sides and bottom of the bowl. With the mixer on low, add ½ the egg yolk mixture. Mix until mostly incorporated. Scrape the sides and bottom of the bowl. Add the rest of the egg yolk mixture. Scrape the bowl and mix until incorporated.
- In another bowl, whip 3 large egg whites with ¼ teaspoon cream of tarter on medium high until they form soft peaks. Turn the mixer to medium low and slowly add the remaining ¼ cup of sugar. Turn the mixer to medium high and whip the whites to full peak. Fold the whites into the base in 2 parts, folding just until there are no streaks of egg whites.
- Divide the batter between the 2 pans and spread so it’s level.
- Bake until the center of the cake springs back when lightly pressed or a toothpick inserted into the middle of the cake comes out clean, about 25-30 minutes.
- Cool 10 minutes in the pan and then turn out onto a cooling rack. When fully cooled, wrap in plastic and refrigerate at least 3 hours or overnight before filling and assembling the cake with your favorite frosting.
Would you like to save this recipe?


As an Amazon Associate and member of other affiliate programs, I earn from qualifying purchases.
Hi, I’m looking to bake a cake and put guava & cream cheese as my filling, frost it in Italian buttercream. I was wondering if this yellow cake would pair good with the filling I want to use if not which cake would be good for this filling?
Yes, this cake would be great with that filling. I used this cake as the base for a coconut/guava cake that was on the menu for my wedding cake business. I would suggest using a buttercream dam with those softer fillings.
Hi,
So, the pan is about 1/3 to 1/2 full as it’s a 3 inch deep tin. As I rarely bake anything larger than 9″ I’m afraid I’m stuck with the non-stick one I own, though I do understand that will affect rise. Everything was room temp, though I admit I didn’t use a thermometer to test the temp. I was very careful about scraping the bowl down thoroughly. After creaming the flour/butter, after 1-1.5 min after sour cream addition and before egg mixture, and 3 times during the egg mixture addition process. I definitely had consistent batter texture when it was placed in the pan – thick but still pourable with assistance. I was very careful not to overbeat the batter after adding the eggs or when i added the egg whites (yes, stiff peak) as I’m having to use modified all-purpose so I didn’t want to enhance the gluten more than what I’m dealing with! I do have an oven thermometer, it read 350F when I put it in and the couple of times I checked – and I didn’t open the oven until 35 minute mark (as I noted the first time that at 25 it still really hadn’t finished setting and was quite jiggly). Cakes were fully cooled on a wire rack then wrapped and refrigerated for 1-3 hours before I torted them. I’m baffled. I mean, I don’t run a business, but I’ve been baking for 20 years and I make novelty cakes regularly. My 12″ (chocolate) baked beautifully, but the vanilla cakes I’ve made have all been disasters. The only thing I can think of left is to use the convection oven which I avoided as that was terrible with the regular creaming method, but I’m guessing from your comments that you don’t normally bake the 10″ longer than the 8 inch…. Thanks again for being so helpful and so quick
Honestly, I’m a bit baffled myself. It’s so hard when you’re not right there with someone to see what’s happening. I just had a friend email me this weekend to say she made this recipe with great success. Did you watch the video to see what the batter looks like? I’ve baked this recipe with both convection and non-convection. Personally, I do tend to prefer the convection. As far as how long to bake, I definitely recommend that you rely more on how the cake looks than the number of minutes. If you have a 3/4 full 8″ pan it might take the same or longer than a 1/2 full 10″ pan. There are so many variables that the visual cues are your best gauge. The chocolate cake that you have success with, is that my chocolate butter cake or another recipe? When you say you have trouble with vanilla cakes, is it just this recipe or vanilla cakes in general?
I must confess it is not your chocolate cake. It’s one I’ve used for several years and is a traditional creaming method using some cocoa + water to replace the flour. For smaller chocolate cakes I use a milk (+vingar)+ melted chocolate in coffee one. I had read your blog previously – the articles breaking down the ingredients’ import (excellent posts, BTW!) -, so when I had problems with a vanilla recipe using a traditional creaming method (same problem, centre of the cake undercooks whilst the outside virtually burns) I thought I’d try yours. Also, I didn’t like the slightly greasy mouth-feel of the traditional method. I love the texture and flavour of yours where it’s cooked through. The only 10″ I’ve made in the past is Victoria sponge. Had no problems with that, same tin, same oven, baked up lovely. But the bride has asked for a lemon cake, so I was opting to go with a lemon flavoured vanilla recipe and lemon curd rather than a sponge. But yes, it appears that vanilla cakes flummox me. Carrot cake, chocolate cake, banana cake, oatmeal spice cake – all no problem. I don’t really want to keep extending the baking time given the cake retracts so much already…
Where are you from, Jennifer? Perhaps your sour cream or some other ingredient isn’t the same as what I’m working with here. Are you in the UK?
American expat living in U.K I’m not aware of the sour cream here being different, though buttermilk definitely is as it’s much thicker with far less liquid. Butter is 80% milk fat I believe, and I’ve not had problems with that previously. The only real difference I know is the AP + cornstarch (cornflour) rather than cake flour. I was reading on another science-y baking blog last night that if the wets aren’t room temp you can end up with collapsed, gooey cake, so perhaps I need to pull out my thermometer and confirm they’re 70F. . They feel it, and they weren’t causing problems with the chocolate cakes, but maybe my sour cream hasn’t warmed up as much as I think it has. They did suggest the whole cake would be affected, and not just the centre, though.
Hi, As noted by one of the other commenter’s we don’t have cake flour in the U.K. I assume this would affect the texture of the cake, but would all-purpose flour be ok? Other flour options here include self-rising and ‘pastry’ flour (though I’ve not used the latter and so am unfamiliar with it’s properties). Cheers!
To replace cake flour you can use a mix of all purpose flour and cornstarch. The texture won’t be exactly the same, but it will be good. For each cup of cake flour use use 3/4 cup of all purpose flour plus 2 tablespoons of cornstarch. So to replace the 2 cups of cake flour in this recipe use 1.5 cups of all purpose flour and a 1/4 cup of cornstarch. If you work by weight that would be 170g of all purpose flour and 30g of corn starch. You can read more about the different types of flour in this post and more about flour in cake batter in this post.
Hi,
You are so good at responding quickly, but given the 5 hour time difference I needed to start before you replied. Having read your other posts I did essentially what you’ve advised. I measured out 4 Tbsp of cornstarch then made up the rest with all purpose. So far they look great. Just took the last one out of the oven, but they look much better than what I had been getting with traditional creaming recipes. Will see when they’ve cooled and I’ve torted them how well I did… Thank you, though, for clarifying, as it makes me feel better about what I’ve already done!
Great! So happy you got the information you needed here. Have a wonderful weekend.
Hi Eileen,
Sorry, this is really long! So, I ultimately ended up making 3 cakes, as the first one was raw in the middle. I am baking (or trying to) a 10″ layer cake. Following your advice to one of your other readers I simply ‘doubled’ the recipe (I didn’t as I only have 1 10inch pan, so I made the same volume as given and baked them one after the other). However, every time they are coming out either raw in the centre or what I feel is under-cooked. About 2inches around the perimeter the cake is lovely, light, moist, just gorgeous. Then there’s about what amounts to a 6″diameter round centre that is dense, collapsed, and tastes (I tried it on the scrapped cake) undercooked. I baked them for 40 minutes, 350, no convection, and both the bounce and toothpick tests came back good. The top of one actually started to burn. They also didn’t particularly rise well (once cooled they come in about 1.5″ high), though that may be as I’m using a Wilton 10″ non-stick pan. How long should I be baking these for? I took the one out because it was starting to burn on top. Both retracted from the sides quite extensively, as well, though they both settled to completely level on top. I do have a fan-assisted oven, but I avoided it as the last 2 attempts to bake vanilla cakes in it resulted in very thick and dense crusting on the sides, bottom and top so there was huge amounts of cake loss. I also tried a flower nail on the last cake, but it doesn’t seem to have made any difference. Any advise would be helpful and very welcome as this is for a friend’s wedding… which I’m starting to regret having agreed to!
Ok, so lets see if we can work our way through this. I have baked this recipe from cupcakes to 14″ across without any issues. As long as the pan is about 1/2 to 2/3 full of batter the size of the pan should not be an issue. But, the non stick pan is not my favorite for baking cakes. I like the cakes to stick to the sides a bit to help the rise. As far as being baked in the center and then an underbaked ring around the center, I can’t really guess. When you say “raw in the center or what I feel is under-cooked” are you waiting until the cake is completely cooled to cut it open? A warm cake will squish and become dense if cut before the starches have a chance to gel. When you mix the butter and sour cream into the flour and then let it beat for 2-3 minutes to aerate you’ve got to carefully scrape the bowl and beater before and during adding the eggs. If you notice in the recipe I repeat 3x that the bowl and beater should be scraped. If you don’t do this step you could wind up with pockets of dense batter. When I had my cake business my oven was a convection oven so I’ve baked this recipe 1000s of times with the convection fan on with no problem. I do recommend reducing the heat by 25 degrees when using convection. Do you have an oven thermometer to check if your oven temp is accurate? The flower nail generally works very well for getting the cake to bake evenly from the middle (less humping). Other issues to consider, remember that room temperature for the butter, eggs and sour cream is about 70 degrees. Too warm or too cold can change the batter. Are you whipping the egg whites to full peak and folding just until it’s combined. Streaks of unfolded whites or over-folding can affect the texture of the cake.
Eileen
I just made your Vanilla Butter Cake and I have some questions.. My batter came out very thick. It was pudding -like, would not pour nor level on its own. Is this how it normal or is more liquid needed? I used a food scale to measure the flour( Bob’s Red Mill super fine) and the sugar. I did use bakers sugar 1:1 instead of granulated. I baked in 8″ rounds which were filled to about half. When removed from the oven they had risen to just above the top of the pan. Upon cooling however they shrunk dramatically in all directions. They are now 7.25″ in diameter x 1.25″ tall. I did use baking strips. Any suggestions or comments would be greatly appreciated!
Hi Craig. This is a thicker batter. It’s not “runny” at all so it does need to be spread in the pan. Did you watch the video? You can see the texture of the batter and the baked cakes in the video. I don’t know what Bob’s Red Mill super fine is. Is that super fine flour or super fine sugar? By baker’s sugar do you mean powdered or confectioner’s sugar? I’ve never made this recipe with powdered sugar so I’m not sure how that would change the batter. The cake can shrink back a bit when cooling, but it sounds like yours shrank more than usual. Was the cake baked through when you cut into it?
HI Eileen,
Wow thanks for the super quick response, Its so wonderful that people like you take time to share their expertise.
Bob’s Red Mill is a super fine cake flour and the superfine sugar is C&H Sugar’s baking sugar. It is not a powdered sugar, just the granules are smaller than regular granulated sugar. I missed the video but will watch it now. I have not cut into the cake yet as I was going to use it to make your Lemon mousse cake and was waiting to make sure it was cool enough to split in half Thanks again
Oh, I see. Let me know how the cake is when you cut it. This recipe can shrink back as it cools but it’s usually fine when you cut into it.
Also, I looked up the Bob’s Red Mill flour. It is an unbleached flour. I always used bleached cake flour. Using unbleached flour will change the batter since bleached flour is more of an emulsifier than unbleached flour. You can read more about that in this post and this post.
Eileen,
I cut into the cakes and found that one was fine, the taste was wonderful, texture was fine even though ti had shrunk quite a bit. The other cake baked baked at the same time, same batter, oven etc. except in a different brand of cake pan was under done as you had suspected. This cake shrunk had more than the other.
I think one of the reasons for the shrinkage was due to the fact that I used cake strips. Even though I did not grease and flour the sides of the pans, I think the cooling effect of the strips didn’t allow the batter to properly “climb” up the sides of the pans.
Another reason is using the unbleached cake flour and its ability to emulsify the fats more than a chlorinated bleached flour (as you mentioned). Thanks for the posts you referenced explaining the various type of flours and their effects upon the final product
I will try the recipe again using half unbleached and half bleached cake flours, I will add one more egg white to the whipped egg whites. Also i will omit the baking strips. I will update you when the results are in.
Thanks for your support and to the search of why things happen. You must have been a Chemistry major in college
I was actually an English major, ha, ha. But my dad was a chemist and I used to love talking baking science with him. Let me know how your kitchen experiments turn out. Have fun!
Eileen, I do have your book and this recipe is a little different in the book than here. In the book I see it calls for only 255 g flour, not 285 g. which recipe is correct?
Hi Jim, First of all, thanks for buying the book. Writing a book with editors really made me be even more accurate than ever when converting volume-oz-grams. 9 oz (252g) is the correct amount. I’ve changed the recipe in the blog post to the correct numbers. Thanks for the catch!