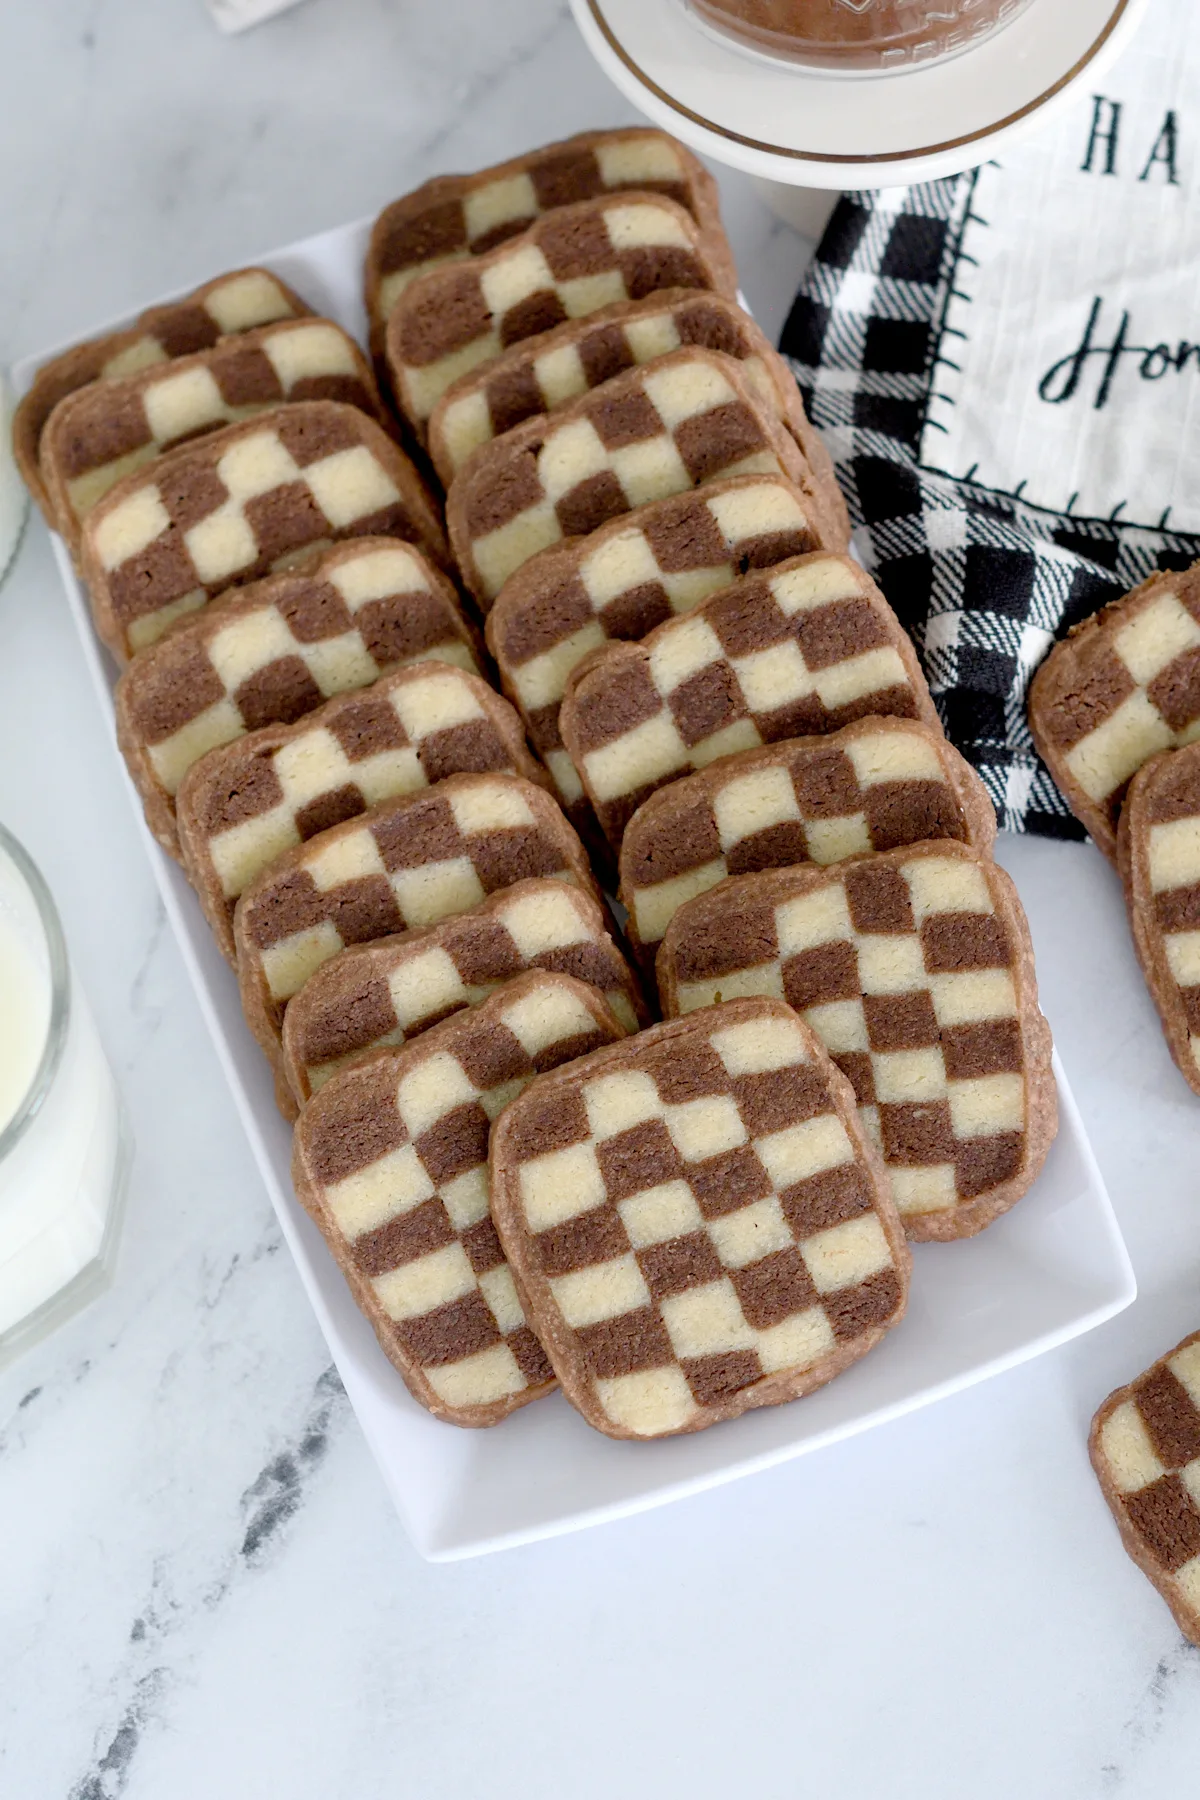
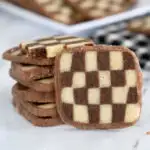
Checkerboard Cookies


Chocolate and vanilla Checkerboard Cookies are not extremely difficult to make, but it does take several steps to create the pattern. These cookies are not only adorable, they’re buttery and delicious.
There are relatively few ingredients in this dough. These checkerboard cookies are basically a type of shortbread cookie. We rely on good butter, sugar, vanilla and a hint of cocoa for a perfectly tasty treat.
The pattern is what makes these cookies extra special and if you simply follow the step by step instructions you’ll see how easy they are to make.
How to make Checkerboard Cookies:
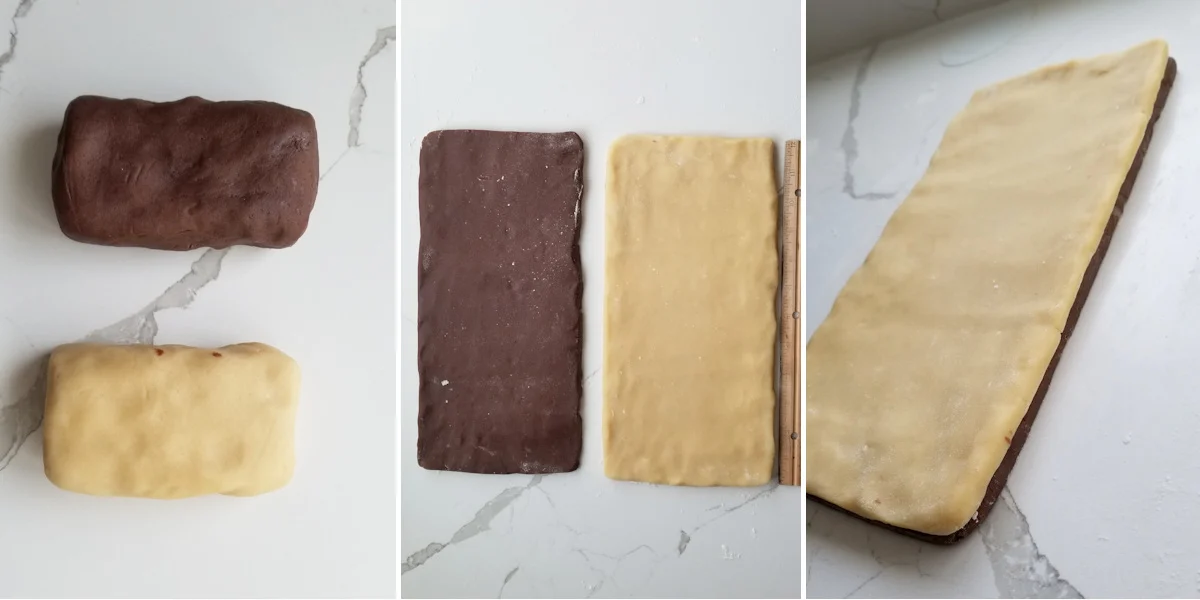
Step 1: Form each piece of dough to a rectangle and chill until firm.
Step 2: Roll each dough to a 6″ x 12″ rectangle.
Step 3: Place the vanilla dough on top of the chocolate dough.
Step 4: Trim the edges and save the scraps.
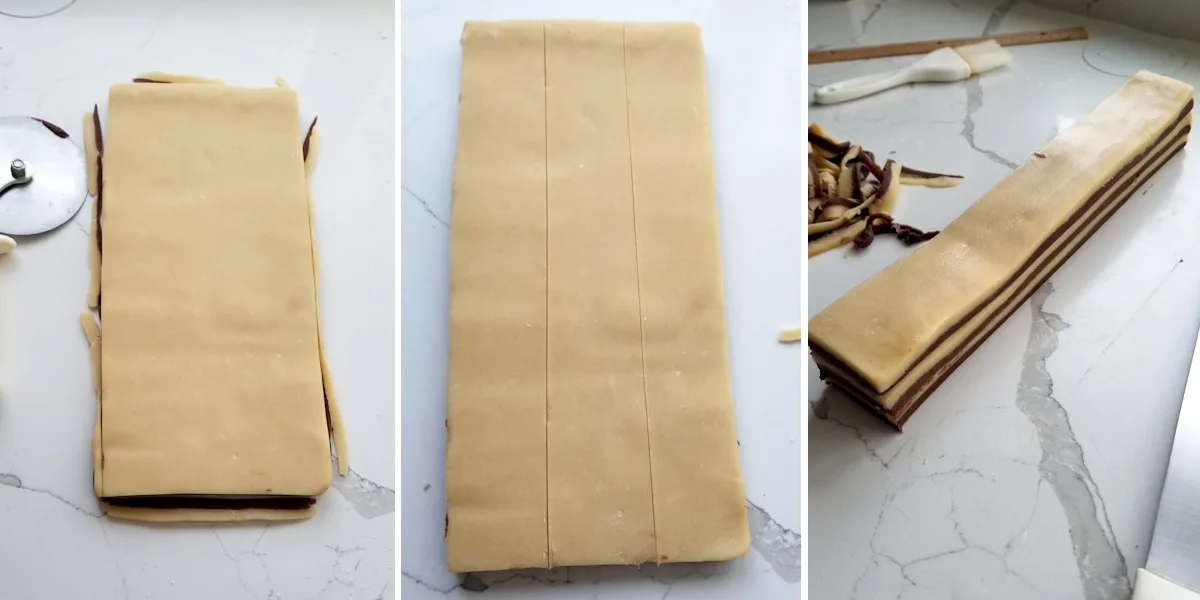
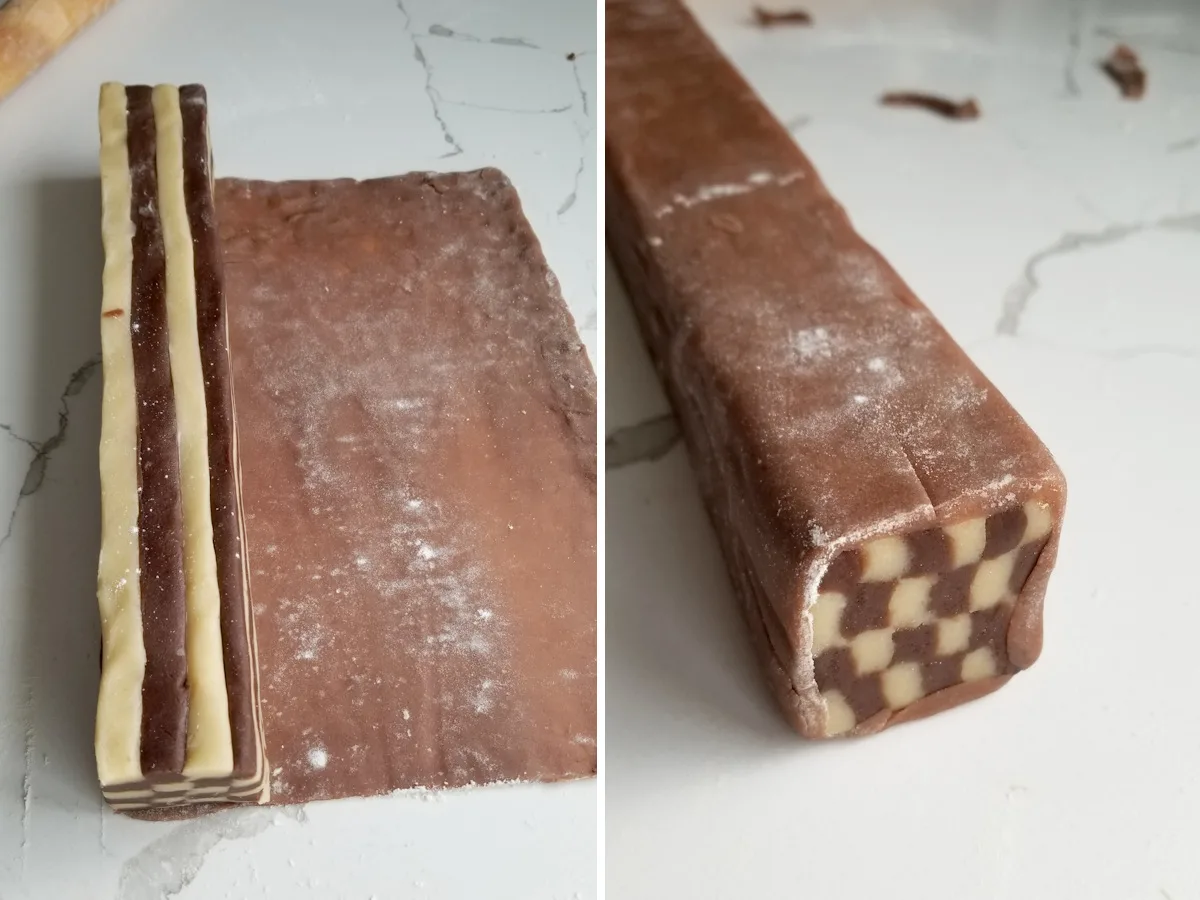
Step 5: Cut the dough into three 2″ x 12″ lengths.
Step 6: Stack the three slices on top of each other. Trim the edges and save the scraps.
Step 7: Cut the dough into four 1/2″ x 12″ slices and flip the first slice with vanilla dough to the left.
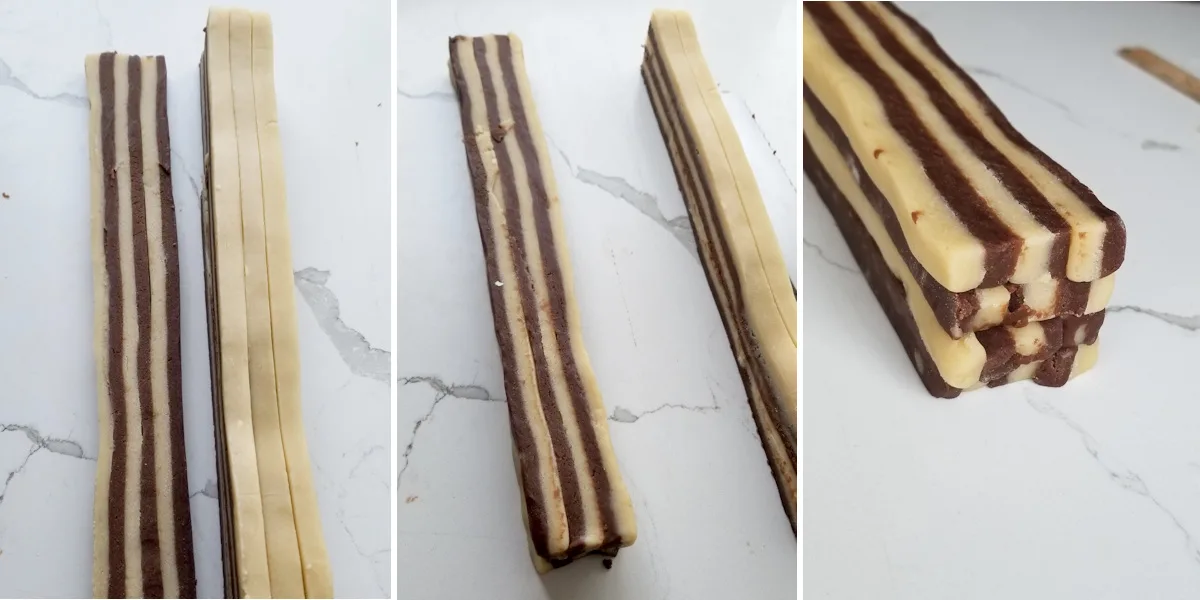
Step 8: Flip the second slice and stack with the chocolate dough to the left.
Step 9: Repeat the pattern with the last two pieces to form a square log with alternating vanilla and chocolate stripes.
Step 10: Knead the scraps together and roll to a 12″ x 8″ rectangle.
Step 11: Wrap the chocolate dough around the log. Wrap in plastic and chill until firm.
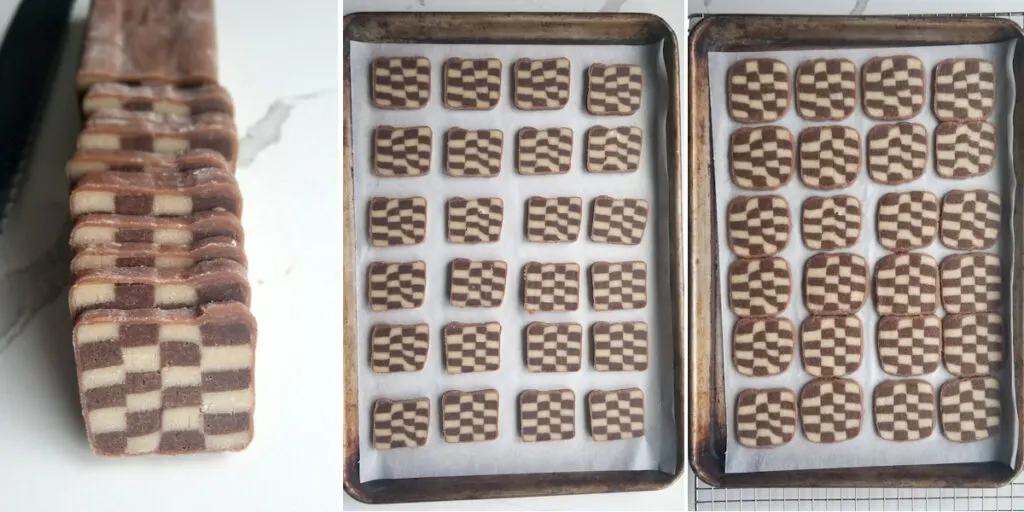
Step 12: 1. Slice the cookies to 3/8″ thick.
Step 13: Arrange on a parchment lined baking sheet.
Step 14: Bake until lightly browned and the dough is set.
Pastry Chef hints for making Checkerboard Cookies:
- Don’t over aerate the butter and sugar. You don’t want the cookies to rise too much when baking.
- Chill the dough before rolling and forming the pattern. If the dough becomes warm chill until it firms up again. Firmer dough will help prevent distortion of the checkerboard pattern.
- Brush the layers lightly with water when stacking the cookies. This will help glue the two different doughs together.
- Chill the dough before slicing so the cookies hold their shape.
- To work ahead, the dough log can be wrapped and frozen.
- The baked cookies will keep in a covered container for several days at room temperature.
- Instead of using cocoa to make chocolate dough you can dye half the dough red or green for the holidays.
- You can use the same dough to make a simple swirl cookie. Roll the chocolate and vanilla dough each to a 12”x12”x ¼” square. Lay the vanilla dough onto the chocolate dough. Divide the stacked square into three 4” wide rectangles. Roll each rectangle from the long side like a jellyroll. Chill, then slice and bake.

Hey Cookies Monster! Here are a few more classic cookies for you to try: Rainbow Cookies, Black & White Cookies, Diamant Sablé, Coconut Thin Cookies, Lemon Thins, Linzer Cookies, and Classic Shortbread Cookies.
If you love this recipe as much as I do, I’d really appreciate a star rating and a quick comment. Ratings and comments help my recipes show in search results. Thanks!
Checkerboard Cookie Recipe
Ingredients
- 12 oz unsalted butter (1 1/2 cups, room temperature)
- 8 oz granulated sugar (1 cup)
- 1/2 teaspoon salt
- 2 teaspoon vanilla extract
- 12 1/2 oz all purpose flour (2 1/2 cups, see note)
- 2 tablespoons dutch process cocoa powder
Instructions
- Cream the butter with the sugar until creamy and well combined, but not fluffy. Add the salt, vanilla and the flour. Mix just until combined. Turn the dough out onto a lightly floured surface and finish kneading until the dough comes together.12 oz unsalted butter, 8 oz granulated sugar, 1/2 teaspoon salt, 2 teaspoon vanilla extract, 12 1/2 oz all purpose flour
- Split the dough in half and knead the cocoa powder into one half to make the chocolate dough. Pat each piece of dough into a rectangle shape. Wrap both pieces of dough and refrigerate at least 30 minutes until firm.2 tablespoons dutch process cocoa powder
- Roll each piece of dough to 6” wide x 12” long rectangle. Lightly brush the chocolate dough with water. Place the vanilla dough on top of the chocolate dough and line up the edges. Trim each of the longs sides of the dough, saving the scraps. Cut the rectangle into three equal 2” x 12" slices, lengthwise. Stack the 3 rectangles on top of each other, lightly brushing the dough with water to stick the layers together. You should now have a 2” wide by 12” long rectangle with 6 alternating layers of chocolate and vanilla. Once again, trim the two long sides so they are straight, saving the scraps.
- Slice the dough, lengthwise, into four ½”-wide slices. Lay one slice on its side with a vanilla stripe on the left side. Brush it lightly with water. Lay the next slice on top of the first, flipping the slice so a chocolate stripe is on the left side, lined up with the vanilla strip on the first slice. Line the next slice, vanilla strip to the left and lay the final strip on so that the chocolate stripe is to the left.
- Knead the dough scraps that you reserved and roll into an 8” x 12” rectangle. Lightly brush the dough with water and place the log along one edge of the rectangle. Roll the log so that it is now wrapped in the dough. Wrap the log in plastic wrap and chill until firm. At this point you can freeze the log for up to a month.
- Preheat the oven to 325°F. Line two baking sheets with parchment paper or a silicone baking mat.
- Trim the uneven ends off the log. Use a sharp knife to cut 3/8” thick slices. Lay the cookies on the prepared baking sheet, ½” apart. Bake until the edges are beginning to brown and the dough is set, about 14 minutes.
- Transfer to a baking rack to cool completely. The cookies will keep in an air-tight container for up to a week.
Would you like to save this recipe?


As an Amazon Associate and member of other affiliate programs, I earn from qualifying purchases.
