Canelés de Bordeaux (aka Cannelés)


Canelés (aka cannelés) are crispy, crunchy, custardy and oh so French. J’adore this canelé recipe and I hope you will too. Don’t worry, I’ve made all the mistakes, so you don’t have to.
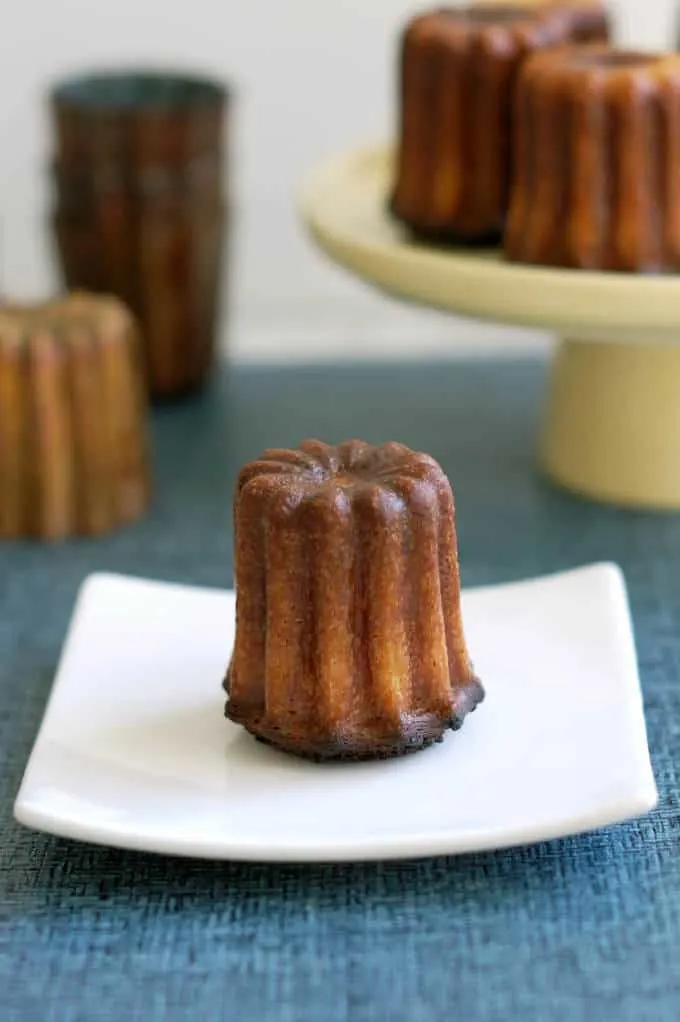
Table of contents
Introduction to Caneles
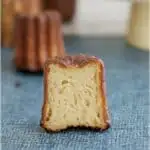
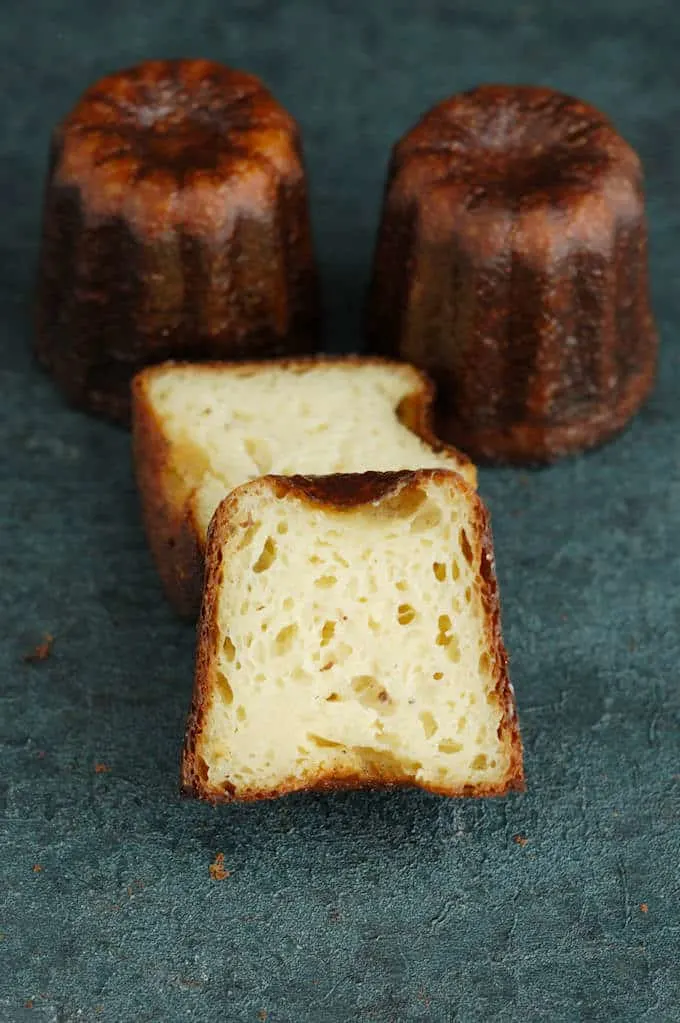
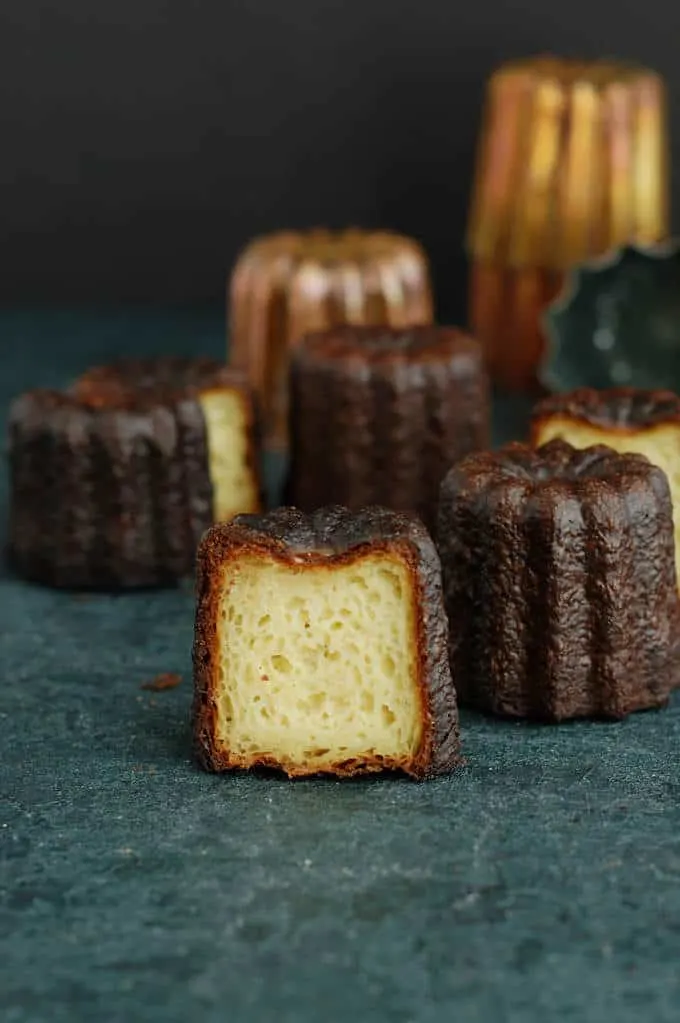
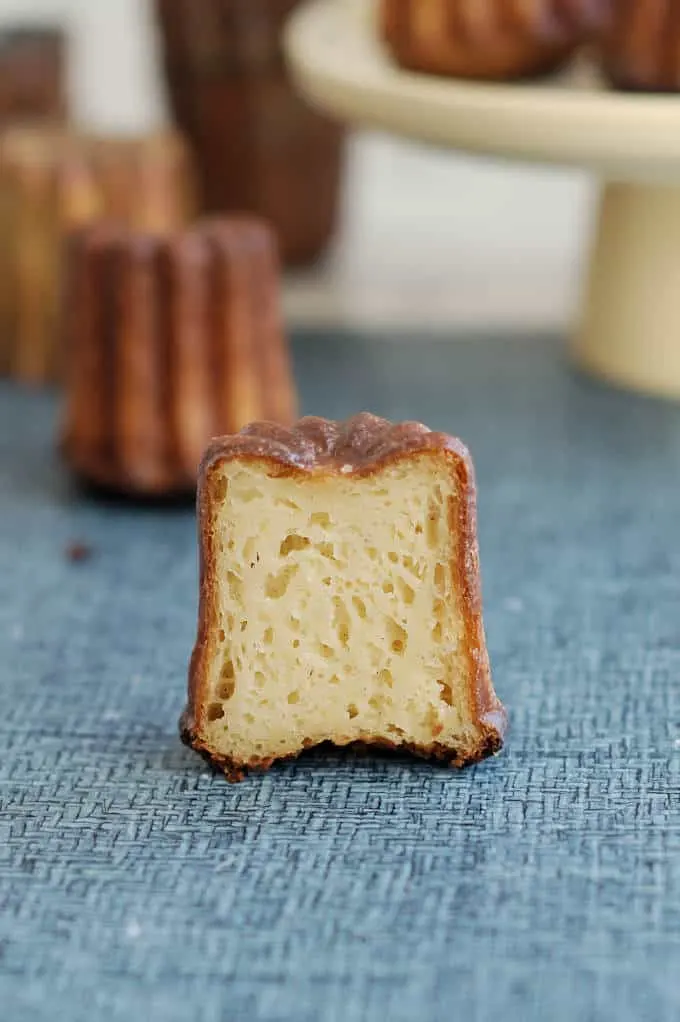
If you’ve never had a canelé imagine them as the sweet and sophisticated French cousin of the popover. Made with a thin crepe-like batter and baked in a special pan, a good canele has a deep-brown crust and a soft, custardy interior.
I can pretty much guarantee that you are not going to find canelés in your local grocery store, and probably not even in a local French bakery. So if you want a canelé (or 4) you’ll have to make them yourself.
Much like the exquisite and ethereal French Macaron, caneles are a bit of a baking challenge. But for us baking geeks that’s half the fun, isn’t it?
I baked a whole bunch of canelés, made all the mistakes and tested all the theories for canelé success.
Can I guarantee that your very first batch of canelés will be “oh-la-la”? Well, I can’t 100% guarantee perfect canelés on the first try. But I will arm you with all the information I gleaned over several weeks of intensive testing to give you a head-start.
The definitive guide to making great Canelés de Bordeaux at home:
Ok, first things first….
Which canele pan is the best?
I’ve seen canelé recipes that use muffin tins (sorry, no way), silicone canelé molds (I’m not a fan of silicone baking pans in general), carbon steel pans and specialized, tin-lined copper canelé molds.
Is it worth spending a small fortune for the fancy French copper molds, or can we spend a little less and get great results? Let’s find out.
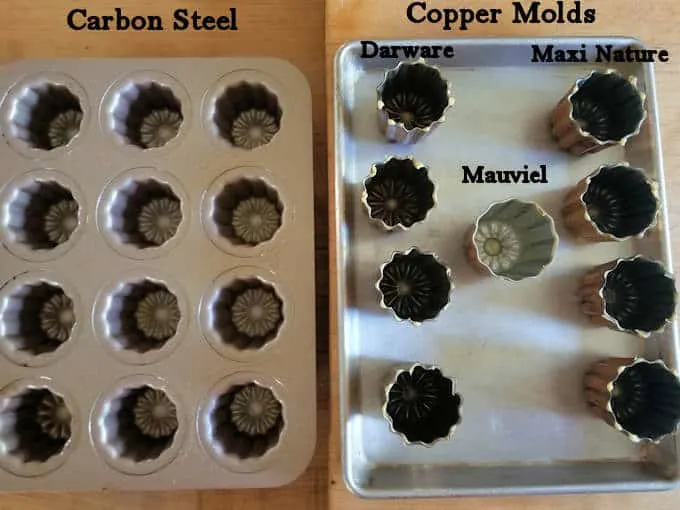
For my testing, I purchased a 12 cup carbon steel pan and 3 brands of copper molds, each at a different price point.
Listed below are the pans I tested. (As an Amazon Associate, I earn from qualifying purchases.)
- Mauviel Canele 2-Inch Mold (1 pack) Tinned Interior $29.95. Made in France.
- Maxi Nature Copper Tinned Molds (4 pack) $44.90. Made in France/Portugal.
- Darware Copper Canelé Pastry Molds (4-Pack) $23.99. Made in India.
- CHEFMADE Canele Mold Cake (12-Cavity) Non-Stick $26.99. Made in China.
The results? Overall I preferred the copper molds to the carbon steel pan. I found that with the silicone-lined steel pan the beeswax was too slippery so I ended up using pan spray instead. (More about that beeswax later…)
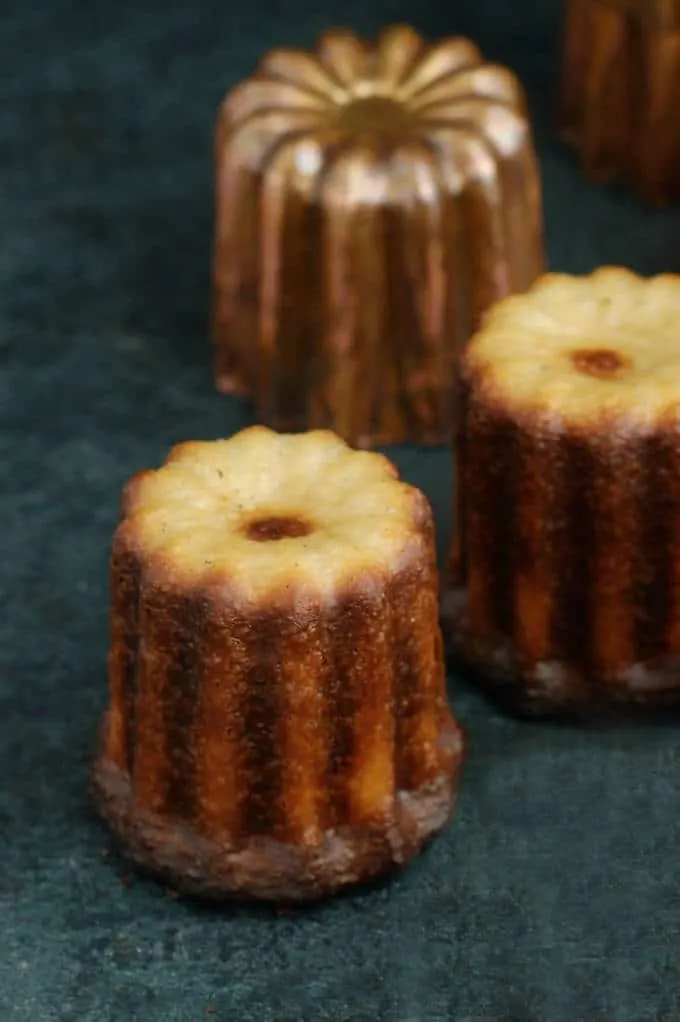
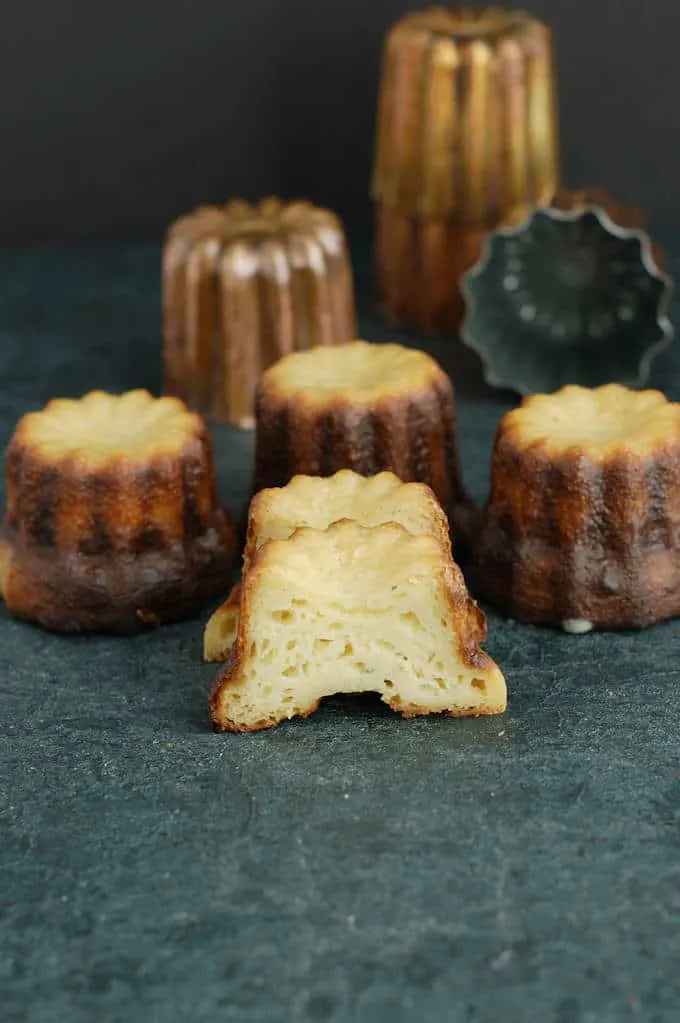
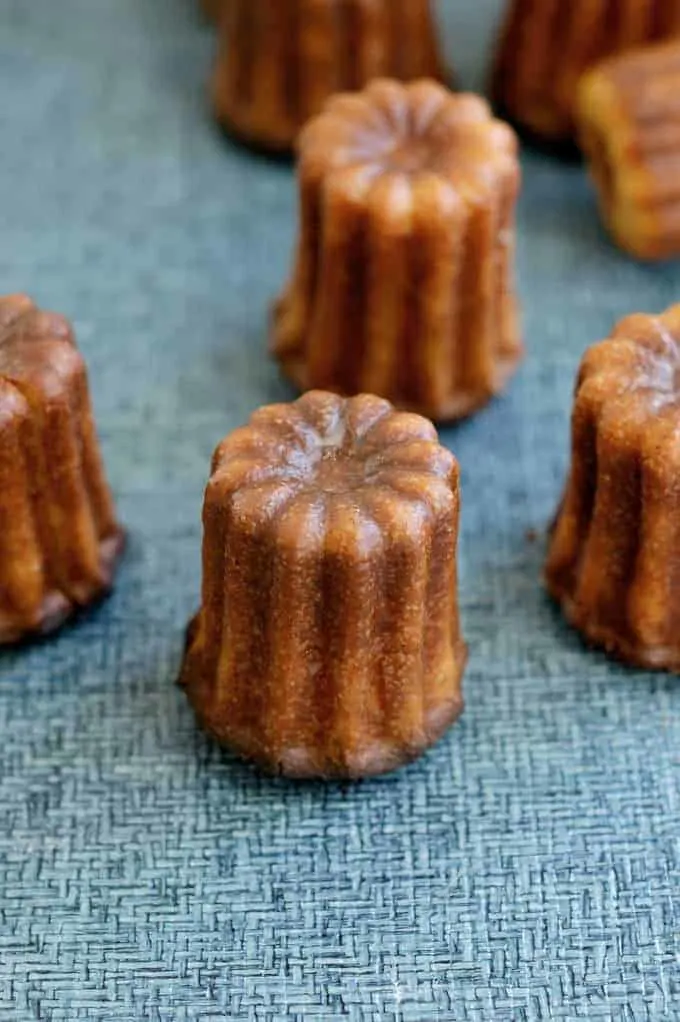
The caneles baked in the copper molds coated with beeswax had a crunchier, thicker and glossier crust.
Because a great canele is all about the textural contrast between the crust and the interior, the quality of the crust matters.
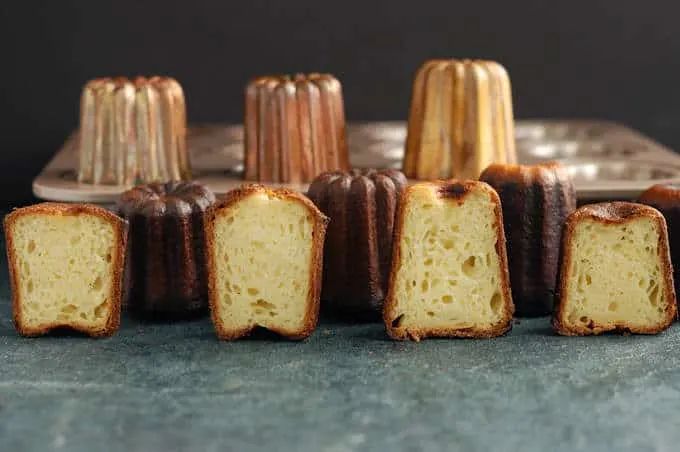
Four caneles baked in different pans. All were acceptable, but I prefer the copper molds with beeswax coating.
The caneles baked in steel carbon looked great, but the crust was thinner and not as crunchy as the crust formed in a copper mold. I also missed the gloss from the beeswax. This pan is acceptable, but not my favorite.
You will make an acceptable canele with the steel pan, and it is significantly less expensive. If you are price sensitive and are willing to compromise a little on the result, this pan is an option.
The Mauviel pan ($29.95 for 1!!!!) was the heaviest, most beautiful and most expensive of all the copper pans.
In side by side tests all the copper molds performed very well. I recommend the Darware molds since they are the most economical choice and produce great caneles.
Now that we’ve chosen our pan, lets work on the recipe and technique.
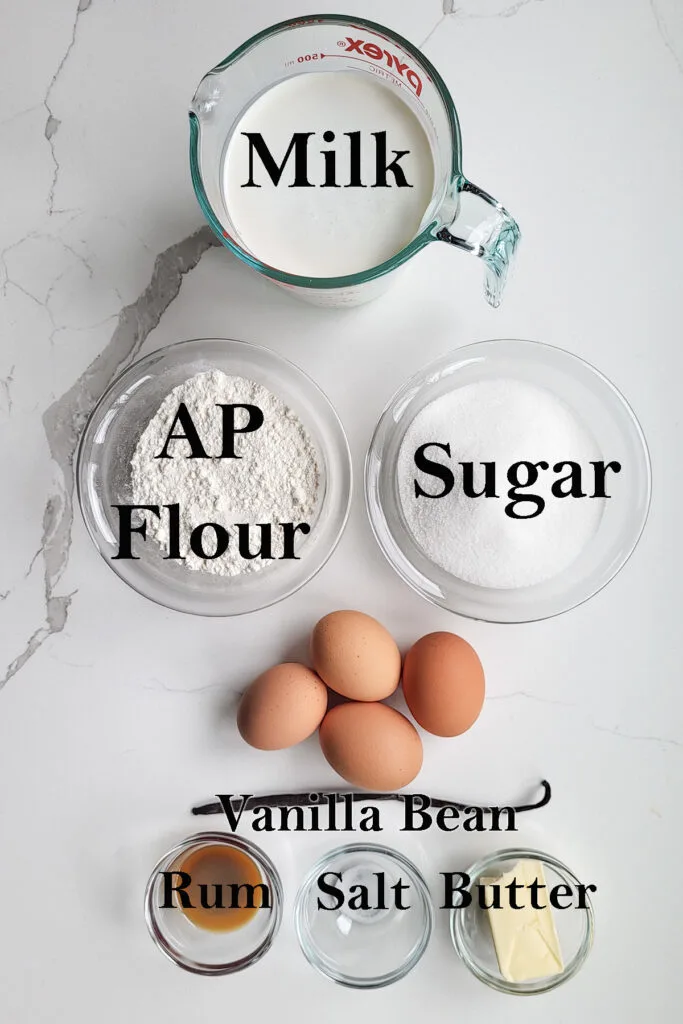
Ingredients
Process Photos
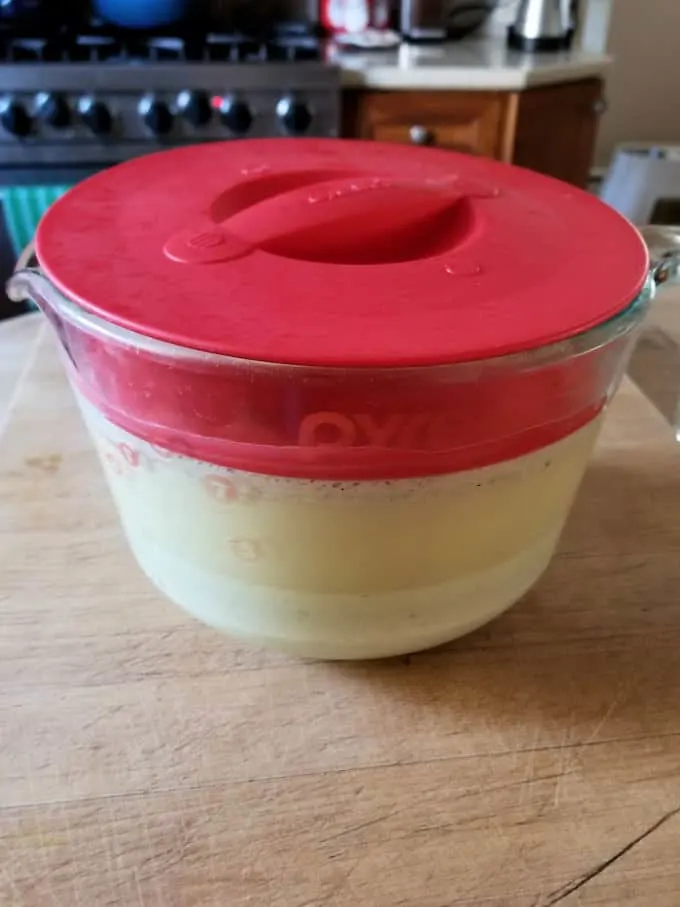
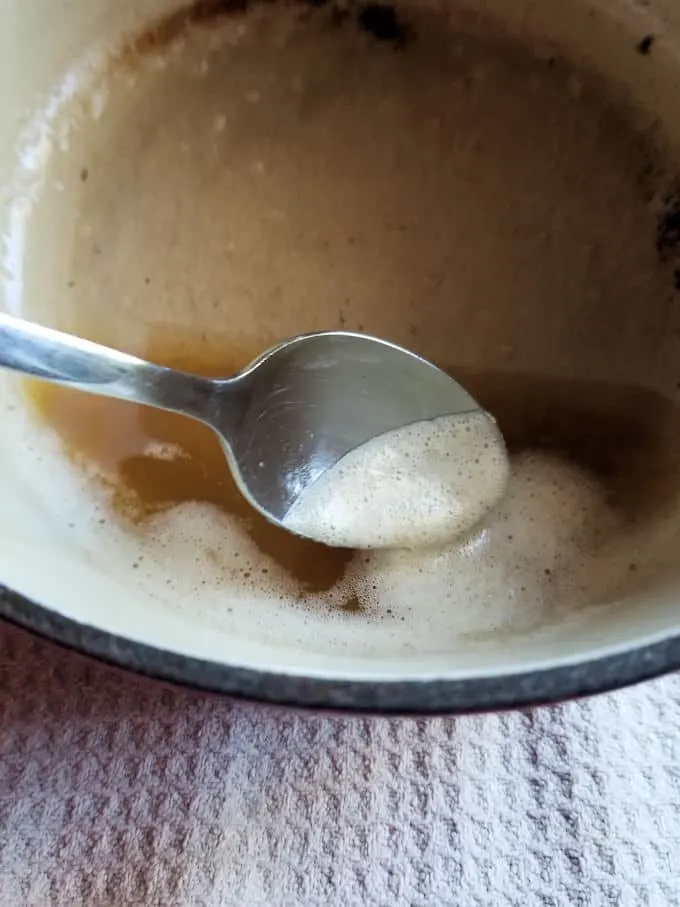
- Mix the ingredients for the batter 1-3 days in advance and refrigerate.
- After a day in the refrigerator the batter will separate. Whisk the batter back together before filling the canele molds.
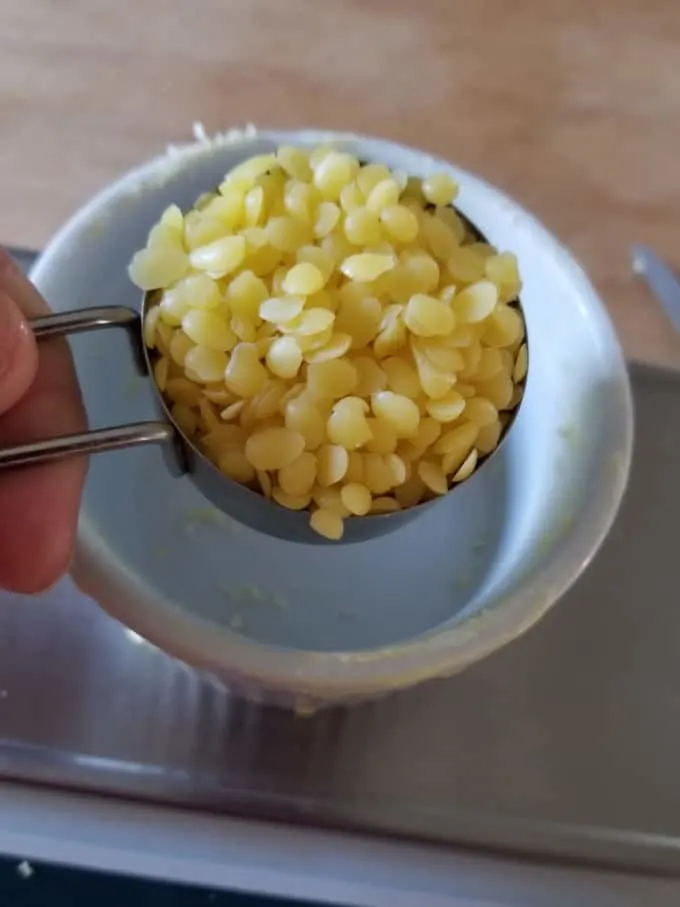
- Melt the beeswax in the microwave or on the stove.
- Clarify the butter then mix it with the melted beeswax. Coat the pans while the wax/butter is hot.
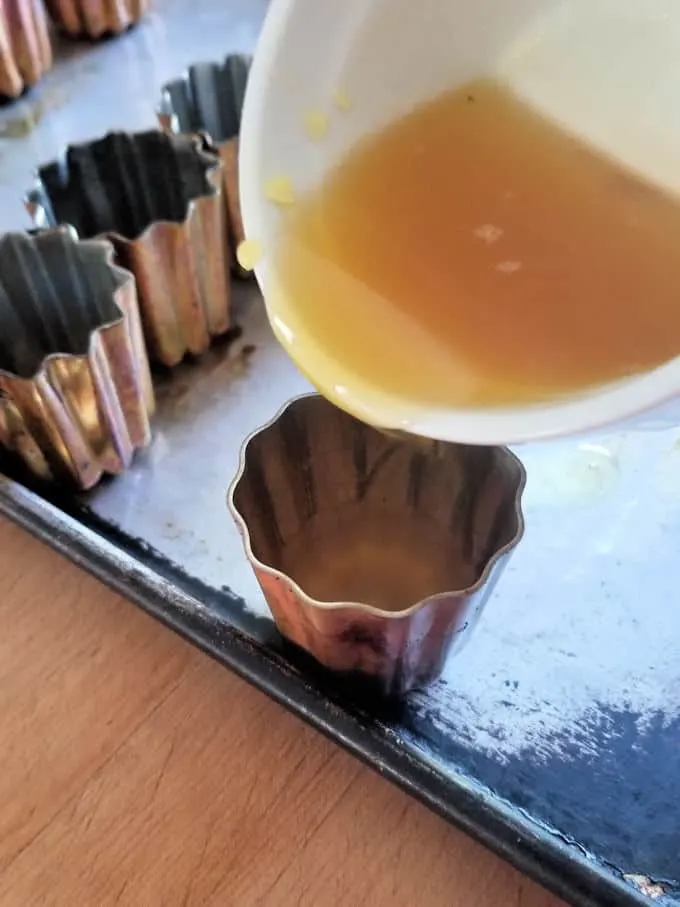
- Pour the hot wax/butter into the warm canele mold
- Drain the molds on a baking rack set over a towel to catch the drips of wax.
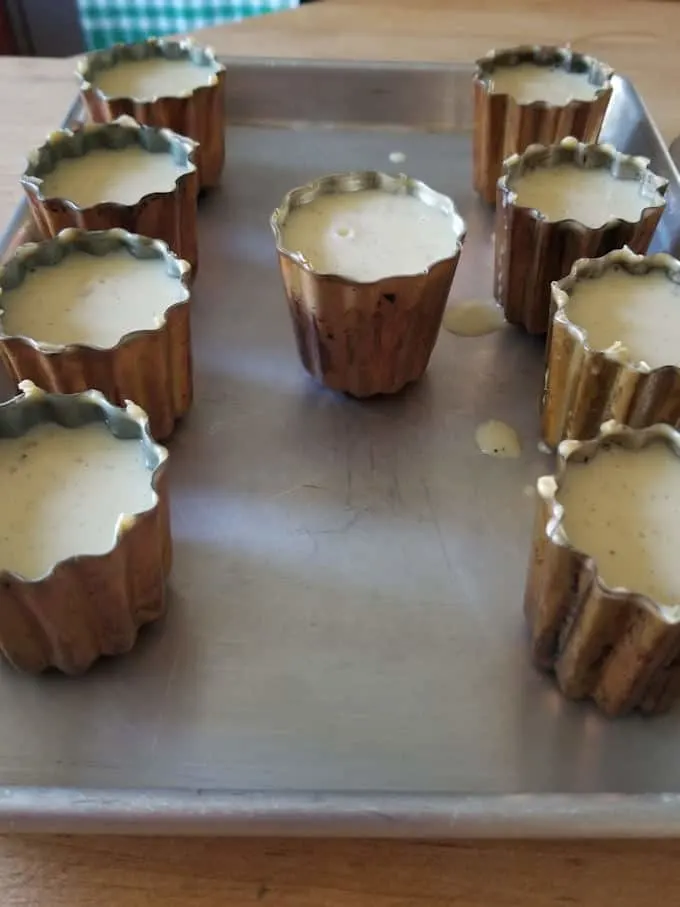
- Fill the pans to 1/4″ from the top. Do not line the pan with baking parchment, it may burn in the hot oven.
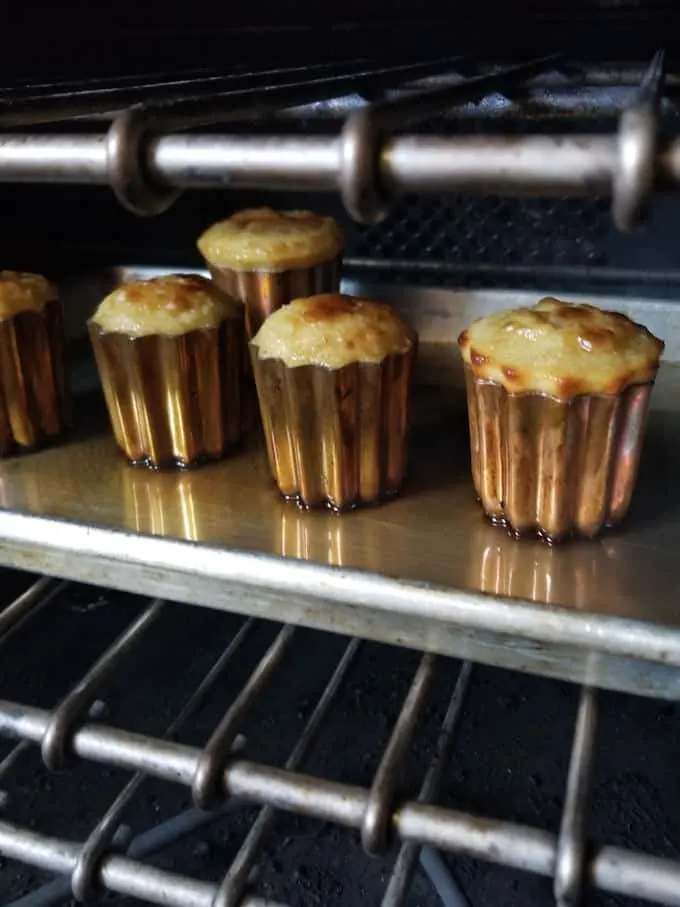
- In a very hot oven the caneles puff but don’t mushroom and they brown very quickly.
- After the initial high-heat, reduce the heat to finish baking the caneles. Start checking the caneles after about 35 minutes at 375°F.
- You can’t just go by what the top of the canele looks like. You’ll want to check the sides. Quickly lift a canele out of the mold (use a gloved hand or tongs) to see if the crust is fully browned. Sometimes the top of the canele can look quite brown, but the sides will still be a little pale.
Canele Baking Tips
- Make the batter up to 3 days in advance: This gives the flour in the batter time to hydrate. Over this time the vanilla and rum flavors will continue to develop.
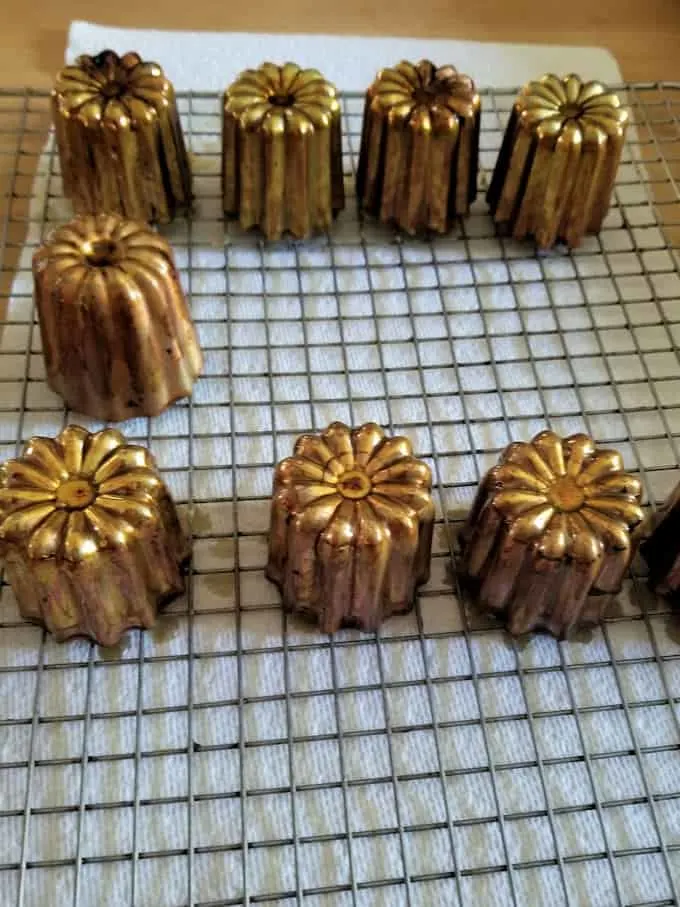
- Use a mixture of beeswax and butter to coat the pans: There’s a reason this is the traditional coating for a canele pan. Butter or pan spray will work in that they allow for easy release of the baked pastries, but the beeswax does more than grease the pan. Caneles baked with beeswax/butter have a glossy finish that sets a great canele apart from an average canele.
- Take the time to clarify the butter for the coating: Since milk solids burn at a lower temperature, separating the milk solids from the butterfat means fewer burnt crusts.
- Use hot wax and warm molds: For a perfectly-thin wax coating, warm the pans in the oven briefly. Pour the hot wax into the warm pans. You might want to use a glove to hold onto the mold, it will get hot from the wax. Immediately dump the wax back into the container. Flip the mold over onto a baking rack to drain.
- Fill the molds up to 1/4″ from the top: The batter will not rise over the pan since the crust forms so quickly. 1/4″ at the top allows enough room for the caneles to rise and create a nice, tall pastry.
- Start with a super hot oven: The defining characteristic of a good canele is the contrast between the thick, crunchy crust and the soft, eggy interior. The way to achieve this is to start them in a very hot (500°F) oven. At this temp the crust forms very quickly, protecting the inside from over baking and keeping the canele from rising up and out of the form.
- Learn to live with an occasional “white butt”: Every so often you’ll turn out a beautifully formed and well-browned canele only to notice that the “butt” (the fluted top) is a little pale.
Other than the “white butt” it’s a perfect canele. Occasionally this happens when the canele lifts a little in the pan. Since the bottom is not touching the hot pan it browns less.
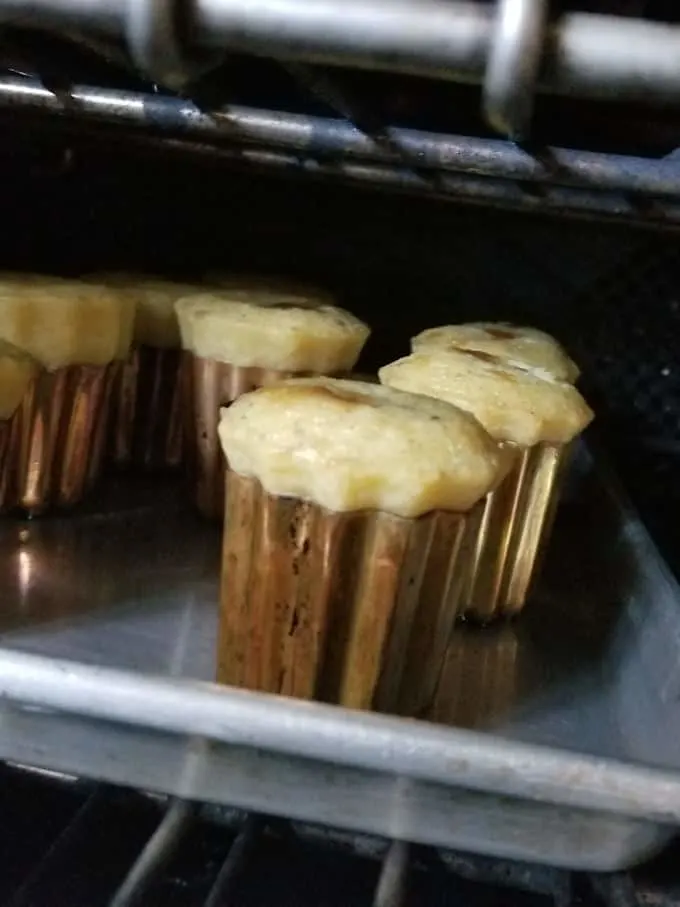
I tried starting at 450°F and got flabby caneles. See how the caneles are mushrooming, but not browning? The oven is not hot enough.
Caneles started at a lower temp oven failed to form a good crust. They mushroomed out of the pan and collapsed when turned out of the mold.
Caneles started above 500°F and made without clarified butter got an overly dark crust.
Storing Leftovers
Caneles are best eaten the day they are baked, preferably within a couple of hours. I left a few caneles in a bag at room temperature overnight and they were soggy and chewy the next day. (But, honestly, I still ate them!)
You can freeze left over caneles. Remove them from the freezer and reheat in the canele molds for about 5 minutes to re-crisp the crust. They’ll be almost as good as fresh.
Caneles FAQ
Before baking with the copper molds you must season them, like you would a cast iron pan. Line the molds up on a sheet pan, fill each mold with vegetable oil and bake in a preheated 300°F oven for 1 hour. Discard the oil and wipe the molds clean with a paper towel.
Don’t put canele pans in the dishwasher and don’t wash with soap or you’ll ruin the seasoning. Use a paper towel to wipe off excess beeswax. That’s it!
Yes, the batter must be made at least a day ahead. You can prepare the molds at least a few days before you’re ready to bake. On the day you want to bake, preheat the oven, fill the molds and bake!
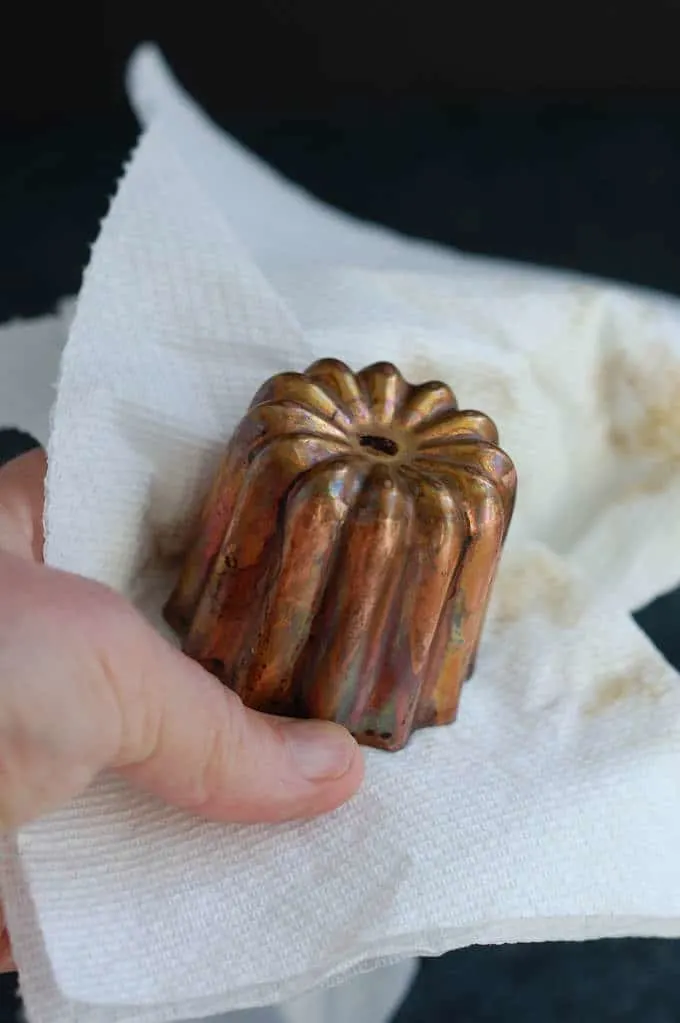
To clean the molds, just wipe inside and out with a dry paper towel.
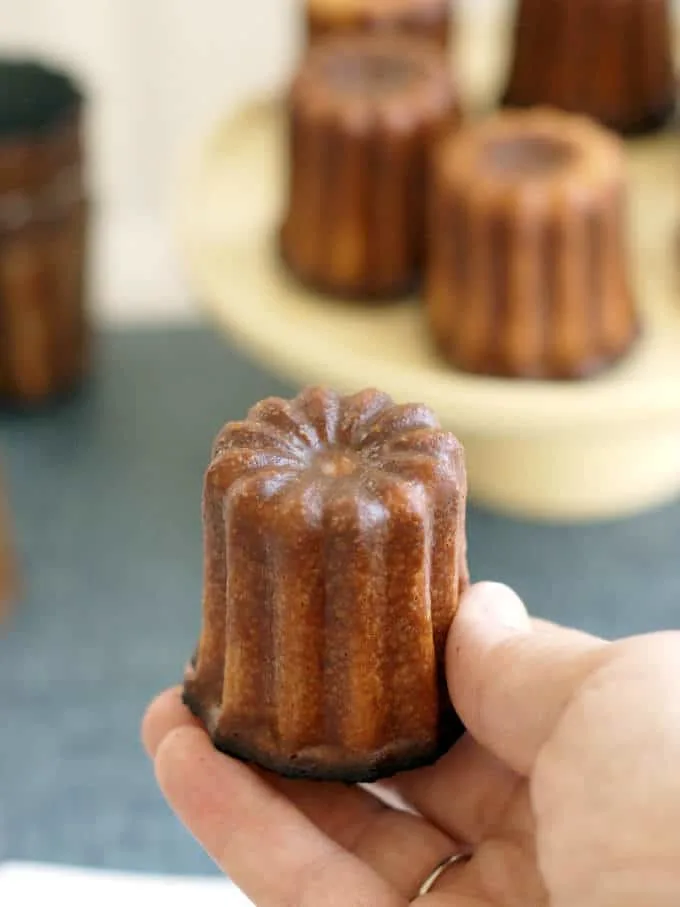
See that glossy finish? That’s the beeswax!
Watch the recipe video to see exactly how to make Caneles de Bordeaux from start to finish.
We love French Pastries. Here are more recipes for you to try: Concorde Cake, Pate a Choux, Chocolate Marveilluex, French Apple Cake, Baba au Rhum, Marolaine, Kouign-Amann, French Apple Tart, Tarte Bourdaloue, French Financiers, Macarons, Sable Cookies, Madeleines and a romantic Coeur a la Creme.
If you love this recipe as much as I do, I’d really appreciate a star rating and a quick comment. Ratings and comments help my recipes show in search results. Thanks!

Caneles Recipe
Video
Ingredients
Batter
- 16 ounces whole milk (2 cups)
- 1 ounce unsalted butter
- 2 ounces dark rum (¼ cup)
- 1 vanilla bean (split)
- ⅛ teaspoon table salt
- 2 large eggs
- 2 large egg yolks
- 8 ounces granulated sugar (1 cup)
- 4 ounces all purpose flour (¾ cup + 2 tablespoons, see note)
Pan Coating
- 2 ounces unsalted butter (¼ cup)
- 1 ½ ounces bees wax (⅓ cup)
Instructions
- Heat 16 ounces whole milk with 1 ounce unsalted butter, 2 ounces dark rum, 1 vanilla bean (split) and ⅛ teaspoon table salt until scalding. Turn off the heat and let the milk steep for 20 minutes. In a large bowl, whisk 2 large eggs and 2 large egg yolks with 8 ounces granulated sugar.
- Remove the vanilla bean from the milk. Scrape the seeds from the pod and add them to the milk. Reheat the milk to scalding hot.
- Slowly whisk ¼ of the hot milk into the egg mixture. Add 4 ounces all purpose flour and whisk until smooth. Whisk in the remaining milk. Return the vanilla pod to the bowl. Cover the bowl and refrigerate the batter for at least 24 hours or up to 3 days.
- Preheat the oven to 500 °F. Remove the bowl of batter from the refrigerator. Arrange the canele molds on a baking tray and place the tray in the oven long enough to warm up the molds. They don't have to be super-hot, just warm.
- Melt 2 ounces unsalted butter in a small saucepan. Continue cooking the butter over medium heat until a foam forms on top of the butter and the milk solids fall to the bottom. Use a small spoon to skim the foam off the top. Pour the butter from the pan, leaving the milk solids behind. While the butter is melting, put 1 ½ ounces bees wax in a microwave safe container. Microwave in 30 second increments until all the wax is melted. Combine the clarified butter with beeswax.
- Set a cooling rack over a tray lined with paper towels. Take the tray of canele molds out of the oven.
- Fill a warm canele mold with the melted butter/wax. Using a gloved hand or a pair of tongs, lift the filled canele mold and pour the butter/wax back into the original container. Immediately place the mold upside down on the rack to drain. Continue coating the rest of the molds with butter/wax. Rewarm the wax/butter if it is setting too quickly.
- Stir the batter well to reincorporate all the ingredients and transfer the batter to a large measuring cup or pitcher with a pouring spout. Place the canele molds right side up on an unlined sheet pan. Fill each mold up to 1/4" from the top with the batter.
- Bake the caneles for 15 minutes. Reduce the heat to 375 °F and bake another 35 minutes. Lift a canele out of the pan to check if the sides are well browned. If not, give them a few more minutes.
- Remove the caneles from the oven and immediately unmold them onto a cooling rack. Cool to room temperature. Best eaten the day they are baked.
Would you like to save this recipe?


As an Amazon Associate and member of other affiliate programs, I earn from qualifying purchases.
What excellent advice. Am curious what you think of cast iron pans.
I’ve never seen cast-iron canele pans.
Can you double this recipe if you have 2 pans? I’ve made this recipe, it’s excellent but wondering if it would effect the final product if doubled.
Sure, it can be doubled. Even if you only had 1 pan, you could make a double batch of the batter and bake half at a time.
Can these be made ahead and frozen? Does it affect the finished product?
I lived in Bordeaux as a student a zillion years ago and I love caneles! I could not afford the copper molds back then, but on a recent return trip I splurged and bought a set. Now I plan to try them out.
Your website posting on this delicious treat is amazing. I read it a couple of times and I feel like I can do this! The one question I have is–after bringing the milk to its second scalding– do you wait till it cools at all, or do you begin to whisk the hot milk into the egg mixture right away?
You add the hot milk to the egg mixture. I’ll update the instructions to make that clear. Thanks.
I notice you (about the only recipe I’ve looked at that doesn’t…) don’t put molds in freezer before filling and baking. To me it’s counterintuitive to do so so I’m trying your recipe next!! And I’ll bite the bullet and go to 500!! I’ve got copper so might as well try to do it right. I didn’t seem to get too much wax too even when draining so may just brush, may try just butter after a spritz of PAM!! See I’ve been reading up!!! Fingers crossed on my next batch!! thanks!!
Caryn S… Seattle Cannele’/Canele’ lover
I’m not sure why you’d want to put the mold into the freezer. I mean, the thing about a great canele is the contrast between the crisp, thick crust and the custardy center. Freezing the mold would slow down the baking and mute that contrast. To be very frank with you, the reason so many recipes look the same on the internet is that often one person publishes a recipe and then many, many others copy that recipe without doing the hard work of actually testing and researching the recipe. Sad, but it’s a fact.