Sourdough Sandwich Bread with a Soft Crust


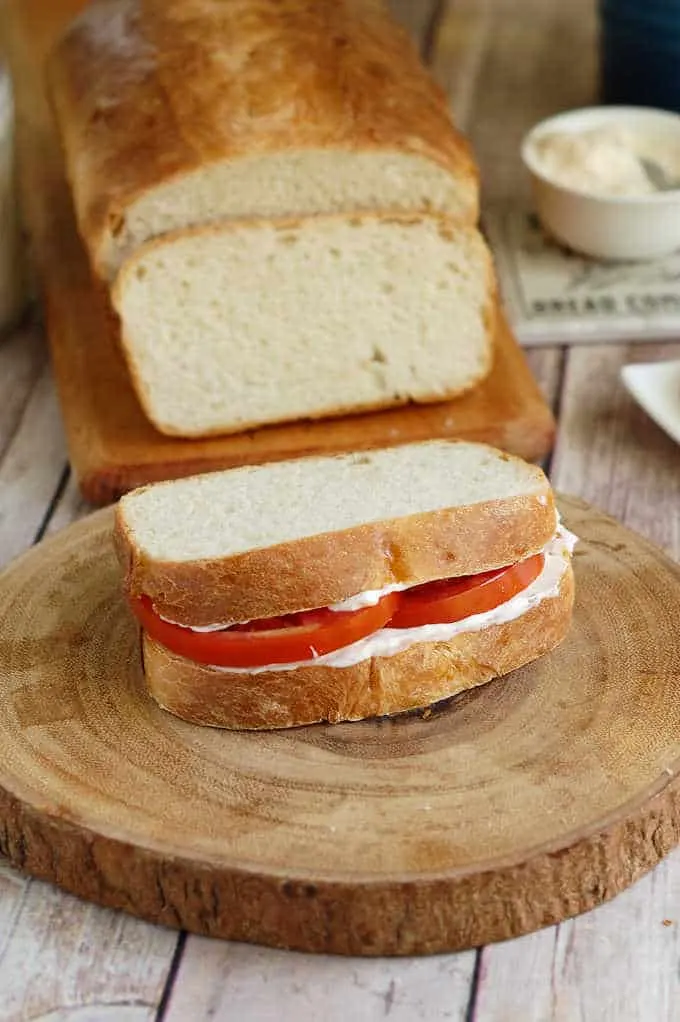
Sourdough Sandwich Bread is made with milk, butter & active sourdough starter. This soft crust sourdough bread has a tender crumb and awesome flavor. It makes a perfect sandwich.
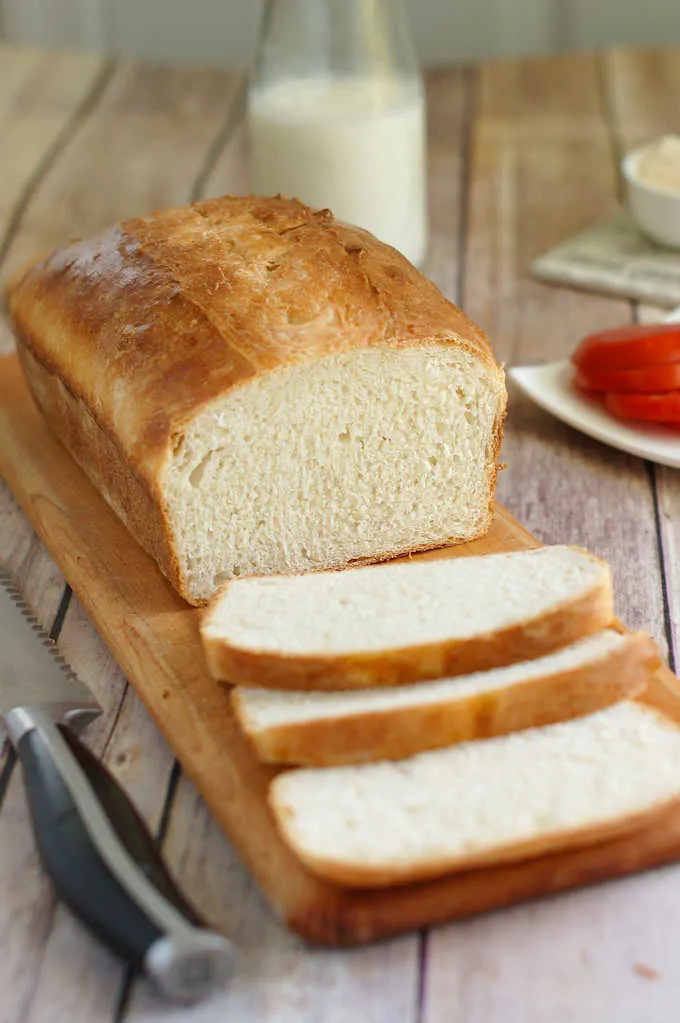
Table of contents
Why this is the best Sourdough Sandwich Bread
White Sandwich Bread doesn’t have to have the lackluster taste and squishy texture of a certain “wonderous” bread that many of us ate growing up. This sourdough sandwich bread has deep flavor, a beautiful texture and a soft crust.
Milk, butter and a whisper of sugar create a perfectly soft white bread that is ideal for making a great PB&J or BLT.
Although this recipe takes a good 8-12 hours from start to finish, the vast majority of the time is hands off.
To make this recipe even more convenient, you can let the dough rise over night. A long rise in the refrigerator does only good things for the bread.
If you don’t already have one, I can show you how to make a sourdough starter and how to feed a sourdough starter.
Ingredients
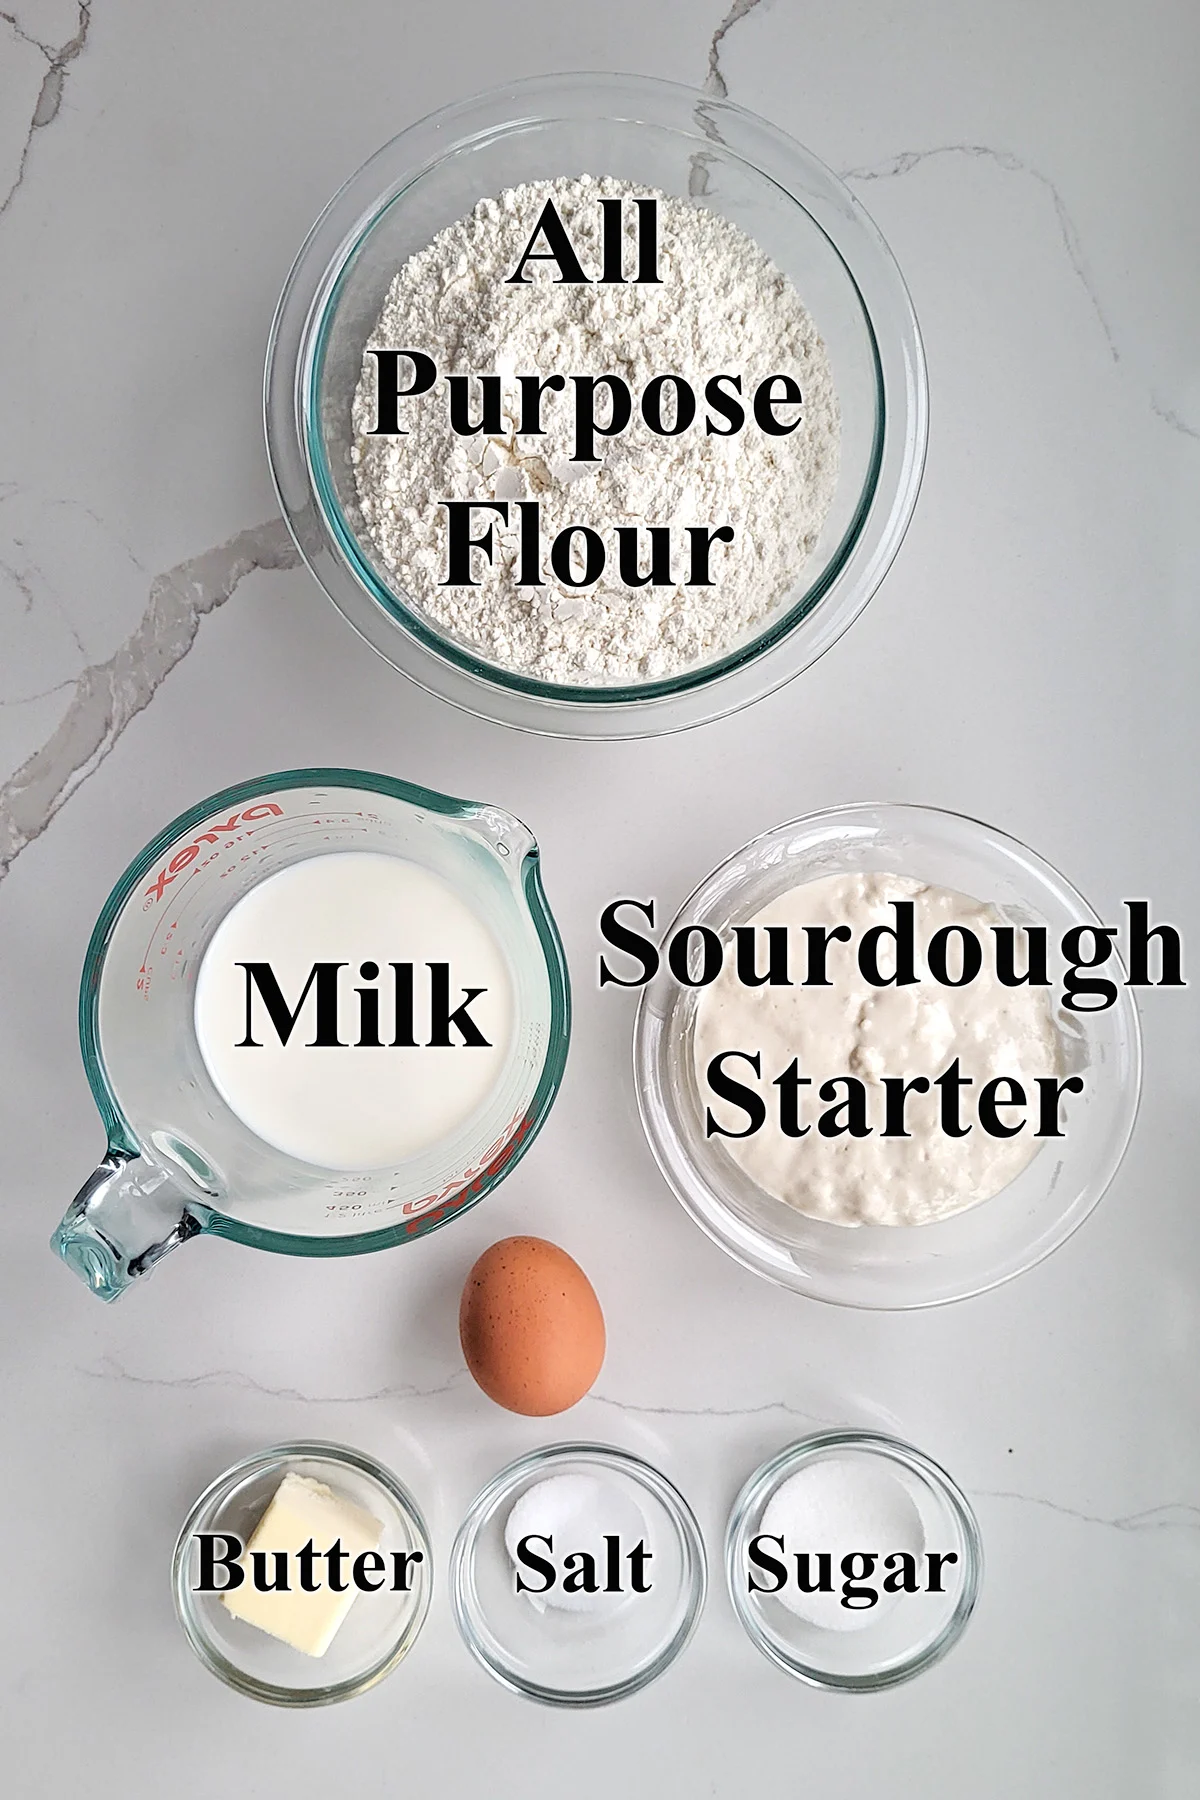
Ingredient Notes
- Sourdough Starter – This recipe was developed using 100% hydration starter. You will need to adjust the liquid or flour in the recipe if you’re starter isn’t at 100% hydration.
- All Purpose Flour – Medium protein AP flour makes a bread with a soft crumb yet develops enough gluten so the bread rises high in the oven.
- Milk – Scalding denatures (breaks down) proteins in the milk which can interfere with gluten development.
- Butter – A little fat softens the crumb of the bread.
- Salt – For flavor.
- Sugar – Enhances browning and make the crumb soft and slightly sweet.
How to make Sourdough Sandwich Bread with a soft crust
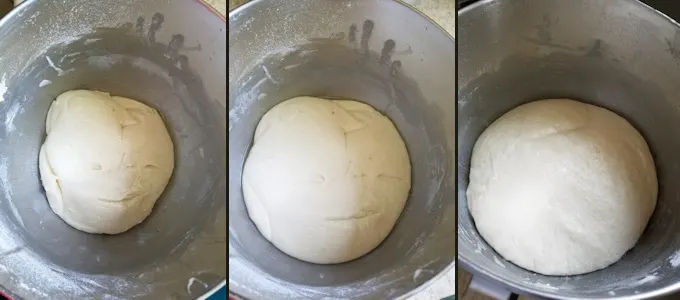
- Mix the dough and set it aside for the initial fermentation.
- With each hour of fermentation the dough will rise higher, become more active and more elastic.
- After the initial fermentation you can continue on to shape and bake the loaf, or you can refrigerate the dough overnight and continue the next day. A long, cool rest in the refrigerator enhances the flavor and texture of the dough.
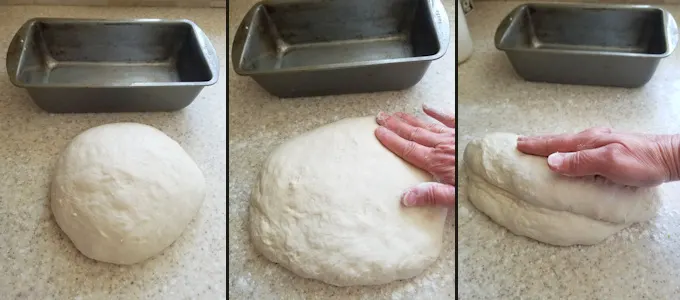
- Turn the dough out onto a lightly floured surface.
- Without kneading out the air, gently form the dough into a rectangle.
- Roll the rectangle into a log and set into a lightly greased loaf pan.
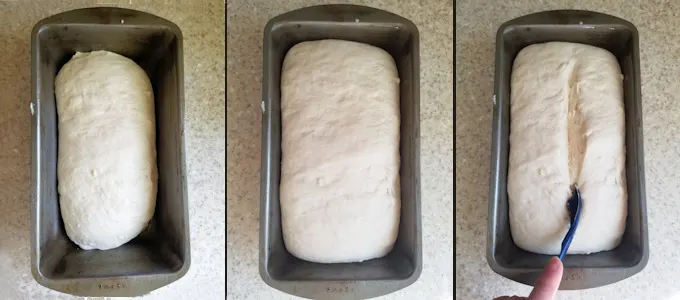
- Cover the pan and set the loaf aside to rise.
- The dough will expand to almost fill the pan.
- Slash the top of the loaf to promote even rising in the oven.
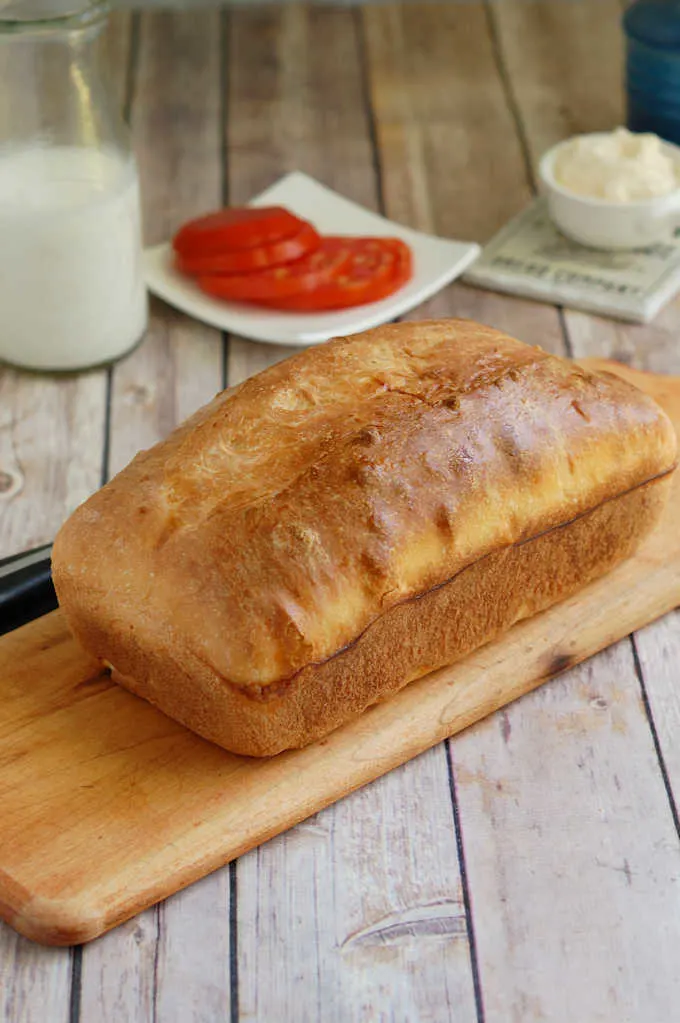
- Brush the loaf with egg wash and bake until the interior temperature is 200F.
- Cool the loaf completely before cutting.
A timeline for making Sourdough Sandwich Bread:
- If your starter needs feeding, do that the night before or early in the morning of the day you want to make the dough.
- Mix the dough in the afternoon, allow it to ferment for 3-4 hours then refrigerate the dough before going to bed.
- Take the dough out of the refrigerator first thing in the morning, shape the loaf and set it into the pan.
- To warm up the dough, turn on the oven just until it’s barely warm. Turn off the oven and set the pan with the cool dough in the oven. Remove the pan once the dough is back to room temperature. You can skip this step, but it does speed up the rising time.
- Leave the loaf to rise for 1 1/2- 2 hours, or as long as is needed to almost double in size.
- To make and bake the dough in the same day, feed your starter the evening before so it’s active by morning. Start the dough early in the morning and it should be ready to bake by late afternoon or early evening.
Storage
Sourdough Sandwich bread will keep at room temperature for 2-3 days. The bread (sliced or whole) can be frozen for up to a month.
I know you hate to throw away that sourdough discard. Check out these recipes that use sourdough discard.
More great sourdough breads
- Whole Wheat Sourdough Bread
- Sourdough Hoagie Rolls
- Sourdough Multigrain Bread
- Sourdough Semolina Bread
- Sourdough Rye Bread
- Crusty Sourdough Bread
If you love this recipe as much as I do, I’d really appreciate a star rating and a quick comment. Ratings and comments help my recipes show in search results. Thanks!

Sourdough Sandwich Bread Recipe
Ingredients
- 8 oz whole milk (1 cup)
- 1 oz unsalted butter
- 8 oz active sourdough starter (1 cup, 100% hydration)
- ½ oz granulated sugar (1 tablespoon)
- 1 ½ teaspoons salt
- 12 ½ oz all purpose flour (2 ½ cups, see note)
- 1 large egg (for egg wash)
Instructions
- Warm 8 oz whole milk in the microwave to until scalding hot (just before it comes to a boil.) Stir 1 oz unsalted butter into the warm milk to melt. Set the milk aside to cool until it's slightly warmer than body temp.
- In a mixer bowl, combine the warm milk with 8 oz active sourdough starter, ½ oz granulated sugar and 1 ½ teaspoons salt and stir to combine. Add 1 ½ cups of the flour and stir until the batter looks like thick pancake batter. If using a stand mixer, change to the dough hook.
- With the mixer running, slowly add the remaining flour until the dough gathers on the hook and clears the sides of the bowl. Knead for 5 minutes. If mixing by hand, stir in as much flour as you can then turn the dough out onto a floured surface and knead in the remaining flour.
- Remove the dough from the bowl onto a lightly floured surface. The dough should be soft and slightly sticky. Knead to form a smooth ball. If the dough is very sticky sprinkle a little more flour as you knead.
- Place the dough in an oiled bowl, turning once to coat the dough. Cover the bowl and set it aside at room temperature.
- After 60 minutes uncover the bowl, lift one side of the dough and fold it into the middle of the dough. Repeat with the other three sides of the dough then flip the dough over. You're basically turning the dough inside-out to redistribute the yeast and strengthen the gluten. Cover the bowl and after 60 minutes repeat the procedure.
- Cover the bowl and after 60 minutes fold the dough one more time. By now the dough should be lively, elastic and airy. If the dough is still sluggish give it another hour or two at room temperature. If you want to finish making the bread in the morning return the dough to the bowl, cover tightly and refrigerate overnight. The next morning continue with shaping. Otherwise continue shaping the loaf on the same day.
- Grease a 9"x 5" loaf pan with a very light film of vegetable oil.
- Turn the dough out onto a floured surface and without kneading out the air, gently push the dough to a 9" rectangle. Tightly roll the dough to form a log.
- Set the dough into the pan and cover with a damp kitchen towel or oiled plastic wrap. Set in a warm place and rise until the dough is doubled in size, about 1-1½hours.
- Preheat the oven to 350 °F. Use a sharp knife or razor to cut a 1/2" deep slash down the center of the loaf. Brush the loaf with egg wash.
- Bake about 30-35 minutes until golden brown and and a toothpick inserted in the center comes out clean. The interior temp should be 200 °F.
- Cool in the pan for 5 minutes before turning out onto a cooling rack. Finish cooling to room temperature before slicing,
Would you like to save this recipe?


As an Amazon Associate and member of other affiliate programs, I earn from qualifying purchases.
Hello,
I am a bit confused on step 6. I am reading that you rise twice for 30 minutes each, then a 60 minute, then repeat all of step 6 again or just the 60 minutes? Then, after the repeat of step 6 move to step 7 for another 60 min rise? Thanks.
Hi Vicki. There’s a total of 4 folds over 3 hours. Wait 30 min and fold, wait 30 min and fold, wait 60 min and fold, wait 60 min and fold. By the end of 3 hours if the dough is aerated and cohesive you can move on to shaping the bread or put it in the fridge and finish the next day. If after the 3 hours and 4 folds your dough is still sluggish you can give it another hour or two before moving on. The total time can vary quite a bit based on the activity of your starter and/or the temp of the dough and the room.
Thank you… Just starting on my second 60 min. Looking forward to trying this bread.
I feed the starter last night and as per instructions kneaded the dough in morning.. but even after all the folds, the dough is still breaking when I am stretching it. What should I do? Should I throw it all and start again please suggest.
So you mixed the dough in the morning and then left it to ferment, folding every 30-60 minutes? What stage are you at? I’ve never had the dough break apart. What type of flour did you use?
Beautiful bread! I am so excited to have such a great result with my sourdough. Everyone loves this bread . I am making it for the second time today, and doubled the batch both times. Thank you!!
So glad you like it!
I live at 5500 feet above sea level. Any changes to the recipe for high altitude?
Thanks
Great recipe! I made it last week, and my kids went wild for it. I doubled the recipe today, and was worried about dividing dough for loaves, but they came out beautifully. I cut the bulk dough in half with a pastry cutter after 2-ish hours of rise before I shaped the loaves, taking care not to deflate the dough as I cut. I also noticed that for me, mixing by hand, my dough takes closer to 3.5 C of AP flour. Thanks so much!
Thanks for the feedback. Have fun! Are the kids getting their hands in the dough too?
Megan, You’re exactly right! The first time I made this i thought I was going crazy adding extra flour little by little but I’m glad I trusted my gut. It turned out fabulous! Making it for a second time today and it required slightly less flour this time… I suppose it depends on just how active your starter is and how much is “actually” in one cup, contributing to more liquid? At least that’s my theory, but I’m no expert! Either way, I LOVE this recipe… and the Sourdough Pizza Crust. Thanks Eileen, for the quality content!
Just made this and it looks great! Waiting for it to cool before slicing. Is there any special care in storing sourdough bread? Should I keep in refrigerator? What is the shelf life? I know it has no preservatives like store bought. Thanks for any tips!
Melinda
Keep it at room temperature for a day or two, and then freeze. Never refrigerate bread as it actually accelerates the staling process. Freezing stops the process. For all my breads I slice the loaf once it’s cooled, eat what I want that day and the rest of the loaf goes directly into the freezer. Most loaves fit nicely in a 1 gallon freezer bag. I clean and reuse the freezer bags.