Sourdough Sandwich Bread


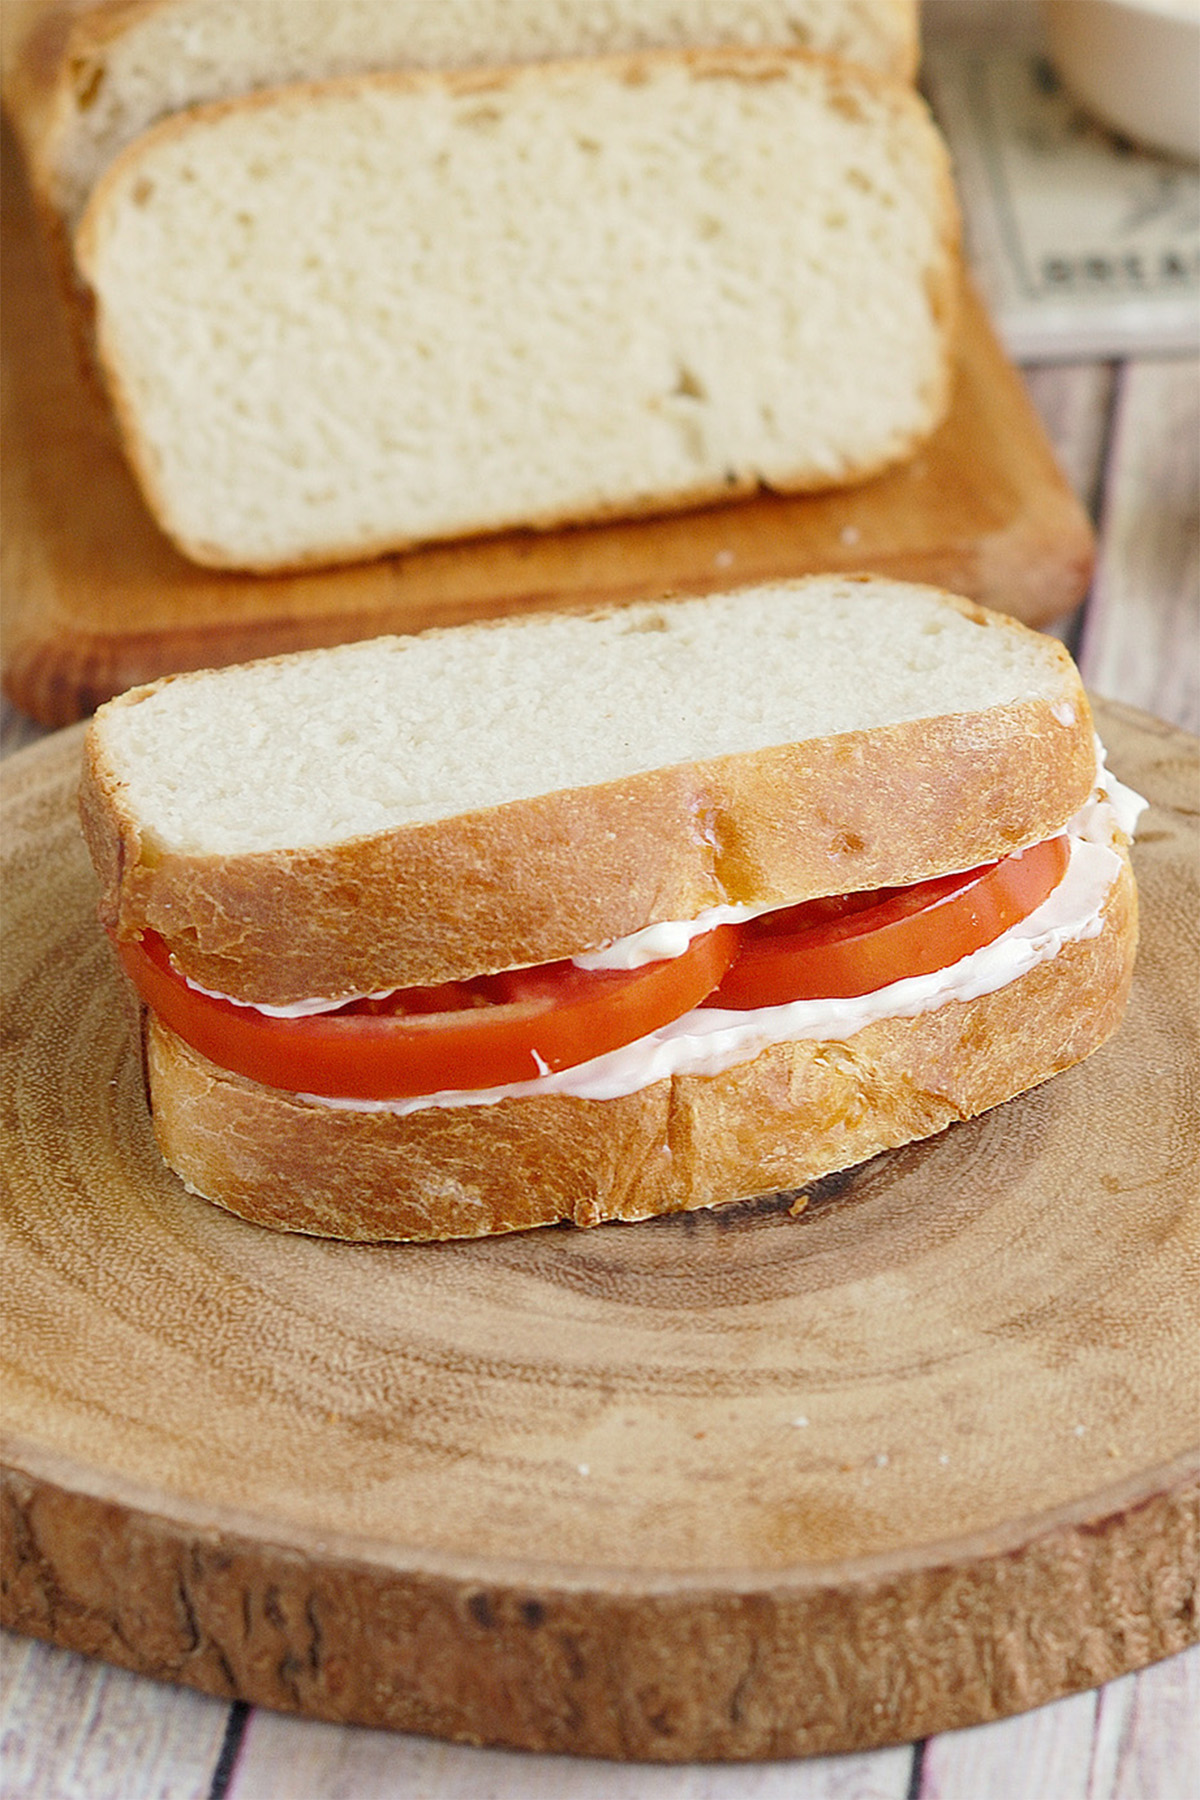
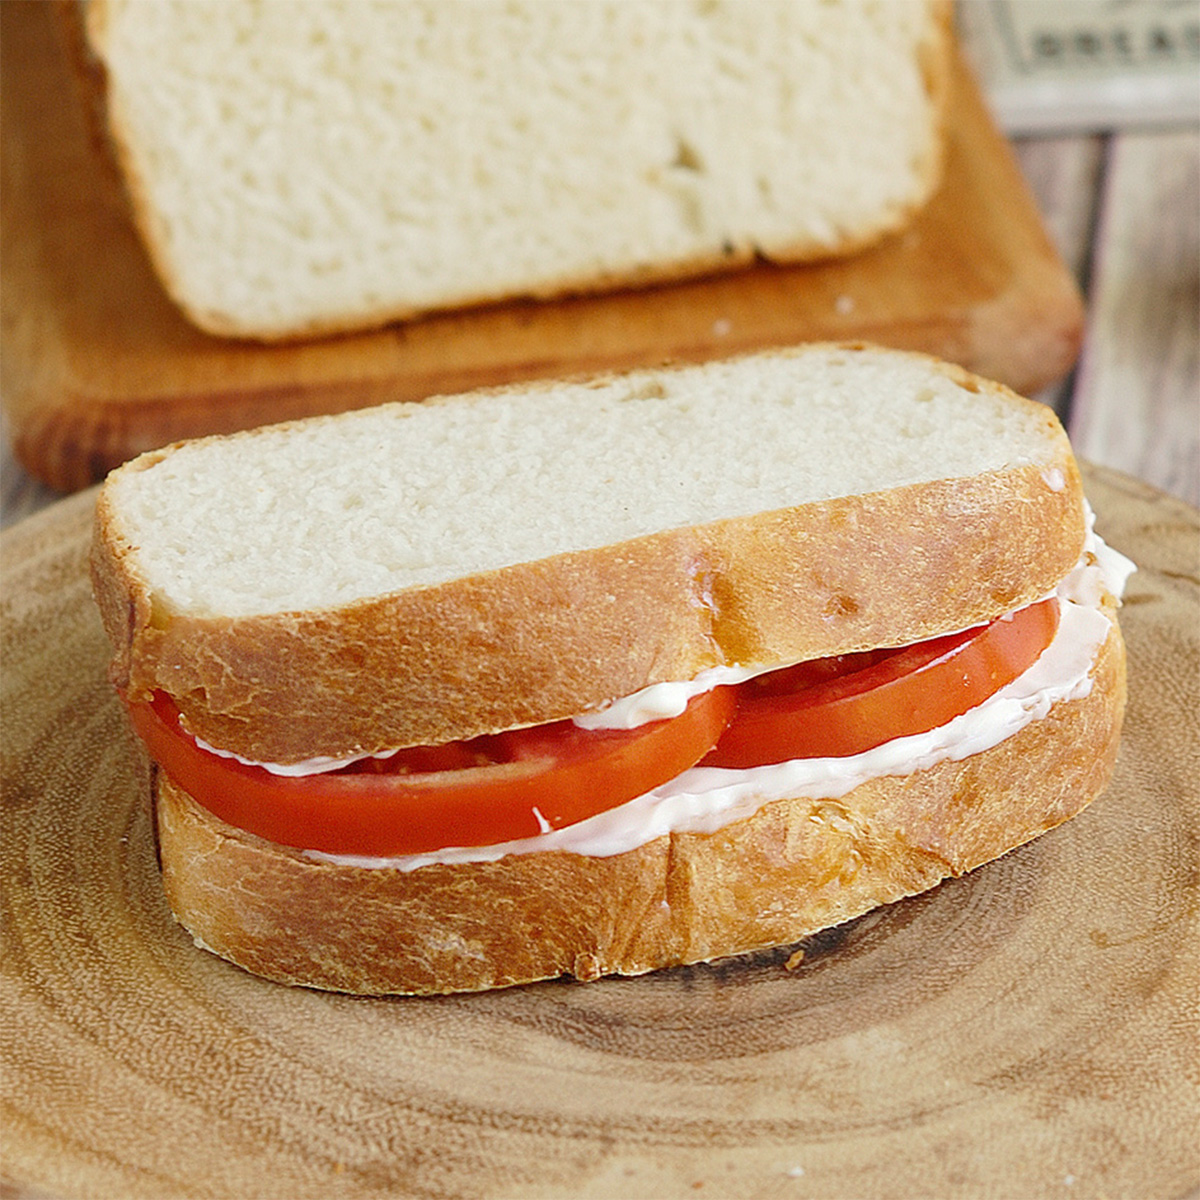
Sourdough Sandwich Bread has a soft crumb and neat, square slices you can depend on for sandwiches, toast, and everyday use.
Clear timing cues, pan-specific shaping, and visual proofing tips make this loaf predictable and reliable — even for home bakers.
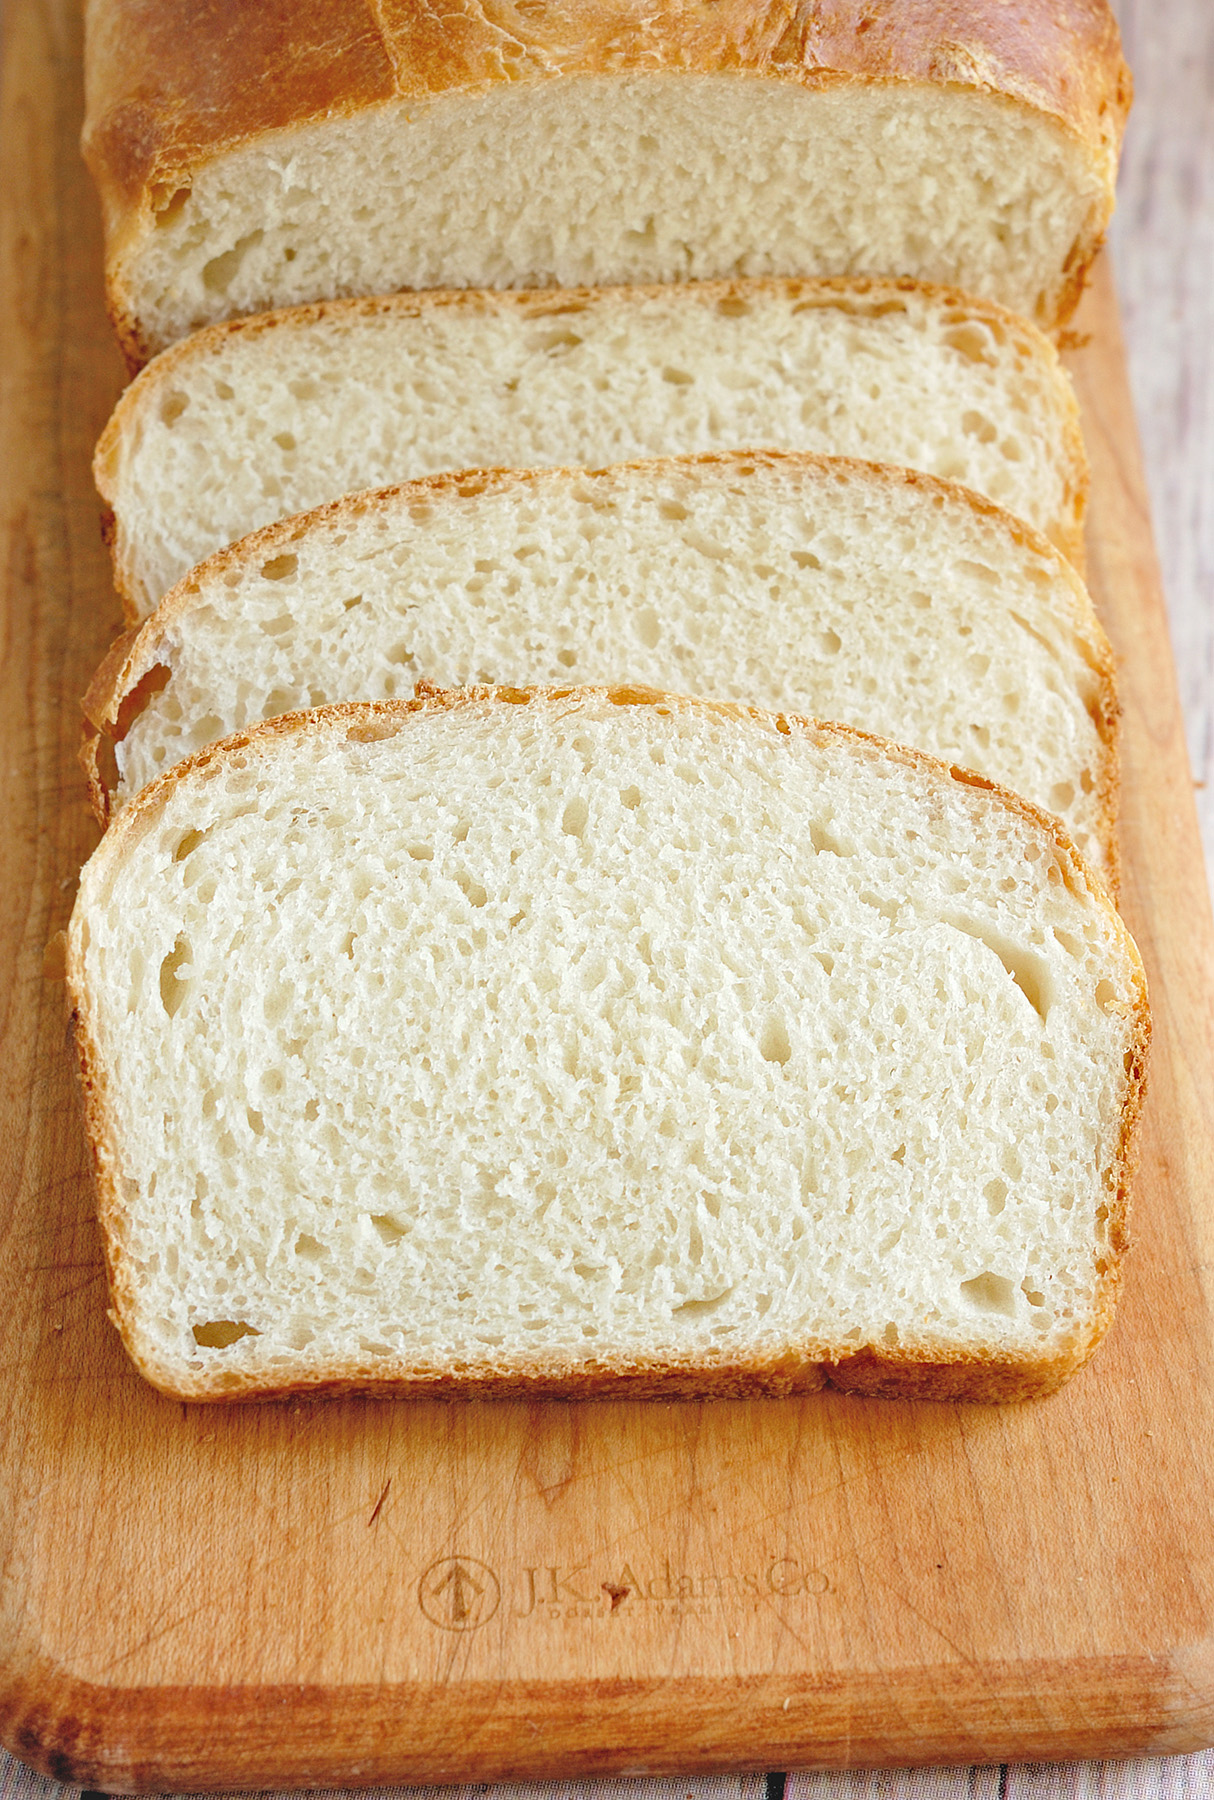
Table of contents
Why This Sourdough Works for Sandwich Bread
This sourdough sandwich bread has a soft, tender crumb, a mild sourdough flavor, and a thin, flexible crust — qualities that make it especially well suited for sandwiches.
Unlike artisan sourdough loaves, this recipe is designed specifically for baking in a loaf pan, producing even slices that hold fillings well — from PB&J to BLTs and grilled sandwiches.
Why Sandwich Sourdough Has a Tighter Crumb
An open, irregular crumb is a hallmark of artisan sourdough, but it’s not ideal for sandwich bread. A slightly tighter crumb creates structure, slices cleanly, and holds fillings without tearing or leaking.
This recipe balances softness with strength to produce even slices meant for everyday sandwiches rather than rustic presentation.
Soft Crumb and Even Slices
This loaf is formulated for structure and softness rather than an open, rustic crumb. Moderate hydration, pan shaping, and a small amount of fat help the bread rise evenly and slice cleanly without crumbling.
Mild Sourdough Flavor That Works With Fillings
Milk, butter, and a small amount of sugar soften the crumb and balance the flavor, keeping the sourdough tang present but not overpowering. The result is a bread that complements sandwich fillings rather than competing with them.
Although the recipe takes about 8–12 hours from start to finish, most of that time is hands-off.
For added flexibility, the dough can ferment overnight in the refrigerator. A long, cool rise improves both flavor and texture and makes the schedule easier to manage.
Ingredients
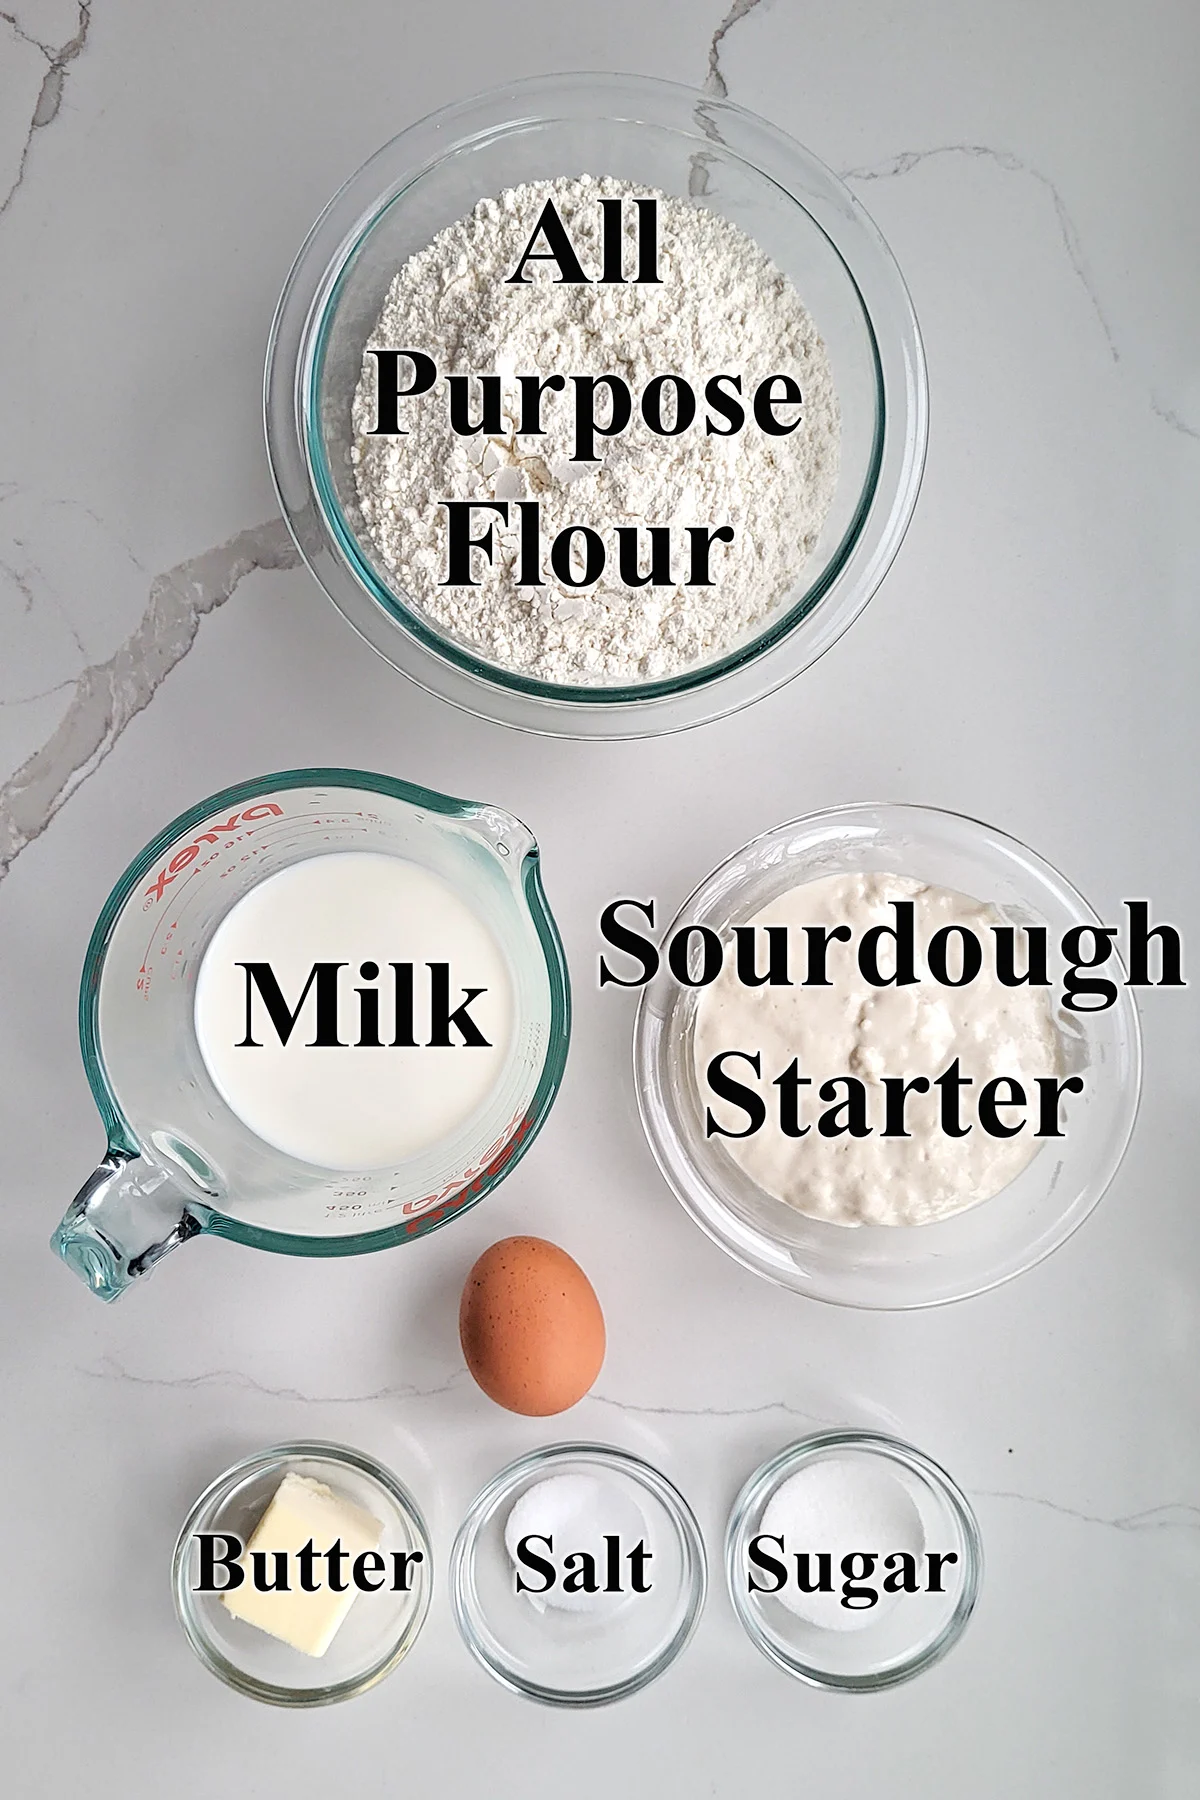
Ingredient Notes
- Sourdough Starter – This recipe was developed using a 100% hydration starter. If your starter is at a different hydration level, you will need to adjust the flour or liquid slightly.
- All-Purpose Flour – Medium-protein all-purpose flour creates a soft crumb while still developing enough gluten to support a tall loaf.
- Milk – Scalding the milk denatures proteins that can interfere with gluten development, resulting in better structure. The milkfat softens the crumb.
- Butter – A small amount of fat tenderizes the crumb and keeps the bread soft.
- Salt – Essential for flavor.
- Sugar – Enhances browning and contributes to a soft, lightly sweet crumb.
How to Make Sourdough Sandwich Bread (Step-by-Step)
Mixing the Dough and Bulk Fermentation
This stage builds structure and flavor in the dough and sets the foundation for a good rise.
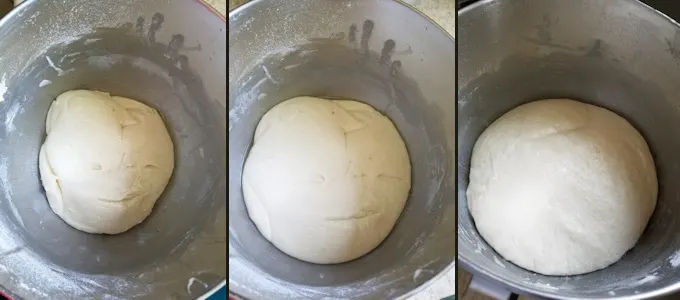
- Mix the dough and set it aside to ferment.
- As fermentation progresses, the dough will rise, become more elastic, and show visible signs of activity. Use visual cues — not just the clock — to judge readiness.
- After bulk fermentation, you can either shape and bake the loaf the same day or refrigerate the dough overnight. A long, cool rest in the refrigerator improves flavor and dough handling.
Shaping the Dough for a Sandwich Loaf
Shaping the dough forms the structure and form for the final loaf.
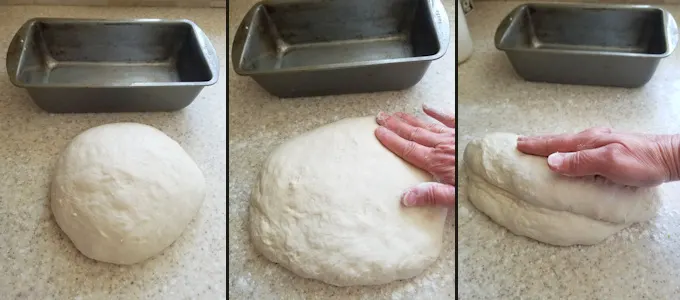
- Turn the dough out onto a lightly floured surface.
- Without kneading out the air, gently form the dough into a rectangle. Roll it into a tight log and place it seam-side down in a lightly greased loaf pan.
- Proper shaping helps the loaf rise evenly and produces neat slices ideal for sandwiches.
Final Proof: When the Dough Is Ready to Bake
The proofing stage forms the crumb and aeration of the final loaf.
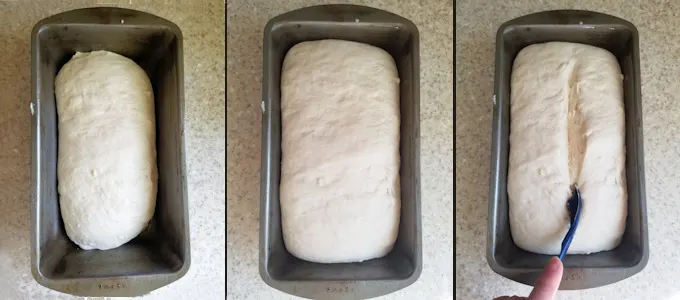
- Cover the pan and set the loaf aside to rise.
- The dough should expand to nearly fill the pan and feel light and aerated. When gently pressed, the dough should slowly spring back.
- Just before baking, slash the top of the loaf to encourage controlled expansion in the oven.
Baking for a Soft Crust and Tender Crumb
Baking the dough in a loaf pan provides structure and support, which helps the bread rise evenly and develop a finer crumb than free-form loaves.
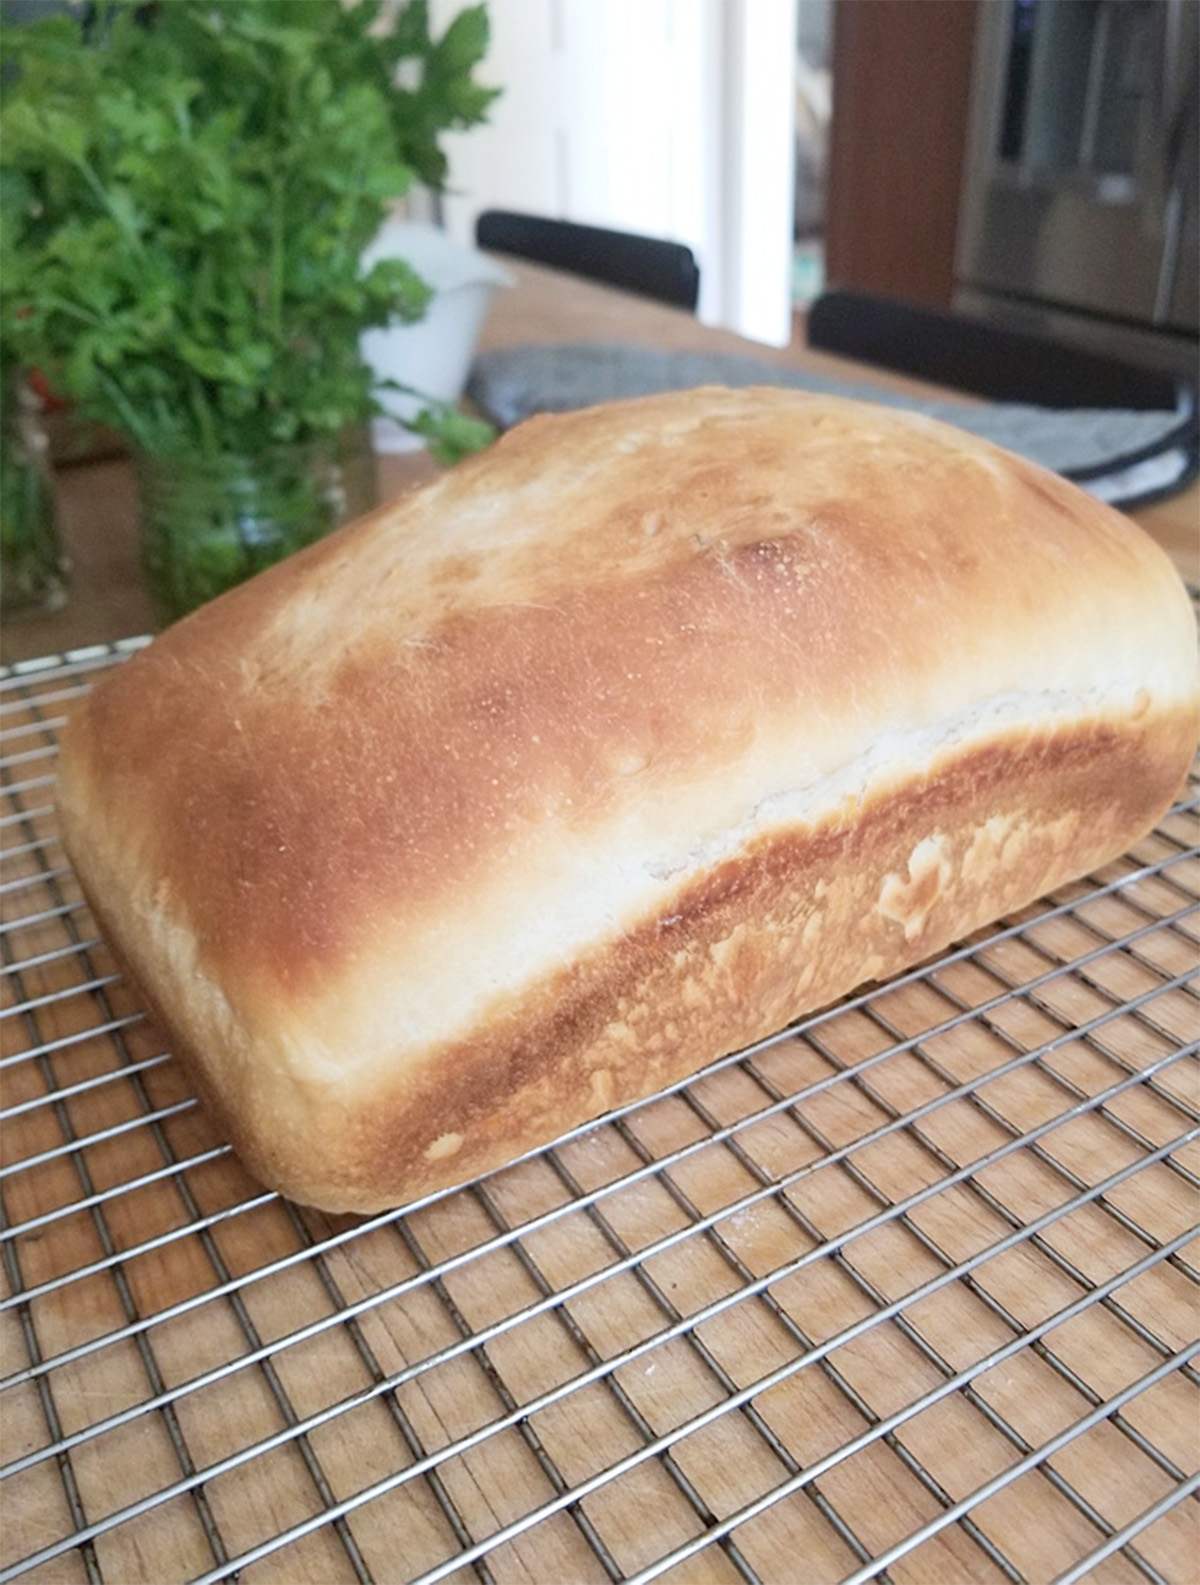
- Brush the loaf with egg wash and bake until the internal temperature reaches 200°F (93°C).
- Allow the bread to cool completely before slicing to avoid a gummy crumb.
Timeline Options (Same-Day or Overnight)
If your starter needs feeding, do so the night before or early in the morning on baking day.
Overnight option:
Mix the dough in the afternoon, allow it to ferment for 3–4 hours, then refrigerate overnight. In the morning, shape the loaf, place it in the pan, and allow it to come to room temperature and rise before baking.
To speed things up, you can briefly warm the oven, turn it off, and let the pan rest inside until the dough warms.
Same-day option:
Feed the starter the night before so it’s active in the morning. Start the dough early in the day and plan to bake by late afternoon or early evening.
Storage, Slicing, and Freezing
Sourdough sandwich bread keeps at room temperature for 2–3 days.
The loaf can be frozen whole or sliced for up to one month. Thaw at room temperature before using.
Troubleshooting Sourdough Sandwich Bread
Why Is My Loaf Dense or Heavy?
A dense loaf is usually the result of insufficient fermentation.
- The starter wasn’t fully active when the dough was mixed
- The dough didn’t ferment long enough during bulk fermentation
- The loaf was under-proofed before baking
Look for visible rise and a light, aerated feel in the dough rather than relying only on the clock.visible rise and a light, aerated feel in the dough rather than relying only on the clock.
Why Didn’t My Bread Rise Evenly in the Pan?
Uneven rise is most often caused by shaping or scoring issues.
- The dough wasn’t shaped tightly enough before going into the pan
- The seam wasn’t placed securely on the bottom
- The loaf wasn’t scored, or wasn’t scored deeply enough, before baking
Proper shaping creates internal structure, and scoring allows the loaf to expand evenly in the oven.tes internal structure, and scoring allows the loaf to expand evenly in the oven.
Why Is My Crumb Gummy?
Gummy crumb is usually caused by cutting the loaf too soon or by under-baking.
- The bread was sliced before it was fully cooled
- The loaf was under-proofed
- The bread was removed from the oven before it was fully baked
For best texture, allow the loaf to cool completely and bake until the internal temperature reaches about 200°F (93°C).°C).
Why Is My Bread Too Sour?
Sourdough flavor is strongly influenced by fermentation time, temperature, and starter hydration.
- Longer or cooler fermentation encourages the production of acetic acid
- A stiffer (lower-hydration) starter can increase sourness
For a milder loaf, shorten the fermentation time or keep the dough slightly warmer. For more detail on how fermentation affects flavor, see my Sourdough Baking Guide.
Frequently Asked Questions
Yes, but expect some changes in texture and hydration.
Whole wheat flour absorbs more liquid than all-purpose flour and may produce a slightly denser crumb. For best results, start by replacing up to 25% of the all-purpose flour with whole wheat flour. You may need to add a small amount of extra liquid to achieve the same dough consistency. Using a higher percentage of whole wheat flour will result in a firmer loaf with less rise and a more pronounced wheat flavor.
If you’re looking for a loaf designed specifically for 100% whole wheat flour, try my sourdough whole wheat bread recipe.
Yes. Most unsweetened non-dairy milks can be used in place of regular milk.
Non-dairy milk will still soften the crumb, but because it does not contain the same proteins as dairy milk, the texture may be slightly different. Choose an unsweetened, unflavored variety for best results.
You can substitute non-dairy milk in equal amounts without changing the rest of the recipe.
I know you hate to throw away that sourdough discard. Check out these recipes that use sourdough discard.
More Sourdough Sandwich Breads
- Whole Wheat Sourdough Bread
- Sourdough Hoagie Rolls
- Sourdough Multigrain Bread
- Sourdough Oatmeal Bread
- Sourdough Rye Bread
If you love this recipe as much as I do, I’d really appreciate a star rating and a quick comment. Ratings and comments help my recipes show in search results. Thanks!

Sourdough Sandwich Bread Recipe
Ingredients
- 8 oz whole milk (1 cup)
- 1 oz unsalted butter
- 8 oz active sourdough starter (1 cup, 100% hydration)
- ½ oz granulated sugar (1 tablespoon)
- 1 ½ teaspoons salt
- 12 ½ oz all purpose flour (2 ½ cups, see note)
- 1 large egg (for egg wash)
Instructions
- Warm 8 oz whole milk in the microwave to until scalding hot (just before it comes to a boil.) Stir 1 oz unsalted butter into the warm milk to melt. Set the milk aside to cool until it's slightly warmer than body temp.
- In a mixer bowl, combine the warm milk with 8 oz active sourdough starter, ½ oz granulated sugar and 1 ½ teaspoons salt and stir to combine. Add 7 ½ oz all purpose flour and stir until the batter looks like thick pancake batter. If using a stand mixer, change to the dough hook.
- With the mixer running, slowly add the remaining 5 oz all purpose flour until the dough gathers on the hook and clears the sides of the bowl. Knead for 5 minutes. If mixing by hand, stir in as much flour as you can then turn the dough out onto a floured surface and knead in the remaining flour.
- Remove the dough from the bowl onto a lightly floured surface. The dough should be soft and slightly sticky. Knead to form a smooth ball.
- Place the dough in an oiled bowl, turning once to coat the dough. Cover the bowl and set it aside at room temperature.
- After 60 minutes uncover the bowl, lift one side of the dough and fold it into the middle of the dough. Repeat with the other three sides of the dough then flip the dough over. You're basically turning the dough inside-out to redistribute the yeast and strengthen the gluten. Cover the bowl and after 60 minutes repeat the procedure.
- Cover the bowl and after 60 minutes fold the dough one more time. By now the dough should be lively, elastic and airy. If the dough is still sluggish give it another hour or two at room temperature. If you want to finish making the bread in the morning return the dough to the bowl, cover tightly and refrigerate overnight. The next morning continue with shaping. Otherwise continue shaping the loaf on the same day.
- Grease a 9"x 5" loaf pan with a very light film of vegetable oil.
- Turn the dough out onto a floured surface and without kneading out the air, gently push the dough to a 9" rectangle. Tightly roll the dough to form a log.
- Set the dough into the pan and cover with a damp kitchen towel or oiled plastic wrap. Set in a warm place and rise until the dough is doubled in size, about 2-3 hours. The exact time will vary based on the ambient temperature and the temperature of your dough.
- Preheat the oven to 350 °F. When the dough is ready, use a sharp knife or razor to cut a 1/2" deep slash down the center of the loaf. Brush the loaf with egg wash.
- Bake about 30-35 minutes until golden brown and the interior temp is 200 °F.
- Cool in the pan for 5 minutes before turning out onto a cooling rack. Finish cooling to room temperature before slicing.
Would you like to save this recipe?


As an Amazon Associate and member of other affiliate programs, I earn from qualifying purchases.
Fantastic recipe! I am struggling to get the high grade and wholemeal flour I use for my usual sourdough baking and this works brilliantly with the medium protein flour I have been able to find. Thank you.
You’re welcome. It also freezes really well. I have a sliced loaf in the freezer now. Often, instead of throwing away starter, I’ll bake extra loaves and freeze.
Hi, I was just reading through comments and came upon yours. I am a sourdough newbie and like most people viewing and testing out Eileen’s recipe, I am loving it! I was buying four from the supermarket, and somedays flour is hard to come by with everyone at home becoming bread bakers…LOL!
I actually went directly to the source and purchased a variety of whole meal flour from a mill. Yes, the flour is higher in price, but also higher in quality. They actually have the date on the flour bag when the flour was milled.
The mill I went to was Sunrise Flour Mill our on MN, but they are just one of many you can purchase from directly. I actually purchased two of the blends in 10 lb bags.
I made this for the second time today and it turned out a lot better second time round (I think I missed a few steps the first time, oops!) Really enjoyed the texture of the bread and the fact that it can be sliced so thinly – a lot of homemade breads I make have to be sliced a lot thicker. Enjoying the time at home to experiment with different breads, so thanks for the recipe!
*second time in a week, not second time today, oops
Thanks for this recipe! We love it soooo much
Wondering if it would turn out if I substituted part whole wheat or if it will then lose its softness and wonderful texture? Any chance you’ve tried?
Hi Hailie, yes you could substitute some of the flour with whole wheat flour. You could probably use about 1/2 to 1 cup of whole wheat flour. I would start with 1/2 cup and if you like that you can try adding a bit more whole wheat next time.
Thank you! Excited to try this modification today
I’m unclear on step 7. I will be using the refrigerator method, but how long am I knead the dough before it goes into the fridge?
Typo… but how long am I to* knead the dough before…
Sorry, that wasn’t very clear. I’ve edited the recipe to make it clear that at that point you will repeat the “folding” procedure. I just made this bread myself today and it is a really good sandwich bread.
Ok,gotcha! Thanks for replying so quickly – appreciate it!!
I should also note that I made the dough for this bread yesterday and just let it hang out on the kitchen counter all afternoon and just put it in the refrigerator when I went to bed. The time is very, very foriving.
I made it yesterday\today and it was delicious! The whole family loved our sandwiches. Thanks for the recipe!
You are welcome!
Hi, I’ve recently been baking a lot of artisan sourdough breads. The crust is crispy, inside soft and chewy. I mean I’ve tried store bought artisan loaves and their texture is the same as mine. Mine actually taste better lol.
Every recipe I’ve used takes four ingredients- flour, water, salt and starter. I’ve cooked inside Dutch ovens for better oven spring and it works wonderful. But my wife wants a soft crust. A really good bread for sandwiches. These artisan loaves are delicious with soups and spreads, good as toast or even a slice by itself but I just don’t believe they’re meant for sandwiches unless I’m doing something wrong.
I have a cinnamon roll dough recipe that I’ve actually used for breadsticks, dinner rolls etc – it’s amazing. How can a dough meant for cinnamon rolls turn out so perfect as a dinner roll. So soft, airy, buttery and fluffy. I’m addicted to the rolls. What’s the difference? It seems only milk, eggs and sugar.
I’m new to all this so bare with me – but what makes sourdough “sourdough” – is it the fact I’m using a starter? I’m also still working on getting more tang, four loaves this week and still not as tangy as I’d like it. Retarding overnight seems to be doing something but still not where I want it to be. I’m driving my wife insane. My first loaf was sour and now 4 loaves later barely sour. I want more tang lol. Please advise. I’m sorry for all the questions. I’m just going nuts lol. Any simple tip or trick that will definitely give me a more sour loaf of bread?
Hi Chris, I don’t know if you’ve made this recipe yet, but I think it’s the soft sandwich bread your wife is looking for. I agree that the artisan sourdough breads are delicious, but maybe not the best sandwich bread. In fact, I knead my crusty sourdough briefly before shaping just to knock out some of the biggest holes.
Yes, milk, eggs and sugar will tenderize the dough and could be baked in different forms.
Sourdough is infinitely interesting and since I closed my cake business I’m just now having time to play and experiment. I consider anything that starts with a starter with natural yeast a “sourdough”. A sourdough doesn’t necessarily taste sour. I’ve read lots of theories of how to get a more sour flavor in the dough. I think it’s about the types of acid produced as the yeast eats the sugar. The more time the dough spends in the refrigerator, the more acetic acid is produced as opposed to lactic acid. You may have noticed that if you leave your starter too long in the refrigerator without feeding it smells quite sharp. In the near future I plan to do some side by side bakes to test the different techniques. In the meantime, if you click on the recipe link at the top you’ll see a drop down menu. There’s an entire category of sourdough recipes you can try, including cinnamon buns and donuts that are to die for. Thanks for reading!
Mine gets less sour if I make bread more often which means I’m feeding it more often. It goes sour again when I feed it less.
Yes! I’ve found my dough has a nice sour flavor if I feed my starter every other day instead of every day.
I actually have 2 starters going. One that I feed every day, that makes lovely mild bread and cinnamon rolls as wells as the one I feed every other day-ish (only when it starts smelling sharp), that gives me much more typical “sour flavor”. Also I’ve found my starter is more sour if it is kept just a bit drier than most instructions recommend…I remember reading somewhere that the yeast that produces acetic acid prefer a slightly drier environment vs the ones that prefer a slightly wetter environment.