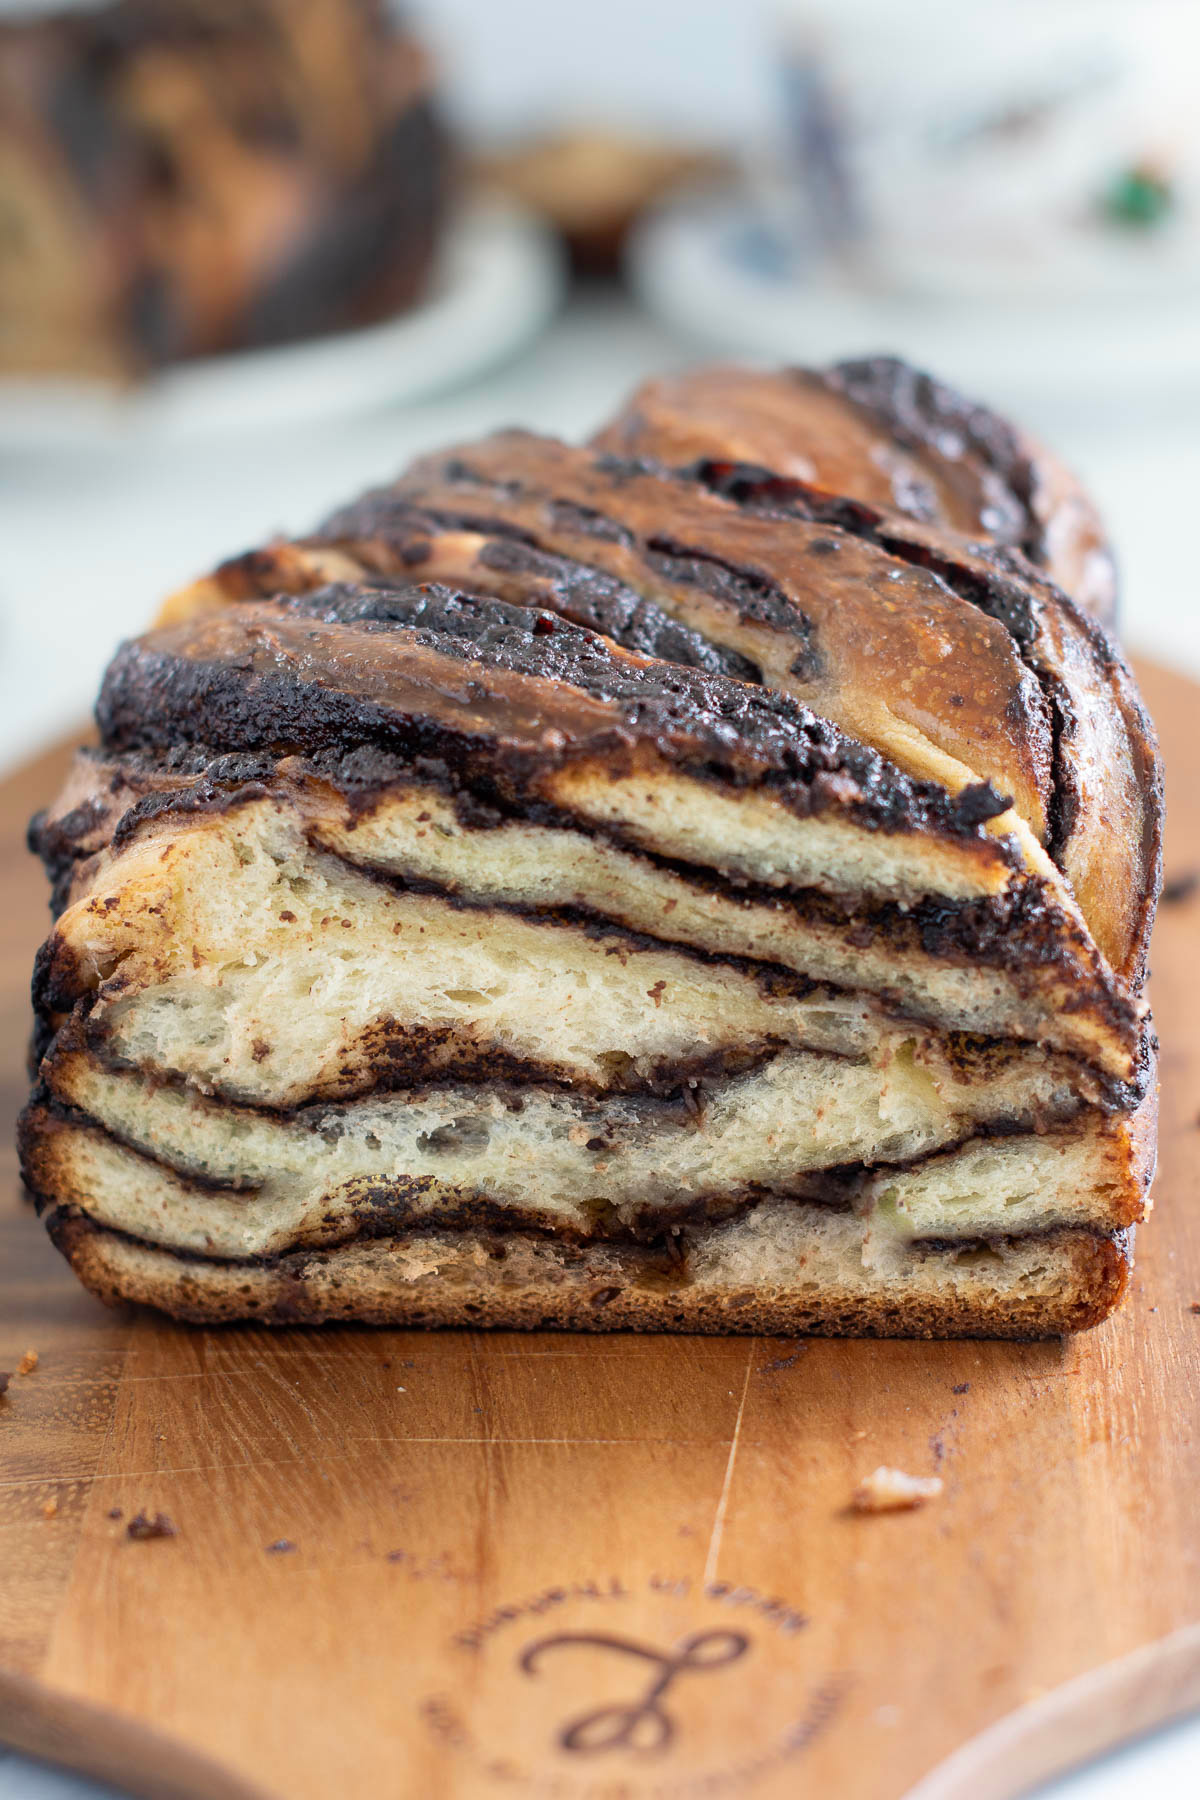
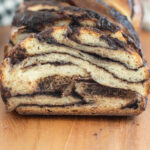
Chocolate Babka
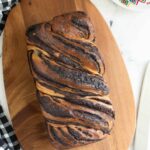
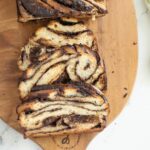
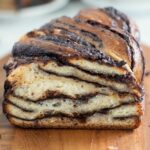
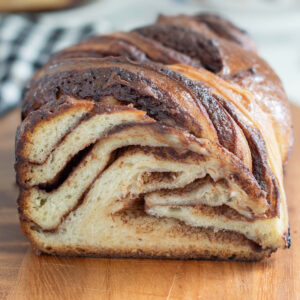
Chocolate Babka is made with soft, buttery brioche dough rolled around a schmear of cinnamon-spiked chocolate, then twisted into a beautiful swirled loaf. The texture is light and silky, the chocolate rich and gooey. It’s everything you want in a bakery-style babka.
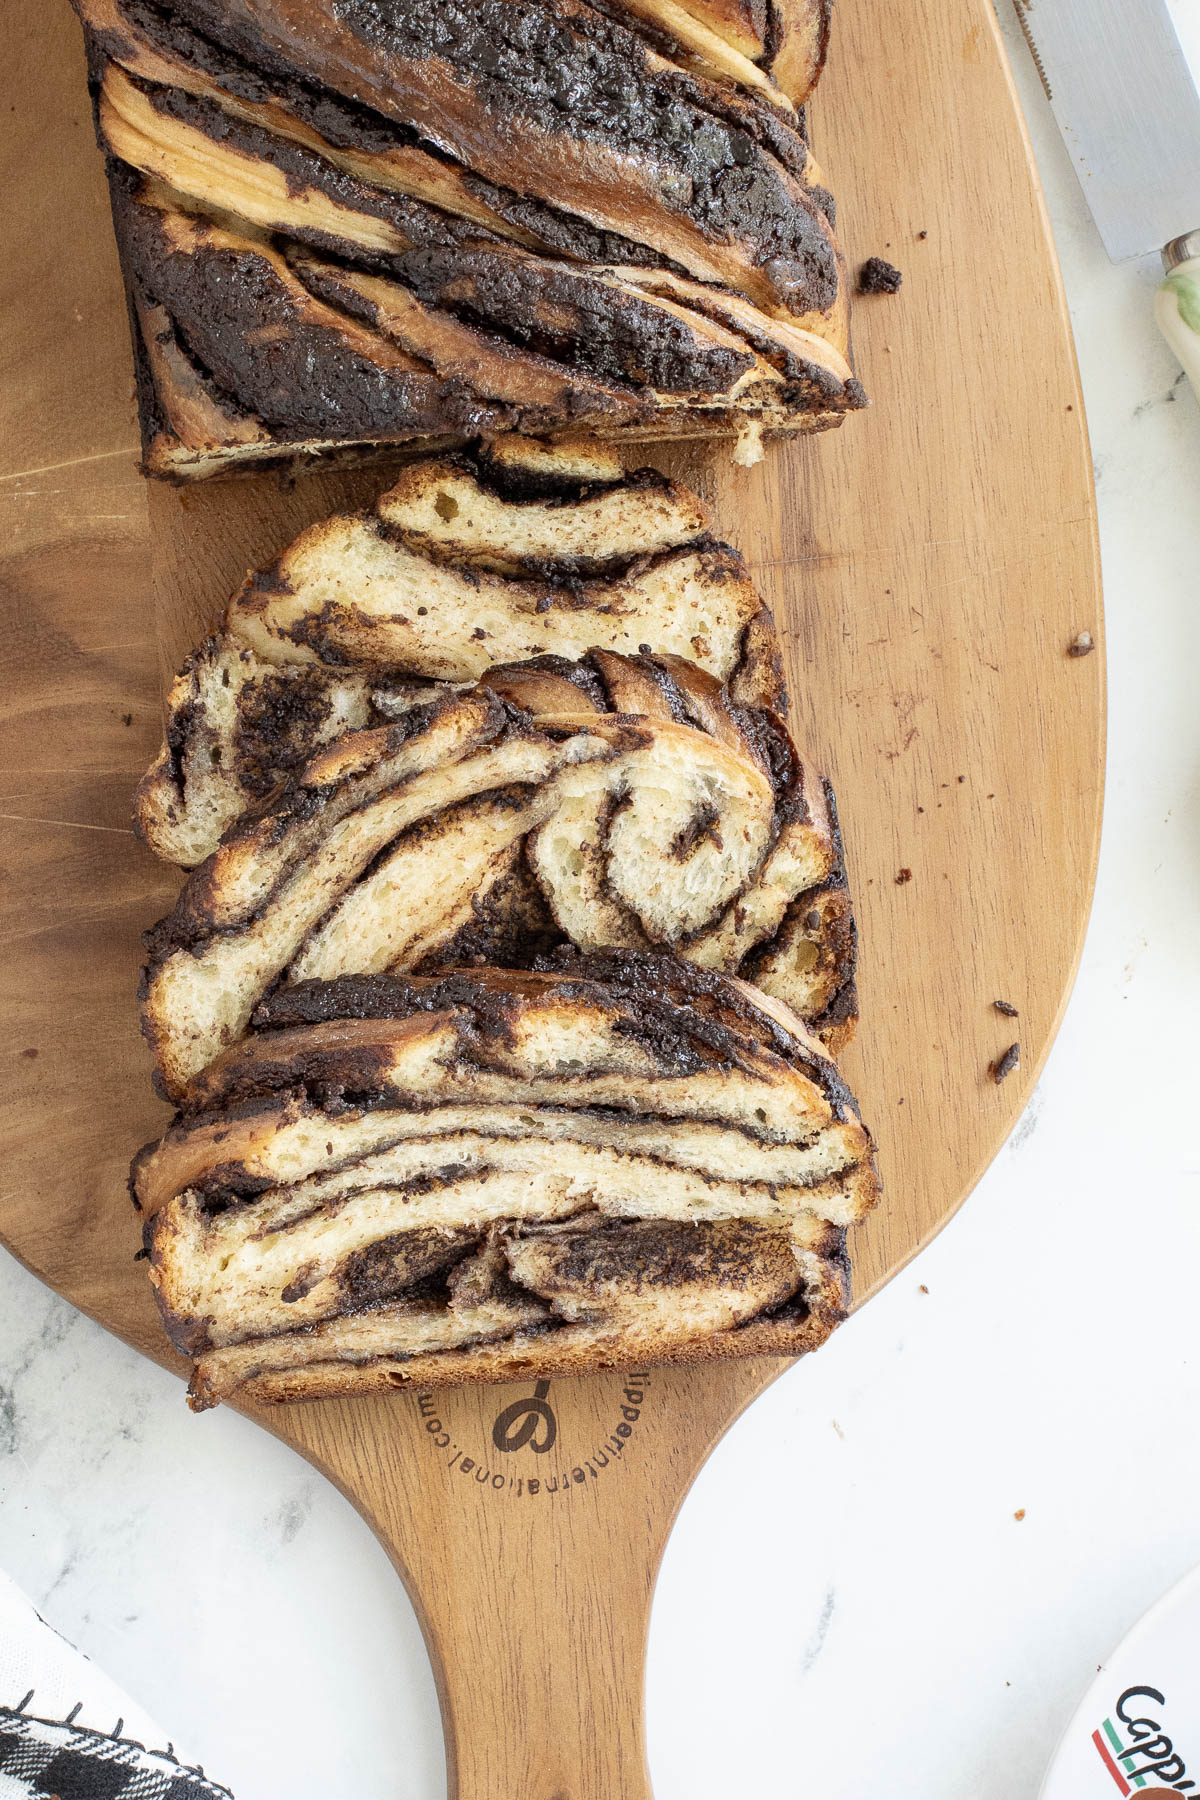
Table of contents
Why I Love This Recipe
When you’re ready for a splurge, this is the one. Breakfast, brunch, or an afternoon snack. The dough is soft and tender, the chocolate ribbon melts into every fold, and the cinnamon keeps the sweetness in balance.
A Quick Note About Babka
Babka originated in the Eastern European Jewish baking tradition. It’s made from enriched dough (similar to brioche or challah), rolled around a sweet filling, then twisted to show off the swirls.
Modern babka tends to be denser and richer than loaf-style brioche because the chocolate filling influences the dough as it bakes.
Overnight Schedule (Why It Works)
This dough benefits from a long, cool fermentation, which develops flavor and makes the dough easier to handle. Mix the dough the day before, rest it overnight in the refrigerator, then shape and bake in the morning.
A relaxed baking schedule is always a bonus.
If you keep a sourdough starter, try my Sourdough Chocolate Babka for a naturally fermented flavor.
Ingredients
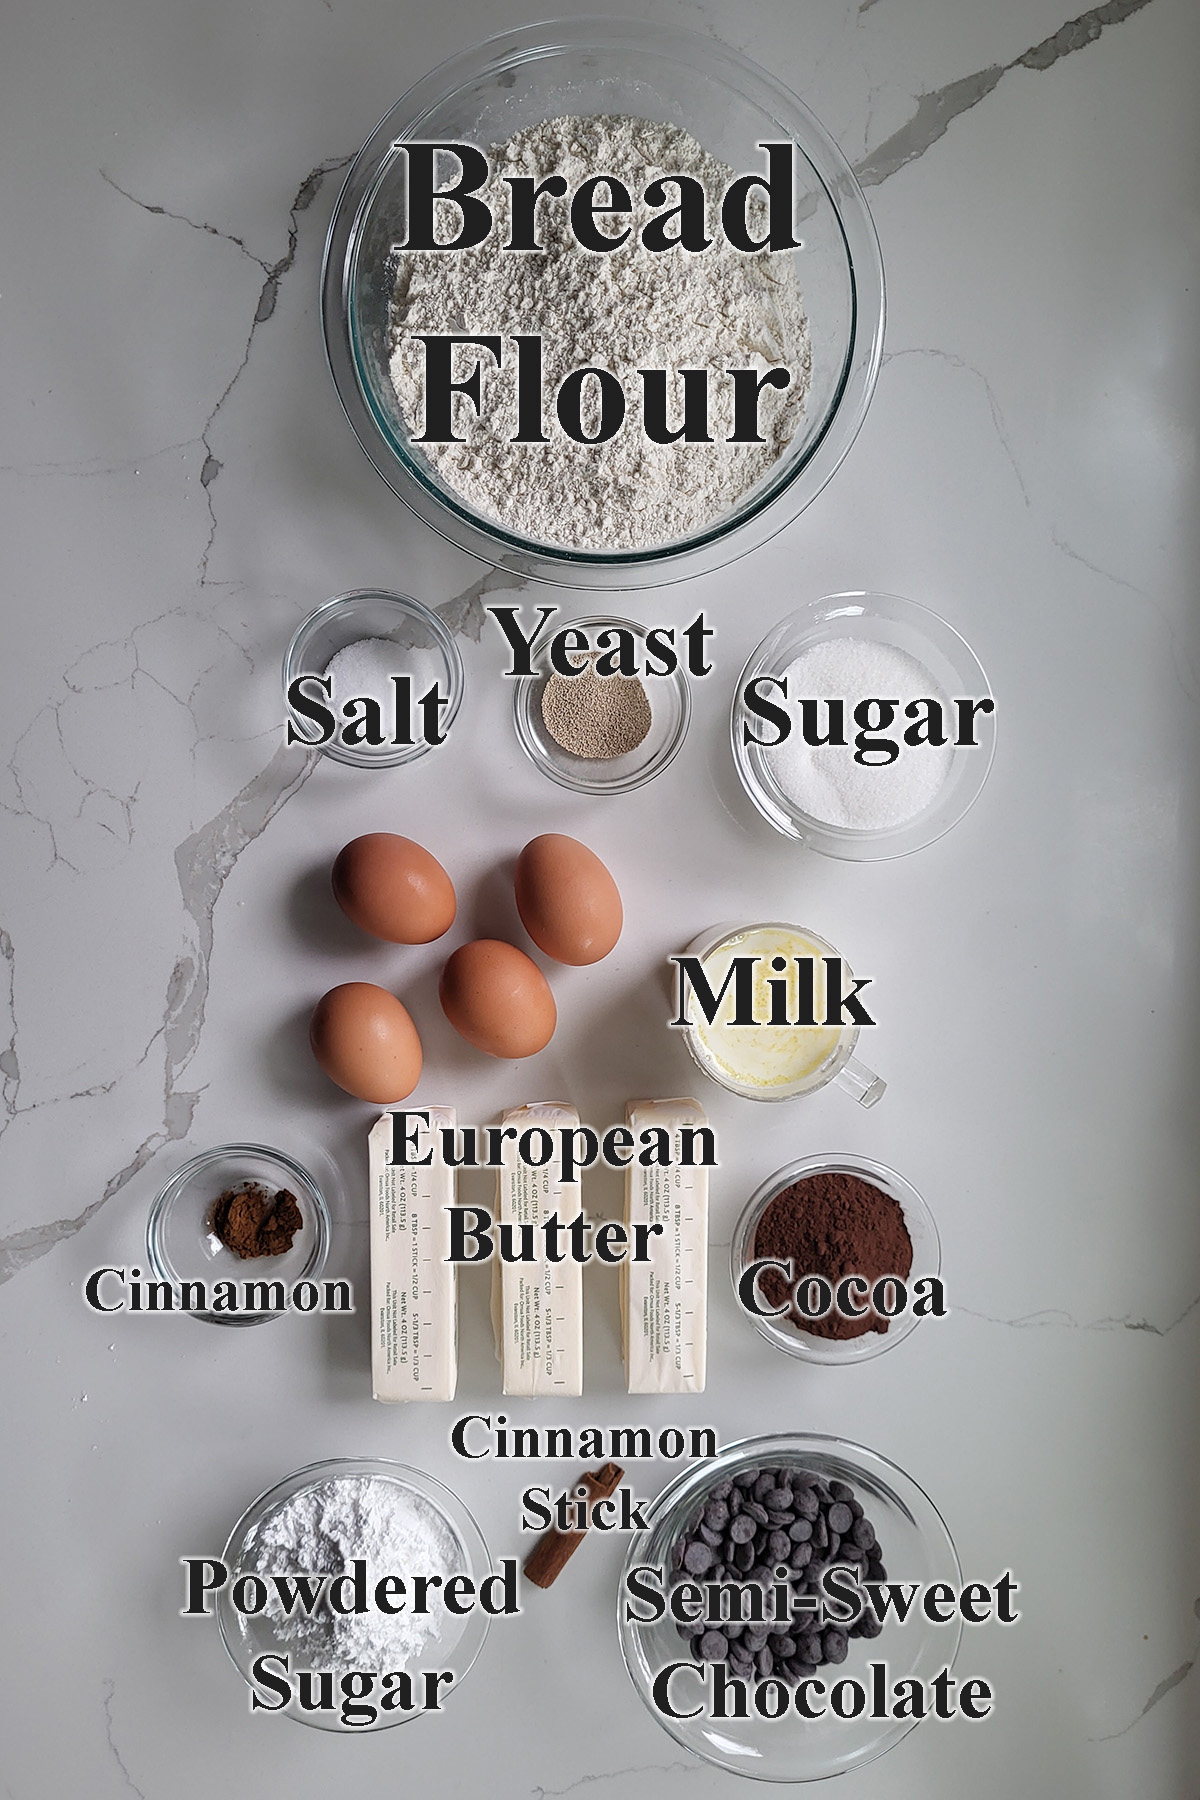
Ingredient Notes
- Bread Flour
Higher protein means stronger gluten development. This elasticity is what allows the twisted loaf to hold its shape. - Active Dry Yeast
Active dry yeast is well-suited to longer fermentation. It dissolves gradually and supports the slow, steady rise we want in enriched dough. - Milk & Egg
These enrich the dough for a soft crumb and supple texture. - Butter
Due to it’s higher fat content, European butter is easier to incorporate into the dough. You can use American butter if you soften it to a pliable texture before adding it to the dough. - Chocolate & Cocoa Powder
Use a good quality semi-sweet chocolate for the filling. Natural or Dutch-process cocoa both work — Dutch will give a deeper flavor. - Cinnamon
Cinnamon complements chocolate and balances sweetness.
If you prefer a pure chocolate flavor, simply omit it — or try the Malted Chocolate Variation below.
Process Photos
Here’s what the dough and shaping process look like at each stage. Refer to the recipe card below for measurements and exact instructions.
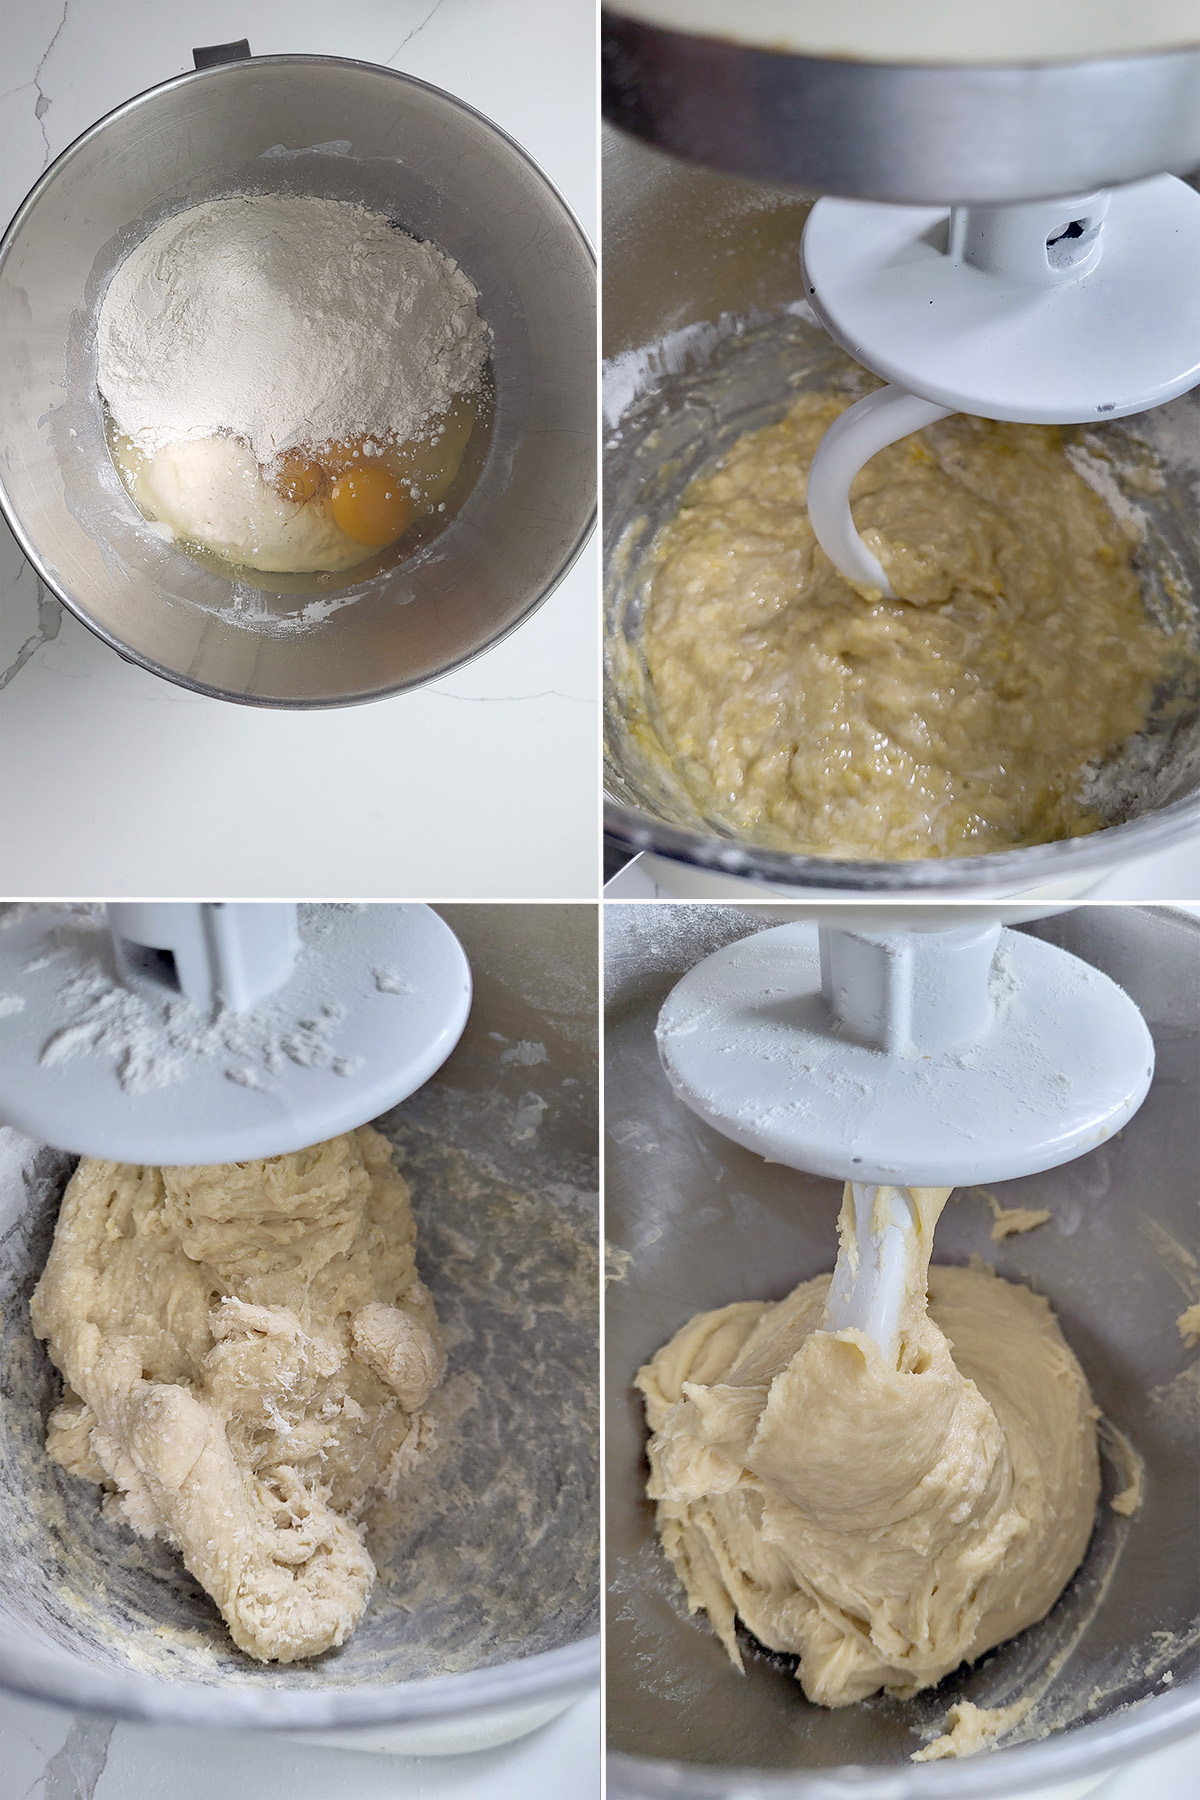
- Form a sponge with the milk, yeast and a portion of the flour. After 30 minutes add the eggs, sugar, salt and more flour to form a thick batter.
- Mix until combined and switch to the dough hook.
- Add the remaining flour to form a shaggy dough.
- Knead until the dough clears the sides of the bowl.
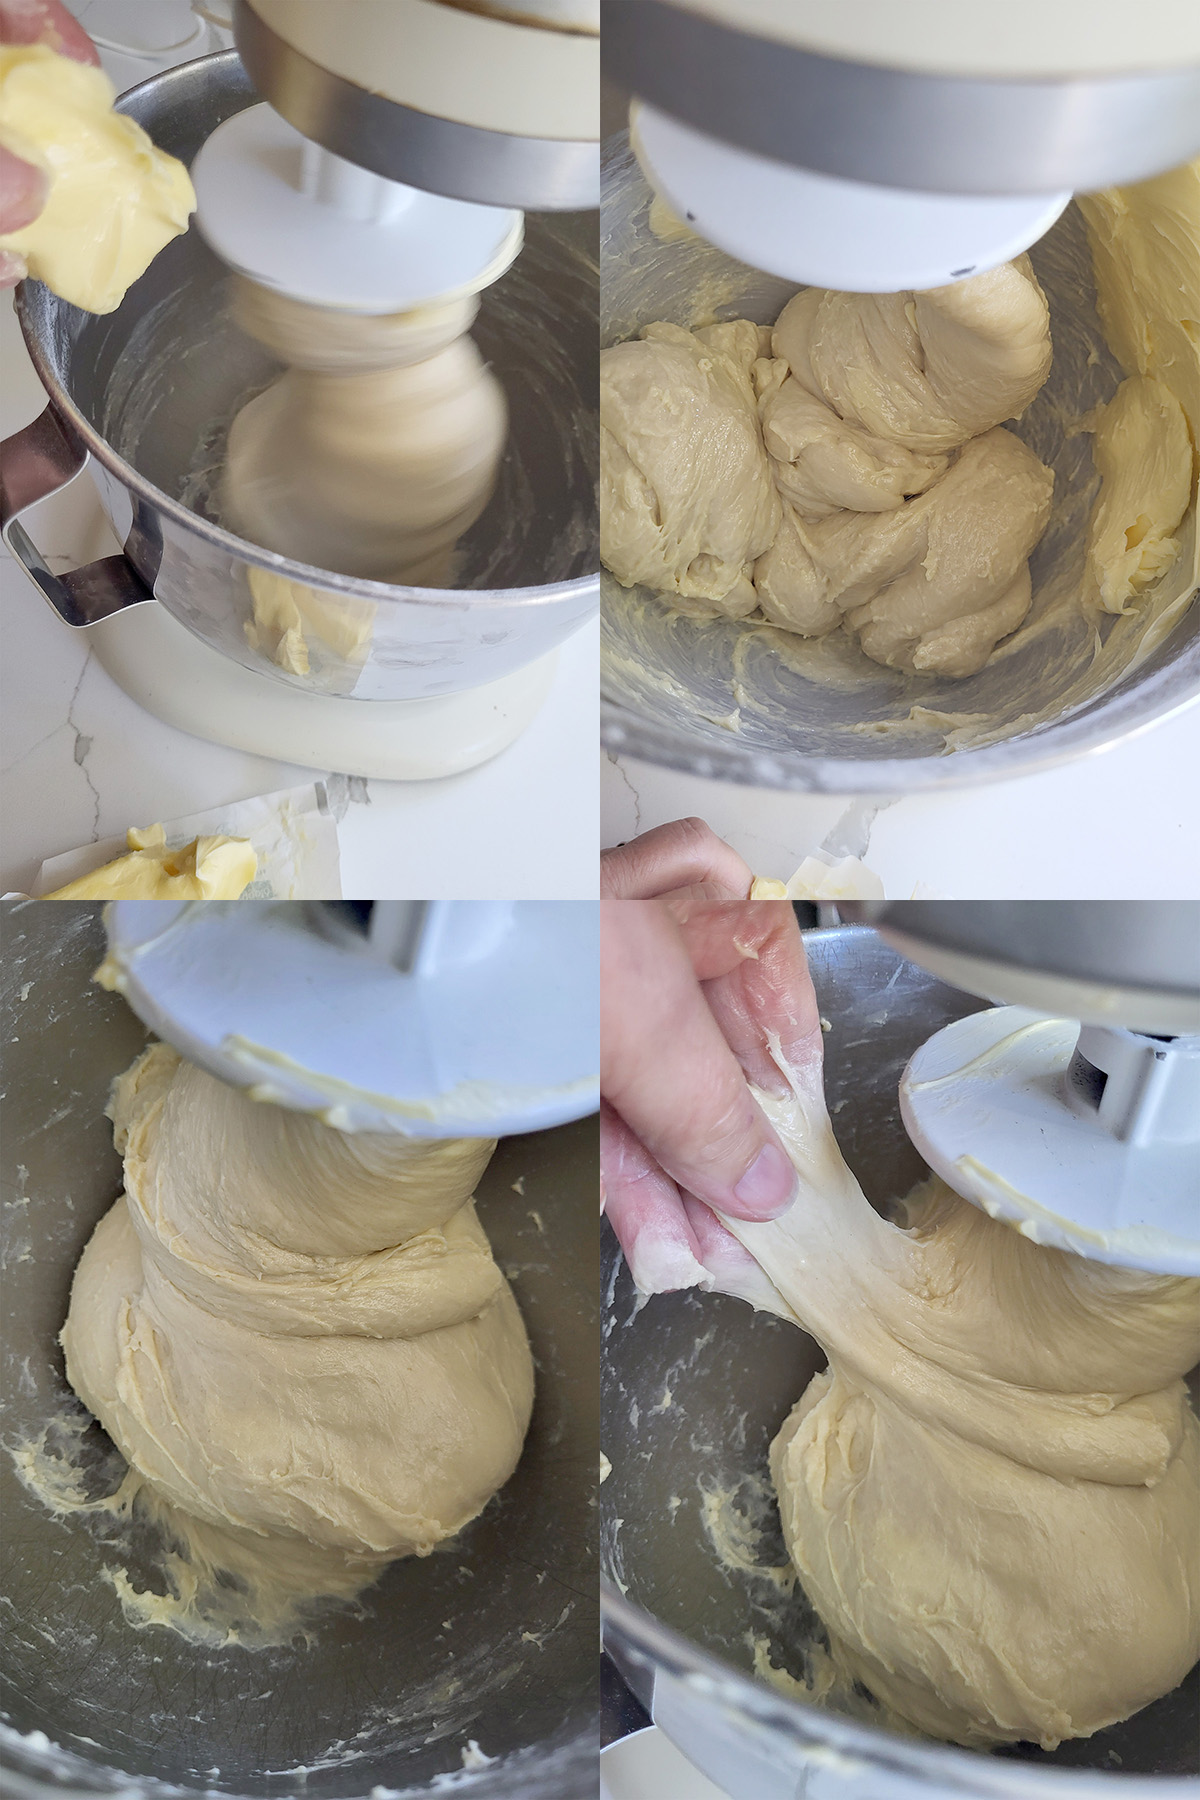
- Add the butter gradually with the mixer running.
- The dough will break apart; scrape the bowl if butter sticks to the sides.
- Continue kneading until the dough comes back together and clears the sides of the bowl again.
- The dough will be soft but strong and elastic.
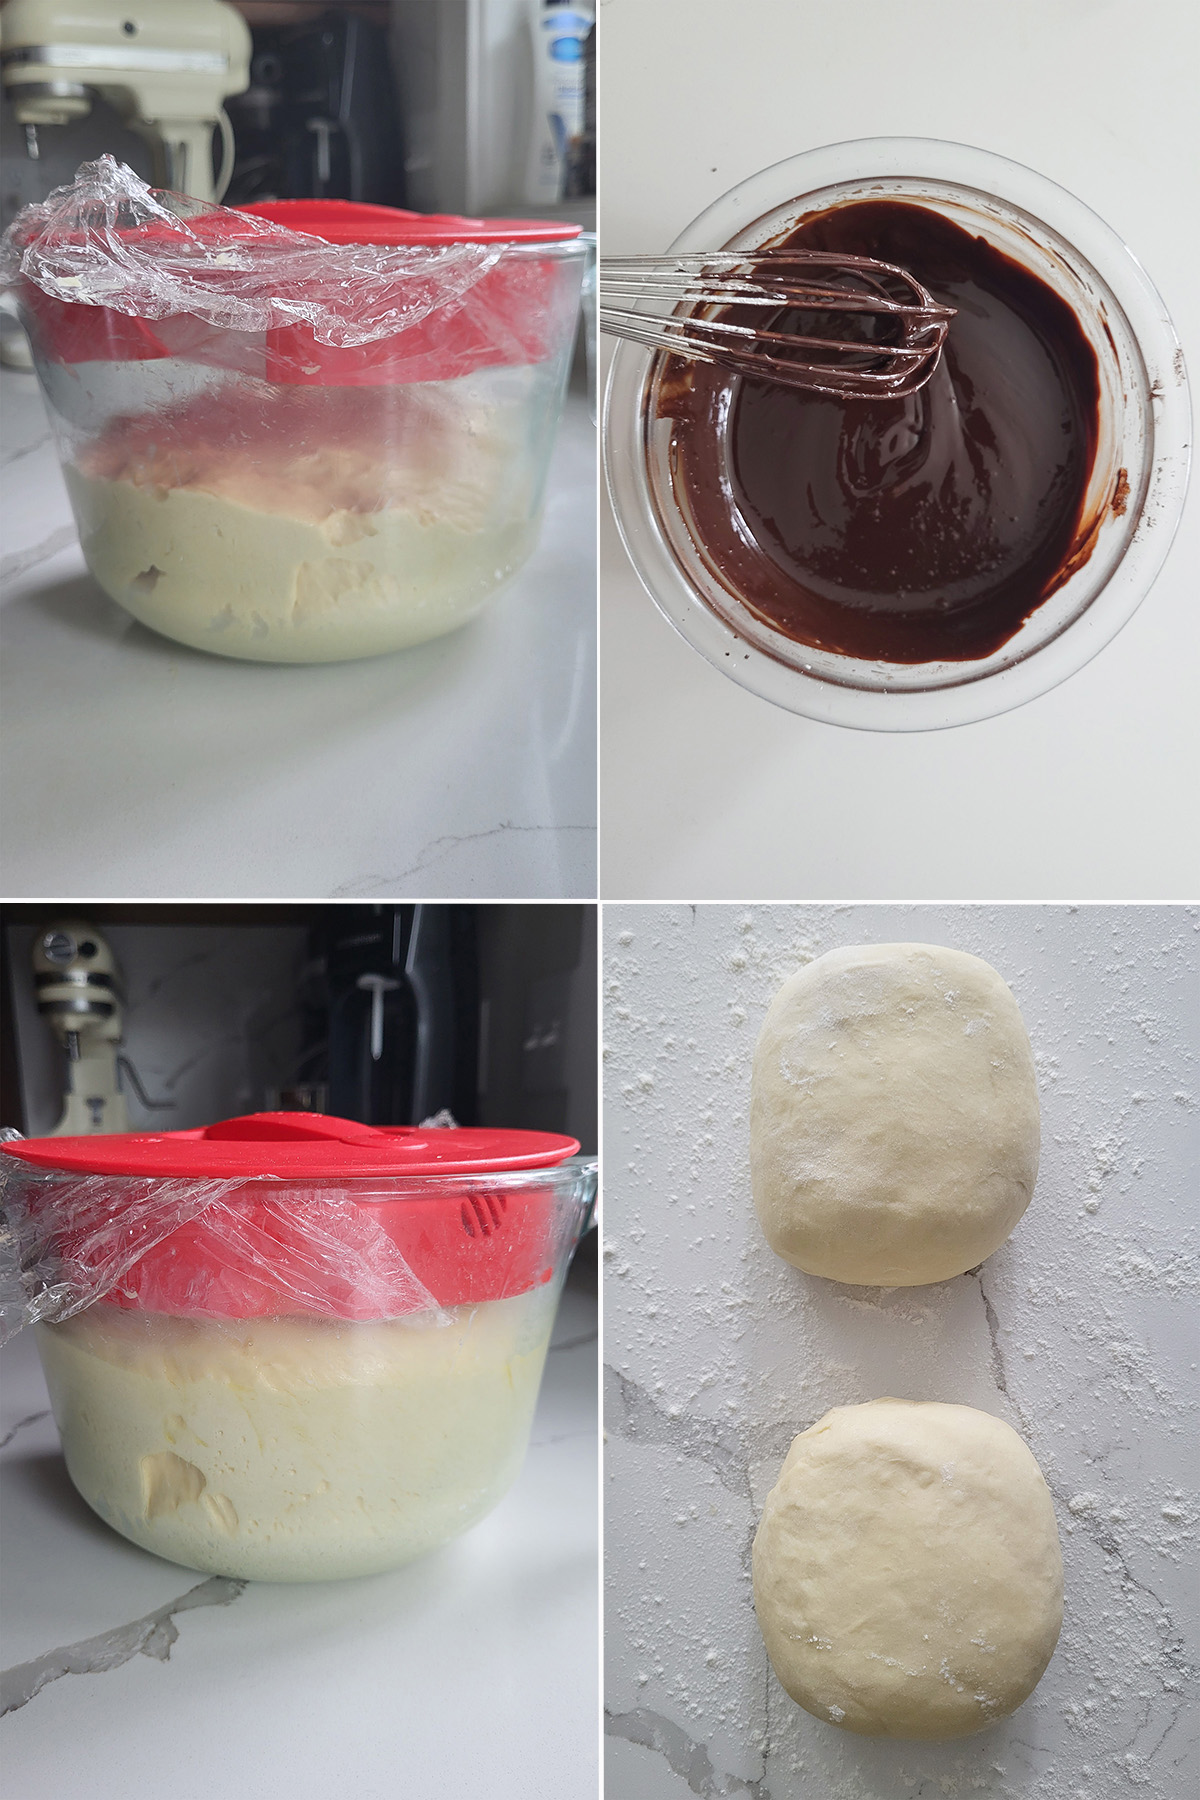
- Allow the dough to rise until doubled in volume.
- Make the filling and set aside to cool.
- Refrigerate the dough overnight.
- The next day, divide the chilled dough in half.
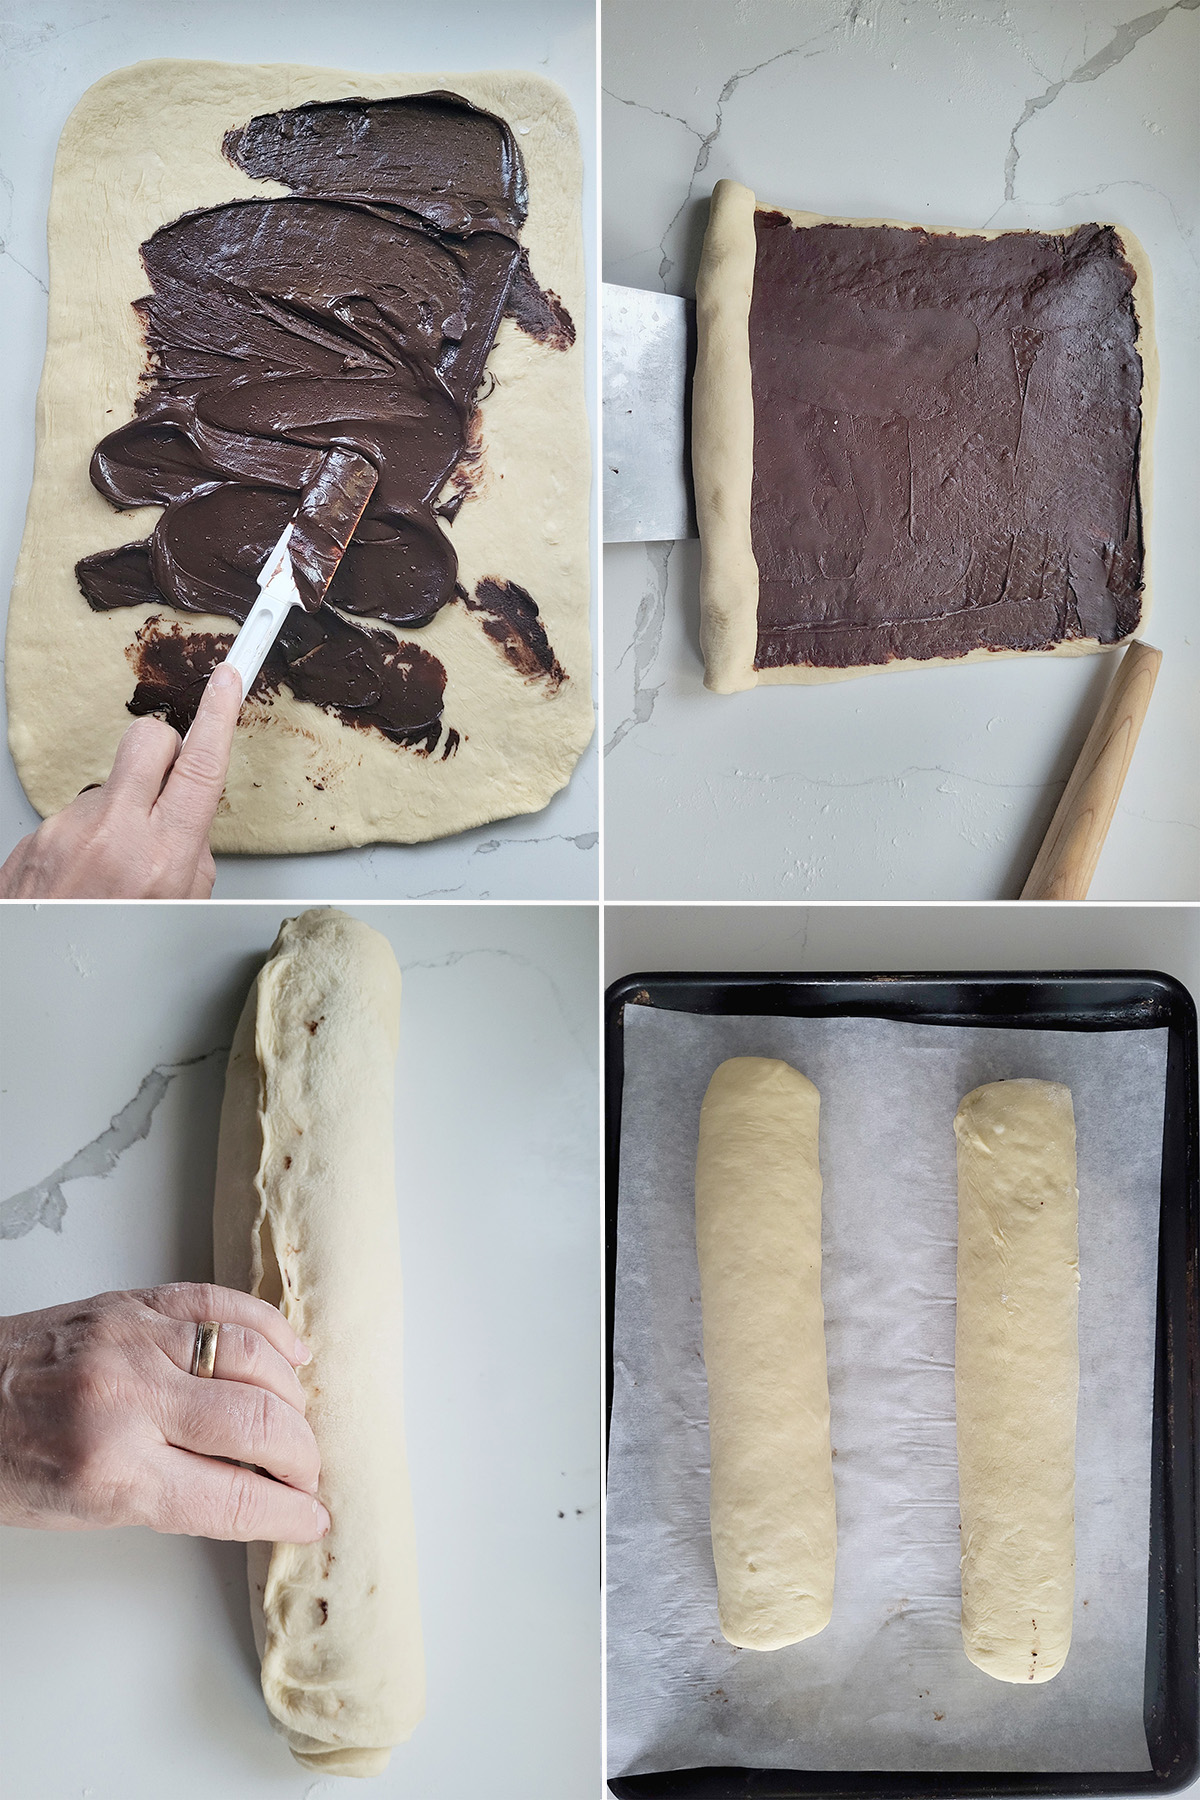
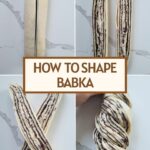
- Roll, fill, and shape the logs. Freeze briefly to make splitting easier.
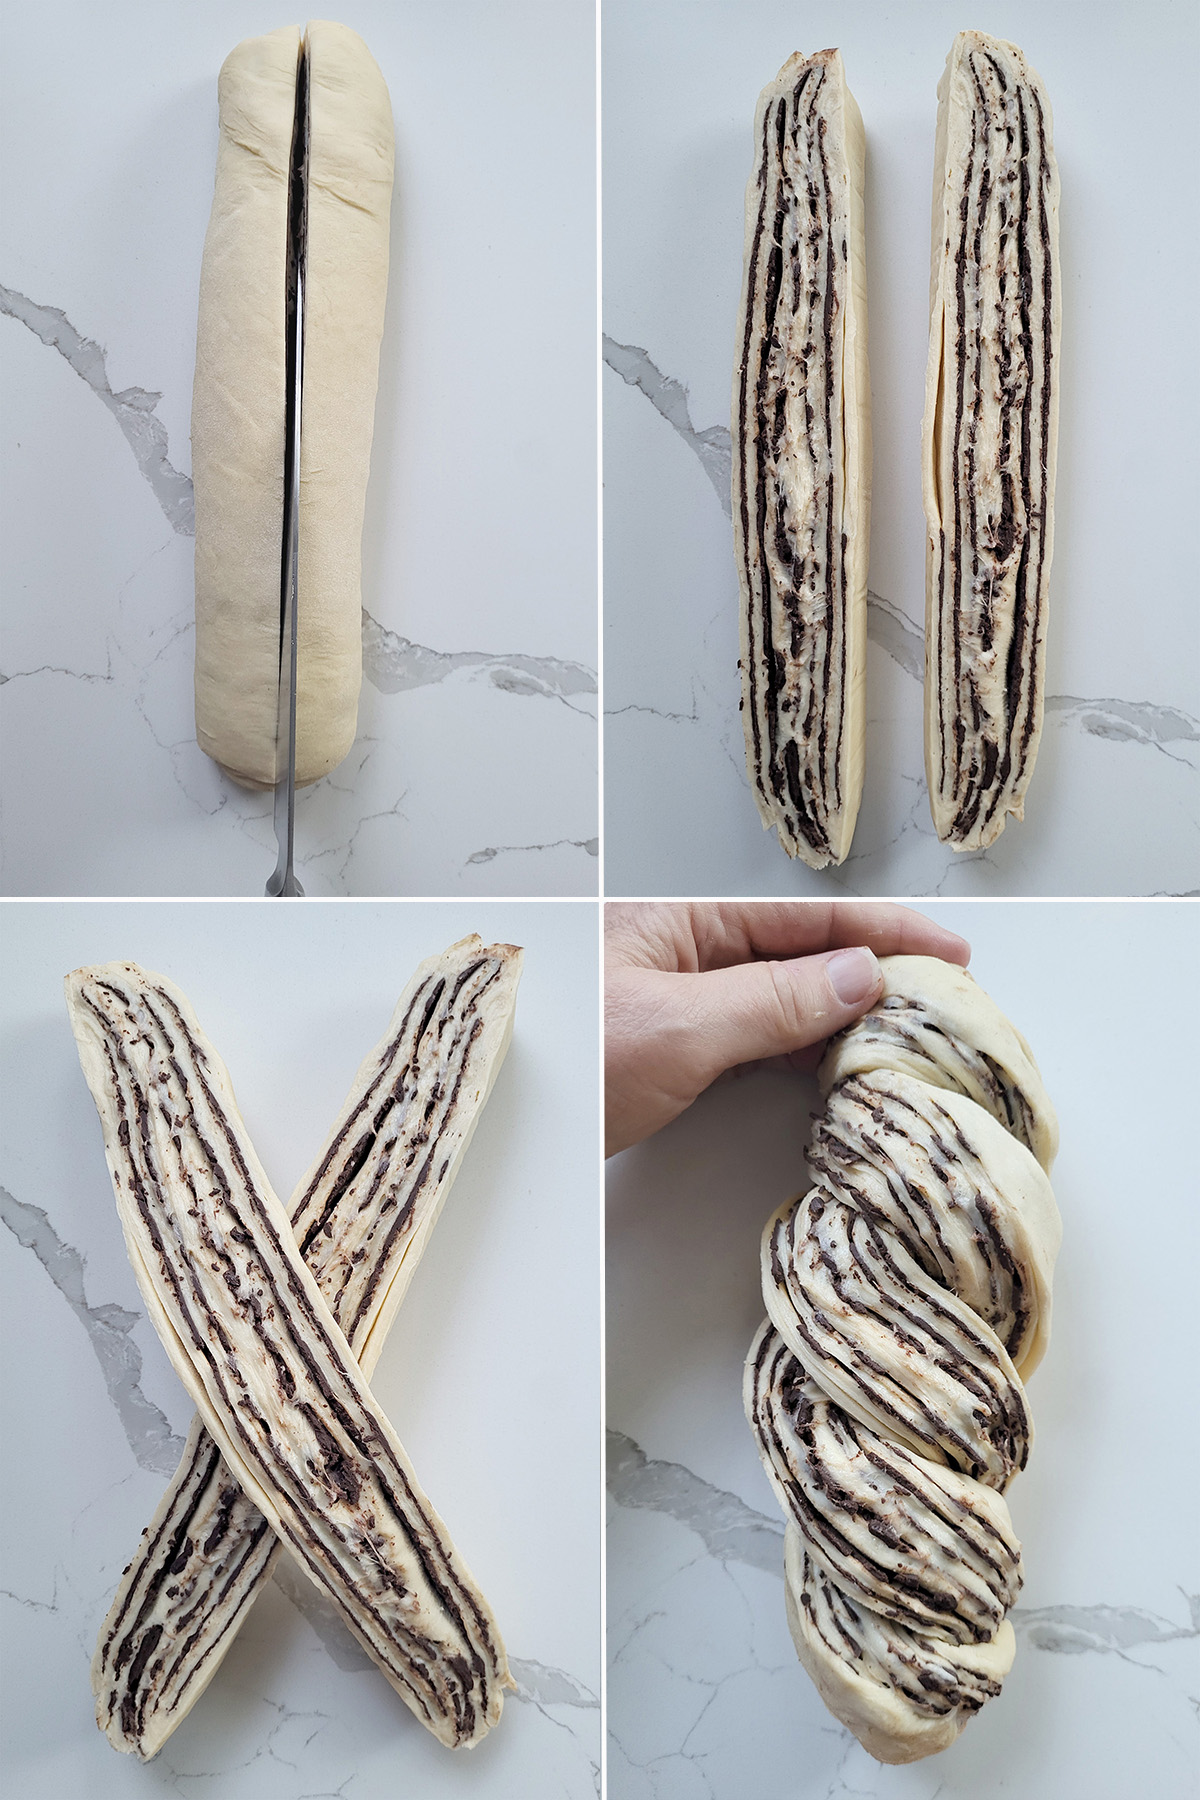
- Split the logs lengthwise and twist into a coil.

- Place in pans, allow the final rise, and bake.
- Turn out and brush with syrup. Cool before slicing.
Baking Sense Tip
Enriched doughs (made with butter, milk and eggs) rise more slowly than lean doughs. Sugar and fat slow yeast activity, so the bulk fermentation and final proof take longer. The overnight rest gives the dough time to relax and develop flavor.
Work-Ahead Schedule (At-a-Glance)
Day 1
- Mix dough
- Bulk ferment 1–2 hours
- Refrigerate overnight (up to 48 hours)
Day 2
- Shape while dough is still cold
- Final proof: 1–2 hours
- Bake and enjoy
Freezer Option:
At the shaping stage, the filled log (before final proof) can be wrapped well and frozen up to 1 month.
Variation: Malted Chocolate Filling
For a warm, toasty flavor, substitute 1 1/2 oz (5 tablespoons) malted milk powder for the cinnamon in the filling. Stir 1/2 oz (1 tablespoon) malted milk powder into the syrup (instead of the cinnamon stick). The malt deepens the chocolate flavor and adds a subtle old-fashioned sweetness.
Storage
Chocolate Babka is best the day it’s baked, but will keep 2–3 days at room temperature. For longer storage, freeze the loaf whole or freeze individual slices and rewarm lightly before serving.
If you love this recipe as much as I do, I’d really appreciate a star rating and a quick comment. Ratings and comments help my recipes show in search results. Thanks!
Chocolate Babka
Ingredients
Dough
- 6 oz whole milk (¾ cup, scalded and cooled)
- 2 ¼ teaspoons dry yeast
- 20 oz bread flour (4 cups, see note)
- 4 large eggs (room temperature)
- 3 oz granulated sugar (⅓ cup)
- 1 ½ teaspoons salt
- 8 oz unsalted European butter (at cool room temperature)
Chocolate Filling
- 4 oz semi-sweet chocolate (finely chopped)
- 4 oz unsalted butter
- 2 oz confectioner sugar (½ cup)
- 1 oz dutch process cocoa powder (¼ cup)
- ½ teaspoon cinnamon
- ¼ teaspoon salt
Syrup
- 4 oz water (½ cup)
- 4 oz granulated sugar (½ cup)
- ½ Cinnamon stick
Instructions
Make the Dough
- In the bowl of a stand mixer with the paddle attachment, combine 6 oz whole milk, 2 ¼ teaspoons dry yeast and 1 cup (5 oz) bread flour. Mix to form a thick batter. Cover the bowl and set aside for 30 minutes. The sponge should become active and bubbly during that time.
- After 30 minutes uncover the bowl. With the mixer running, add 4 large eggs, 3 oz granulated sugar, 1 ½ teaspoons salt, and another cup of the flour. Mix until combined. Switch to the dough hook. With the mixer running on low, add the remaining flour.
- Increase the speed to medium and knead the dough for 10 minutes until it gathers on the hook, becomes smooth and silky and slaps the sides of the bowl.
- If you're using a European butter you might not need to work the butter if it's already pliable. While the dough is kneading, turn 8 oz unsalted European butter out onto the work surface and knead it with a bench scraper or pound it with a rolling pin until it's soft and pliable and has a similar texture to the dough. You want it pliable but not melted and greasy.
- Turn off the mixer and scrape any dough that may be sticking to the sides of the bowl. At this point the dough should be very stretchy and quite sticky. Turn the mixer to low speed and add the butter to the dough, a tablespoon at a time. The dough will break apart, keep adding the rest of the butter. Stop the mixer and scrape the sides if the butter builds up on the bowl. Increase the speed to medium and knead until the dough comes back together, gathers on the hook and again slaps the sides of the bowl.
- Turn the dough out onto a floured surface. The dough should be quite soft and a little sticky at this point. Form the dough into a large ball and transfer to a lightly buttered bowl.
- Cover the bowl and set aside at room temperature for 1½ – 2 hours until it doubles in volume. Turn the dough out onto a lightly floured surface. Knead the the dough to form a ball and return to the bowl. Cover and refrigerate at least 4 hours or, preferably, overnight. Chilling the dough will firm up the butter and make the dough easier to handle.
Make the Filling
- Place 4 oz semi-sweet chocolate and 4 oz unsalted butter in a microwave proof bowl. Microwave in 30 second increments, stirring in between, until the chocolate is melted. Whisk in 2 oz confectioner sugar, 1 oz dutch process cocoa powder and ½ teaspoon cinnamon. Set the filling aside to cool and firm up a bit. The filling can be made the day before when you make the dough and held at room temperature overnight. If the filling becomes very stiff microwave it in 10 seconds bursts until it's spreadable.
Assembly & Baking
- Butter two 9"x5" loaf pans then line the pans across the short side with a parchment sling (see process photos). Line a half sheet pan with parchment paper.
- Remove the dough from the refrigerator and divide it in half. Roll one piece of the dough to a 12"x16" rectangle. Spread half the chocolate filling over the dough, leaving a 1/2" border along the short sides. From the short side roll the dough to form a 12" log. Pinch the seam tightly. Transfer the log, seam side down, to the parchment lined sheet pan. Repeat those steps with the remaining dough and filling.
- Slide the pan with the dough logs into the freezer for 15 minutes to firm up the logs. This makes forming the loaves much easer.
- Remove the pan from the freezer. Use a sharp knife to slice one of the logs in half, lengthwise. With the filling sides up, criss-cross the two pieces of dough to form a large "X". Continue twisting the dough at least 3x on either end, keeping the cut sides up as best you can until you have one tight rope. Pinch each end of the rope together. Transfer the loaf, still with the cut side up, to one of the prepared loaf pans. Repeat with the other dough. At this point one or both of the loaves can be wrapped tightly and frozen to bake at a later date. (see note)
- Cover the pans and set them aside at room temperature to rise until the dough fills the pan, about 1½-2 hours. The dough is ready if you poke the dough and the dent slowly fills in. If the dent immediately springs back the dough is not ready.
- Meanwhile, preheat the oven to 350 °F. Bake the loaves until golden brown and the interior is 200 °F, about 35 minutes.
- While the bread is baking, combine 4 oz water, 4 oz granulated sugar, ½ Cinnamon stick and ¼ teaspoon salt in a small saucepan over medium-high heat. Cook until the sugar is melted and the syrup just begins to boil. Turn off the heat and set the syrup aside.
- When the bread is done baking, set the pans onto a cooling rack. Remove the cinnamon stick from the syrup and immediately brush each loaf generously using about half the syrup. 5 minutes later brush the loaves again with any remaining syrup.
- Allow the loaves to cool for at least 15 minutes before using the sling to lift the loaf out of the pan. Cool completely before slicing.
Would you like to save this recipe?


As an Amazon Associate and member of other affiliate programs, I earn from qualifying purchases.

Hello- I completed this bake yesterday following your recipe exactly. The only problem I had was spreading the filling after it was cooled – not as easy as your pic shows! Maybe I should have warmed it up a bit…. I did freeze one of the loaves; how would I proceed with that one when I am ready to bake again? I could not find any info in your post. Thanks for any input! And thank you for all your work in sharing your recipes and baking knowledge. Much appreciated by this home cook.
Hi Denise, Especially in the winter, the filling can stiffen up a bit once it’s cooled. I would microwave it in 10 seconds bursts just to soften until it’s easily spreadable. I’ll add a note to the recipe. Regarding the frozen loaf – I assume you froze it raw, before rising? If so, remove it from the freezer and set it into a buttered pan. Allow it to defrost completely and then rise until it fills the pan. Bake as noted in the recipe. I would take it out the night before, let it defrost and then hold it in the refrigerator until morning. You’ll have to use your judgement based on how warm you environment is and keep an eye on the dough.
Excelente explicación como siempre
Y este Babka vale toda la espera, es delicioso