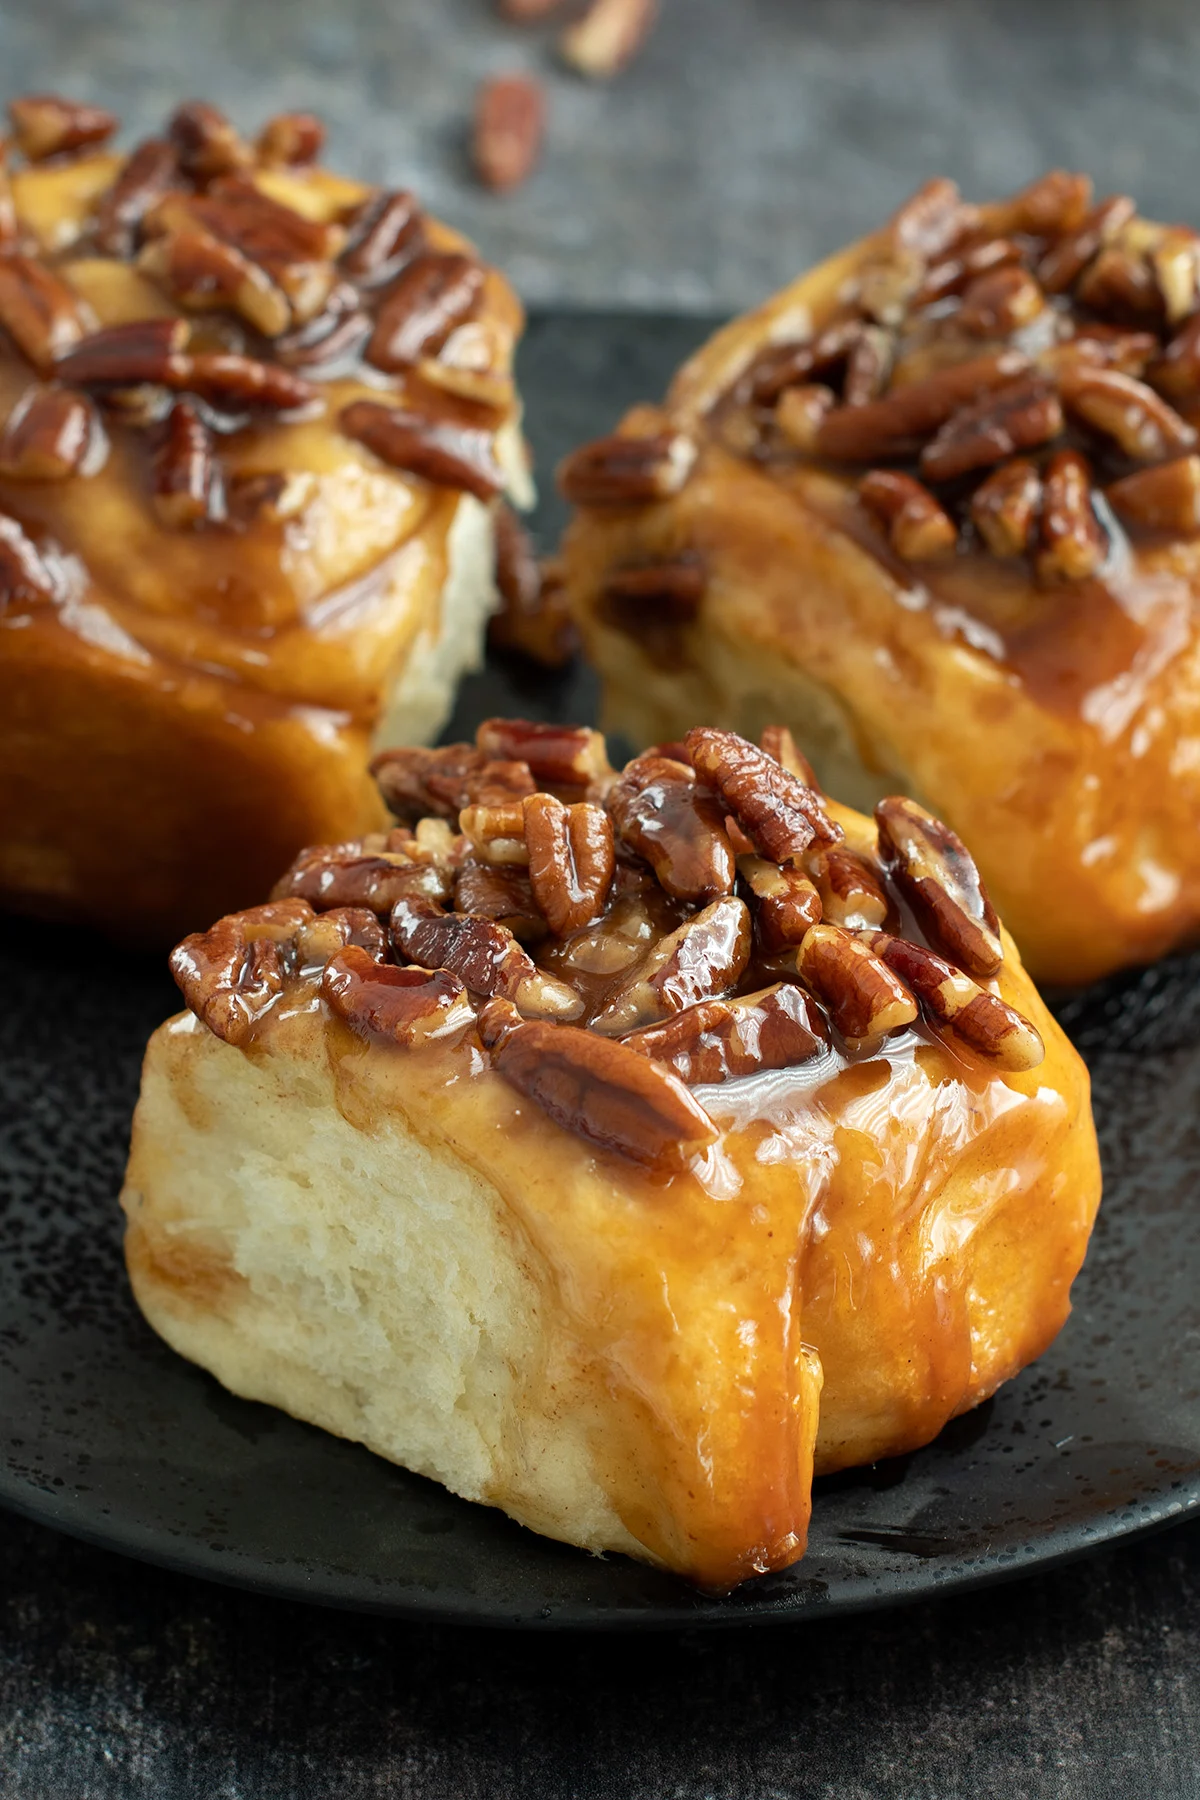
Sticky Buns
Sticky Buns rise in the refrigerator overnight so you can have an indulgent treat just an hour or so after you get out of bed. They’re loaded with brown sugar, cinnamon, caramel and pecans.
When you’re ready for a splurge, Sticky Buns are what you want for breakfast. Oozy, gooey, sweet and crunchy all in one delicious package.
Start the process the day before and all you have to do in the morning is preheat the oven and bake.
Ingredients
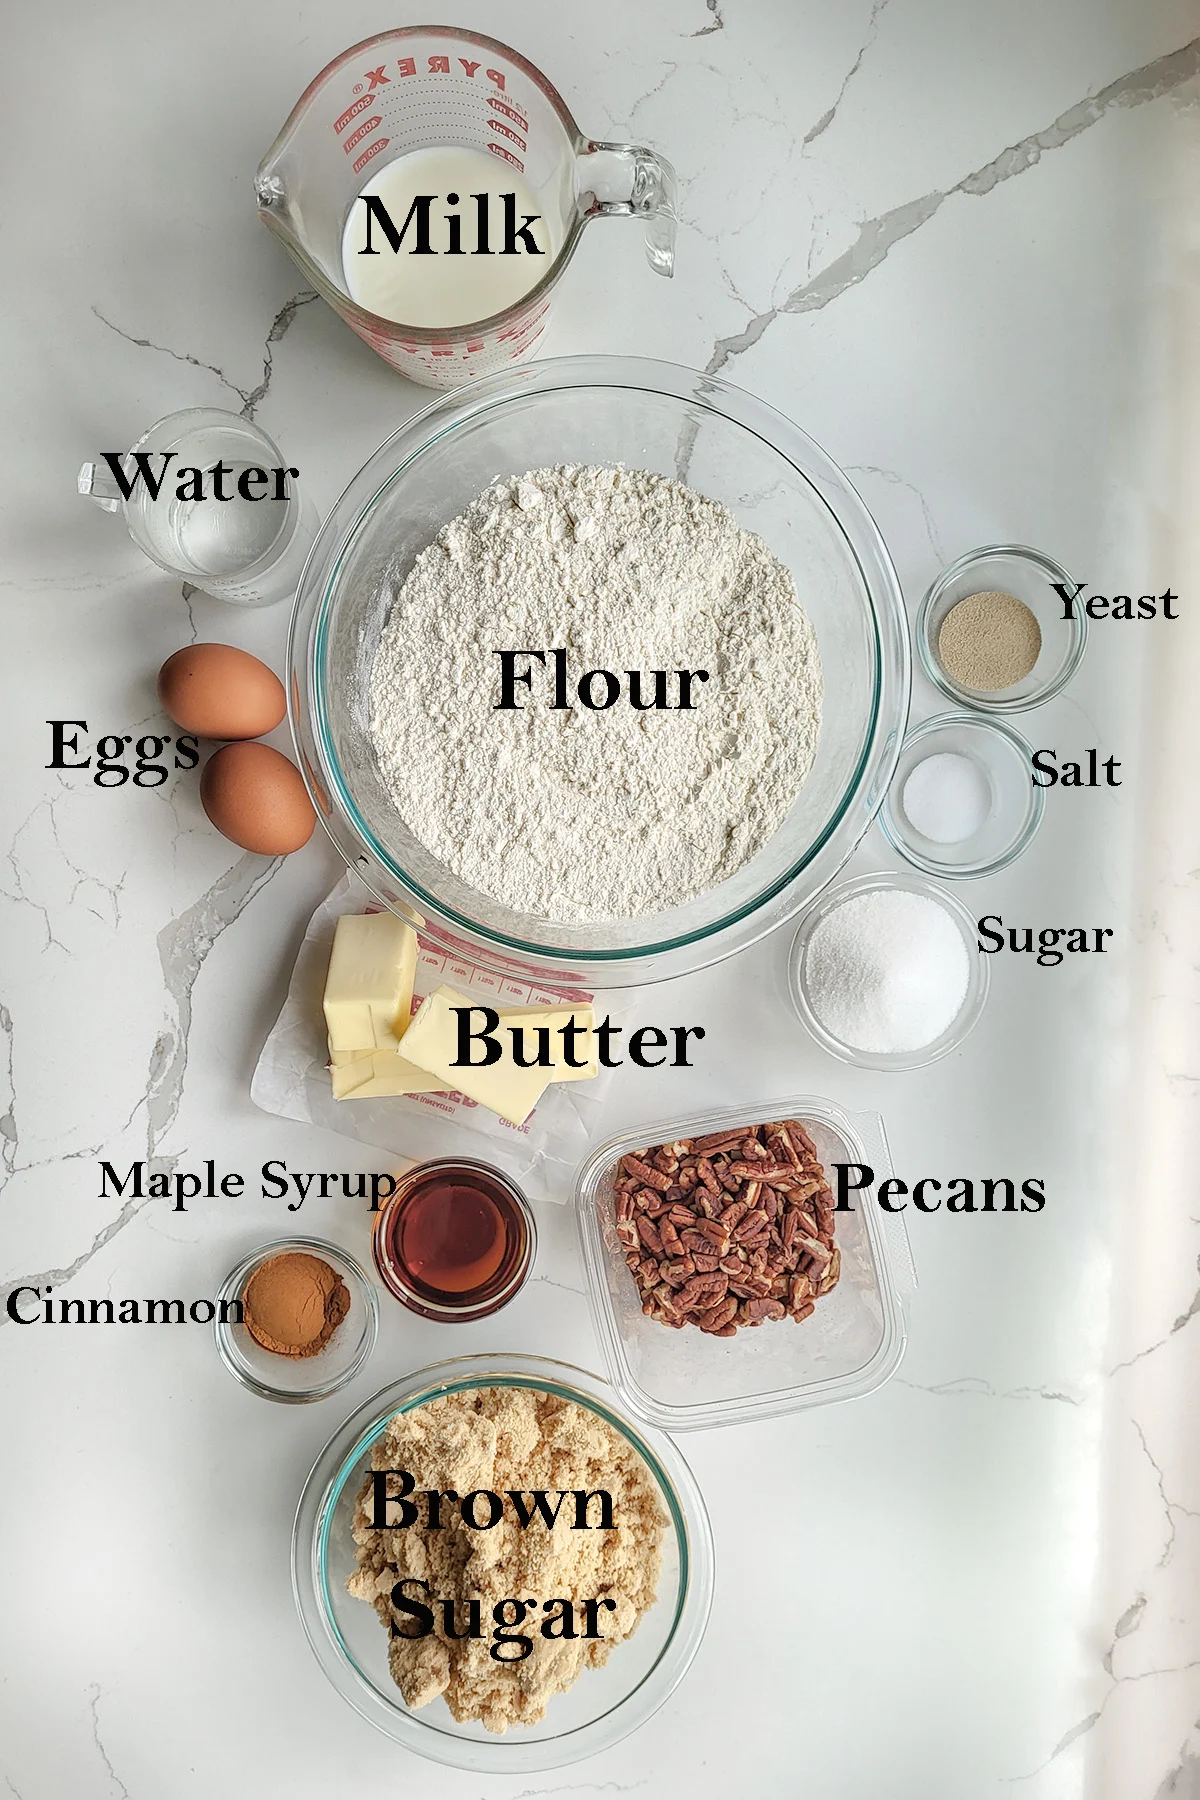
Ingredient Notes
- All purpose flour has a medium protein content which is perfect for making this enriched dough. The dough has nice elasticity from the gluten, but is still soft and tender.
- Instant Yeast – I prefer instant yeast to rapid rise yeast for a slightly slower rise.
- Milk, Eggs, and butter enrich the dough for a soft and pillowy texture.
- Maple Syrup – A little syrup keeps the caramel from crystalizing. You can substitute honey or corn syrup.
- Pecans are traditional for sticky buns, but you can bake the buns without any nuts or substitute walnuts or chopped almonds.
How to make Pecan Sticky Buns

- Combine the water and milk with the yeast.
- Add some of the flour and set the sponge aside for 30-60 minutes. While the sponge rests, the yeast will activate and the flour will absorb the water and begin forming gluten.
- Add the sugar, eggs and butter to the dough. Switch to the dough hook and add the remaining flour.
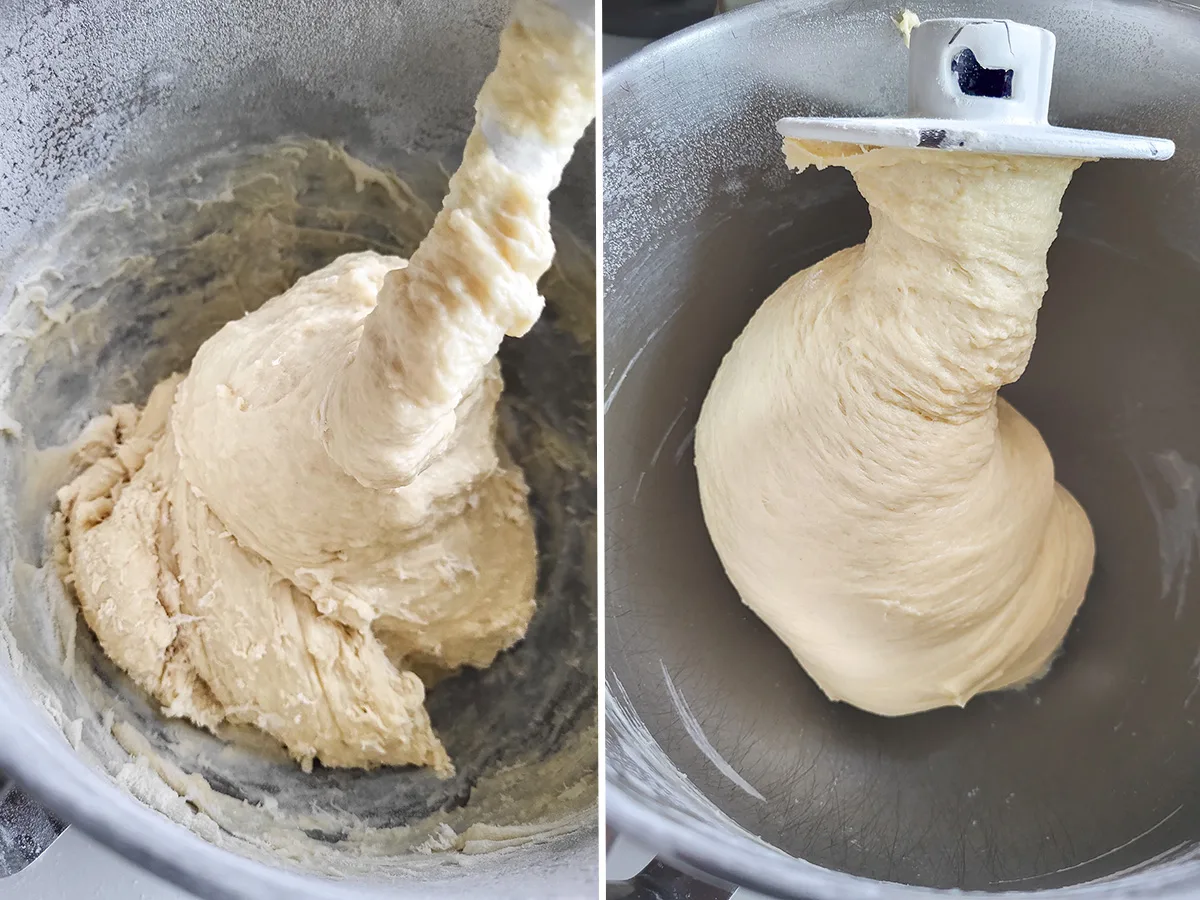
- The dough will be sticky and shaggy after the flour is added.
- After kneading, the dough should clear the bowl and cling to the dough hook.
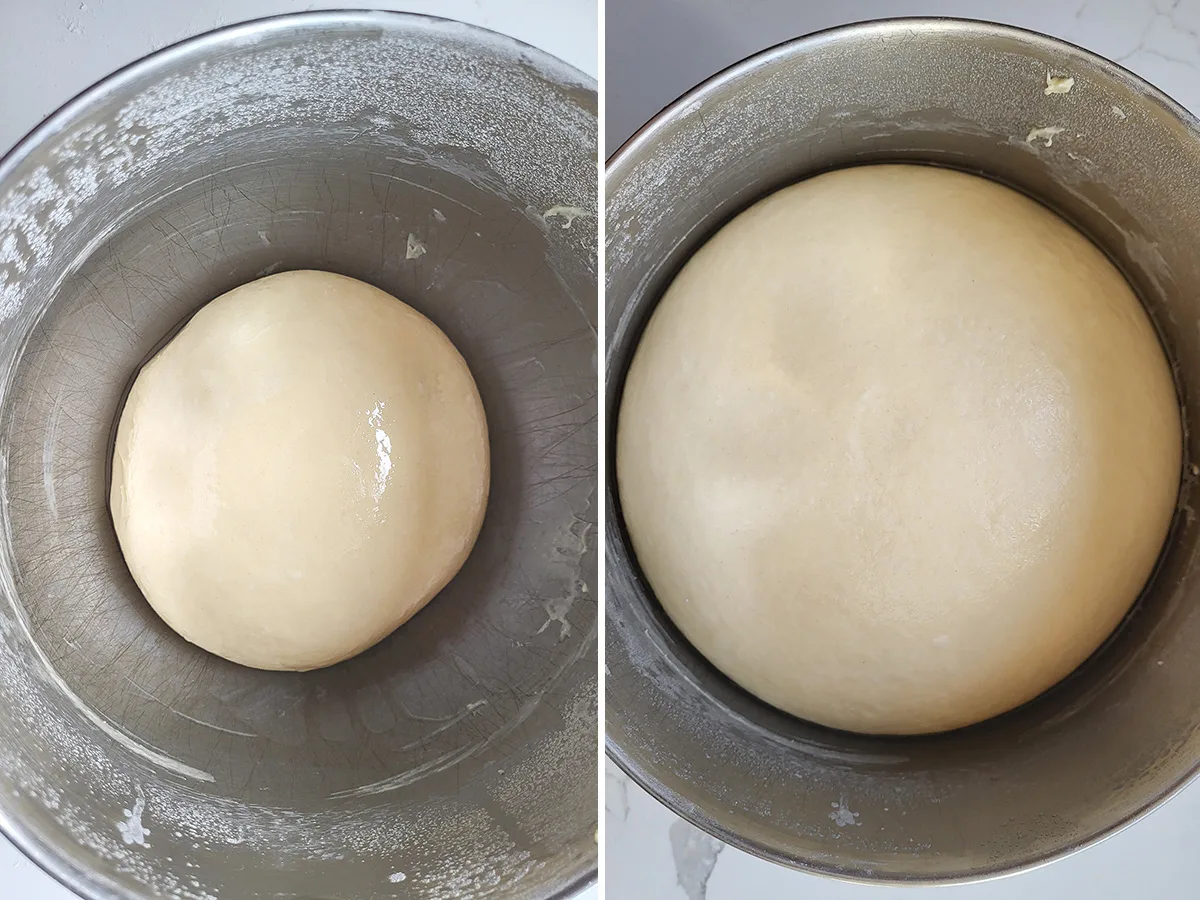
- Set the dough aside to rise until doubled in volume. Meanwhile, prepare the sticky topping.
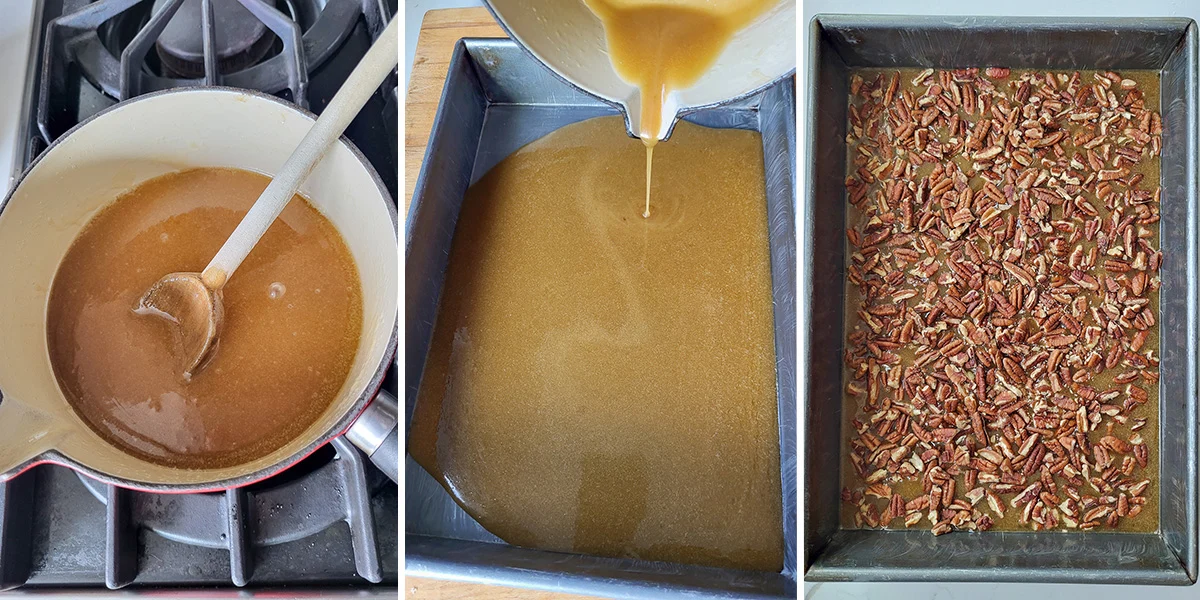
- Melt the butter with the brown sugar and maple syrup.
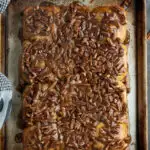
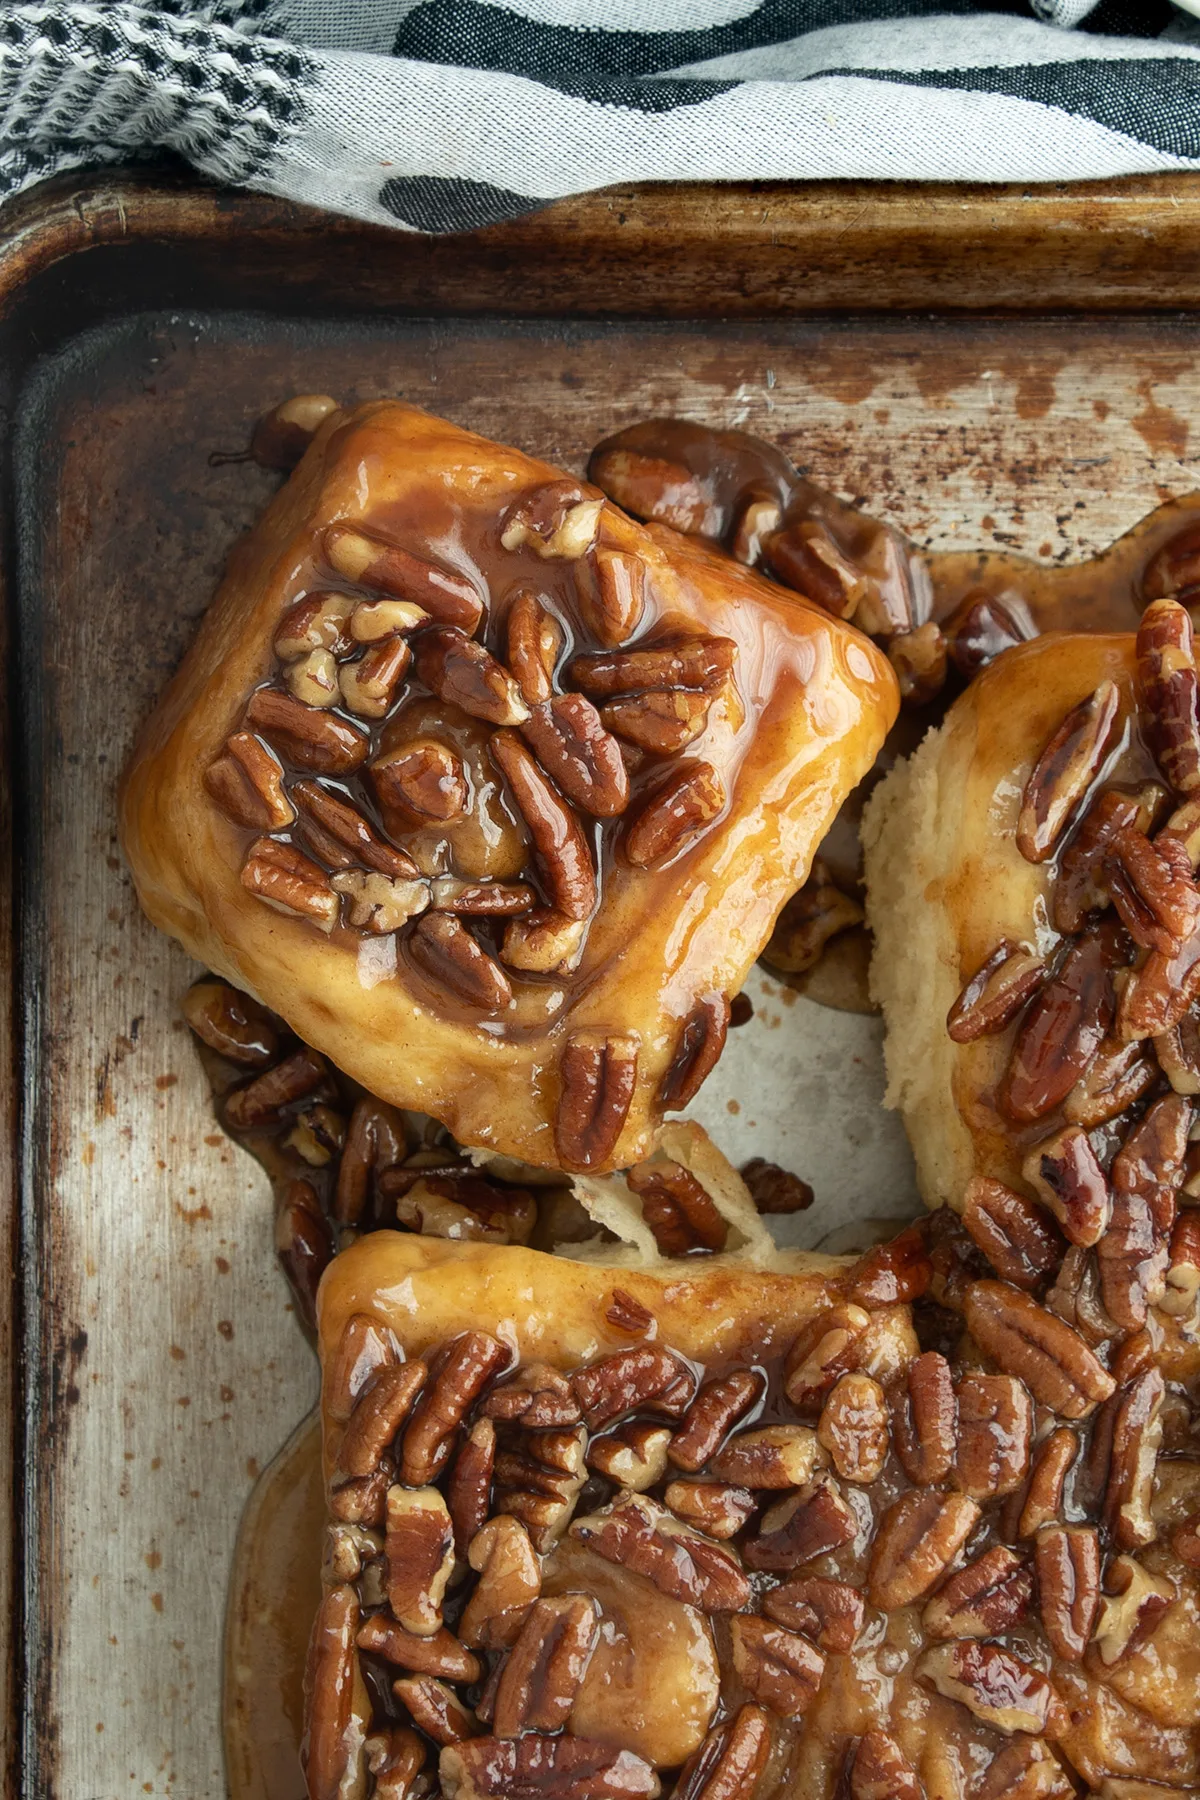
- Pour the caramel into a buttered baking pan.
- Sprinkle chopped pecans over the caramel. Set the pan aside while you prepare the buns.
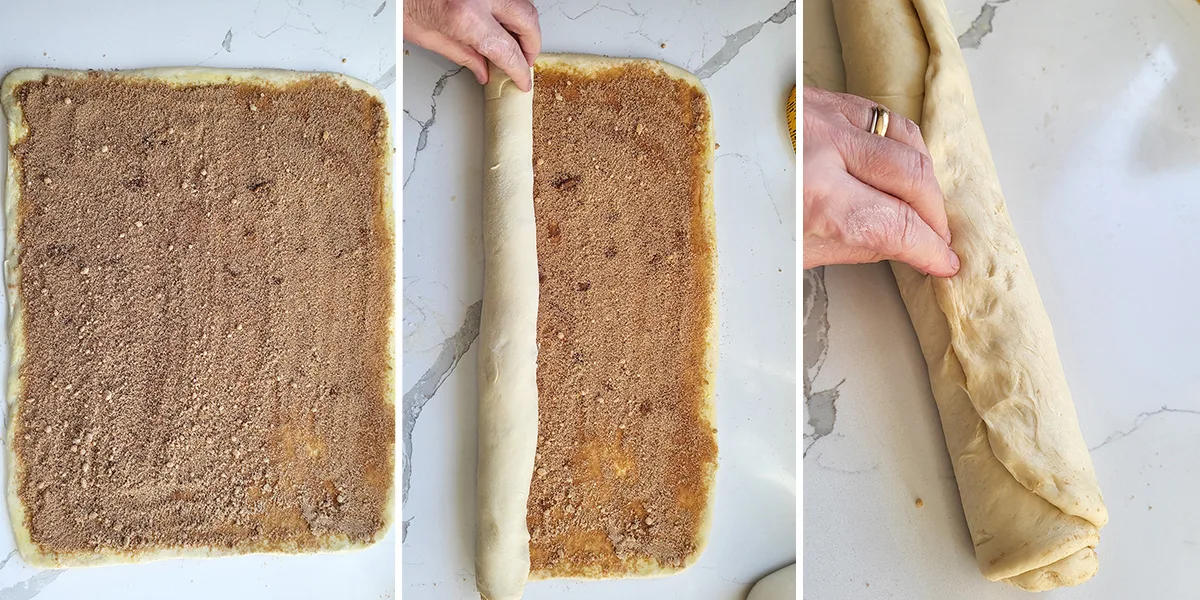
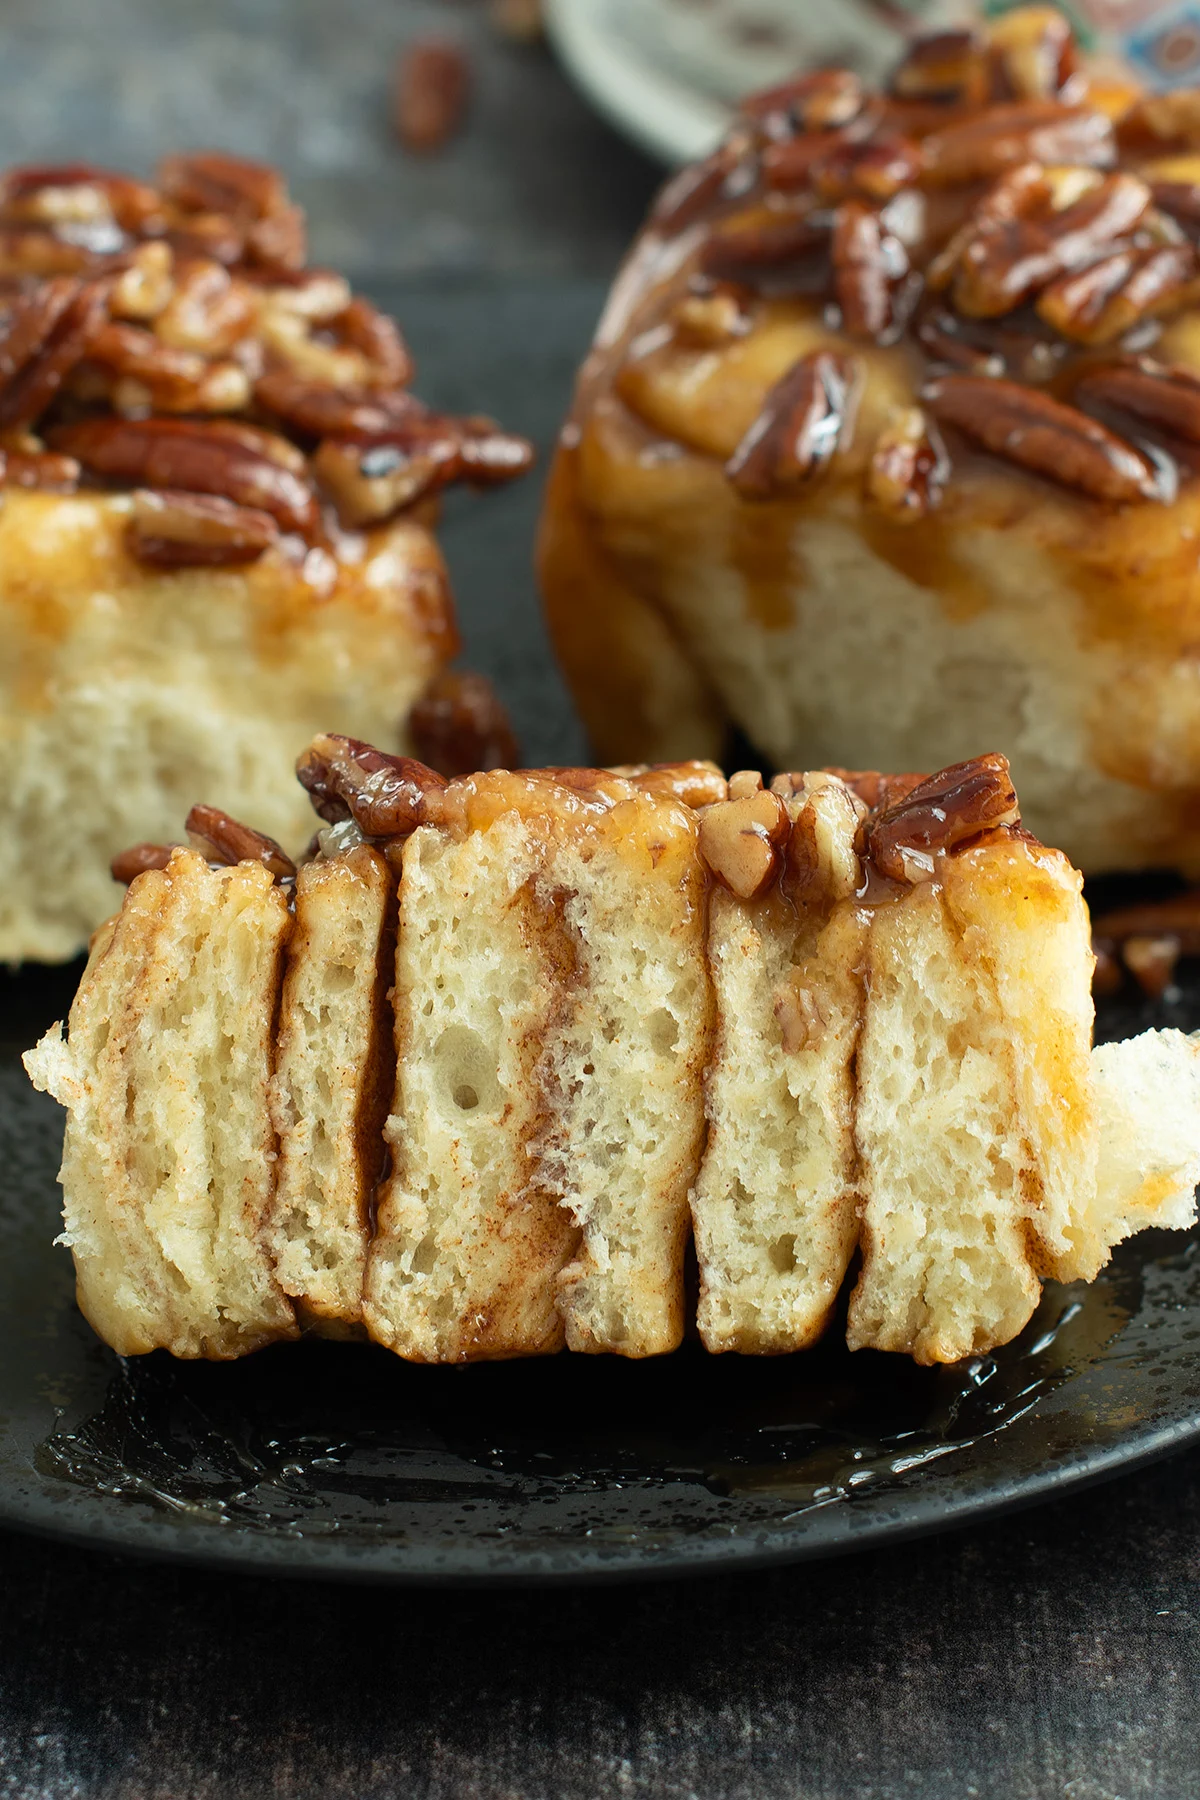
- Roll the dough to an 18″ x 16″ rectangle. Brush the dough with egg wash and sprinkle with brown sugar and cinnamon.
- Roll the dough from the long end into a tight log.
- Pinch the seam closed.
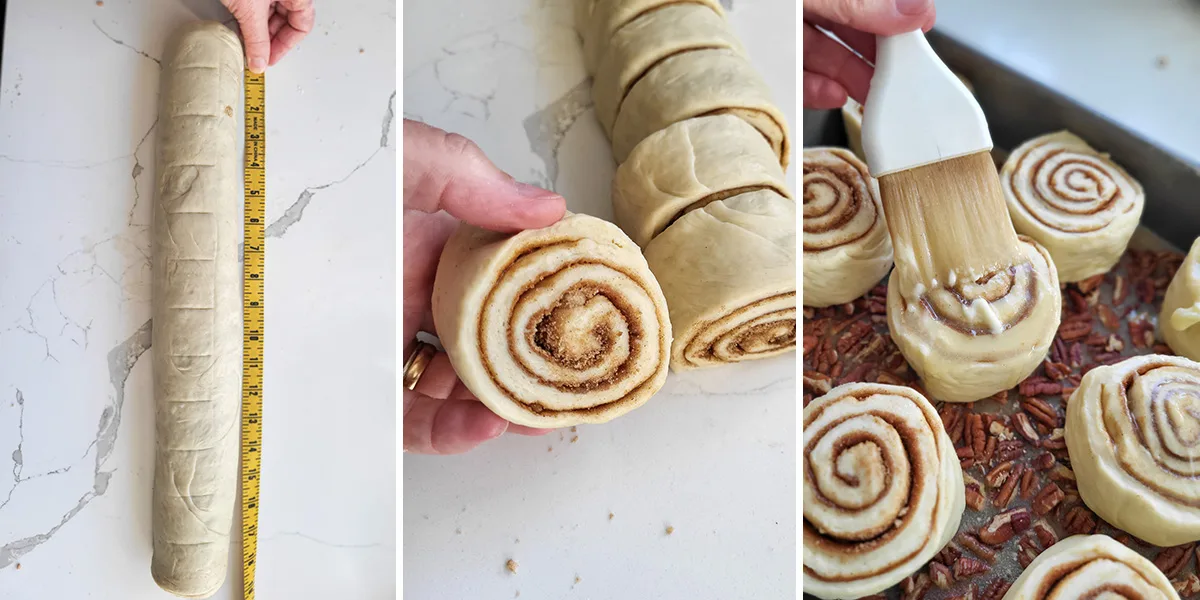
- Mark off 1 1/2″ increments on the log.
- Slice the buns and place them into the prepared pan.
- Brush the buns with melted butter.
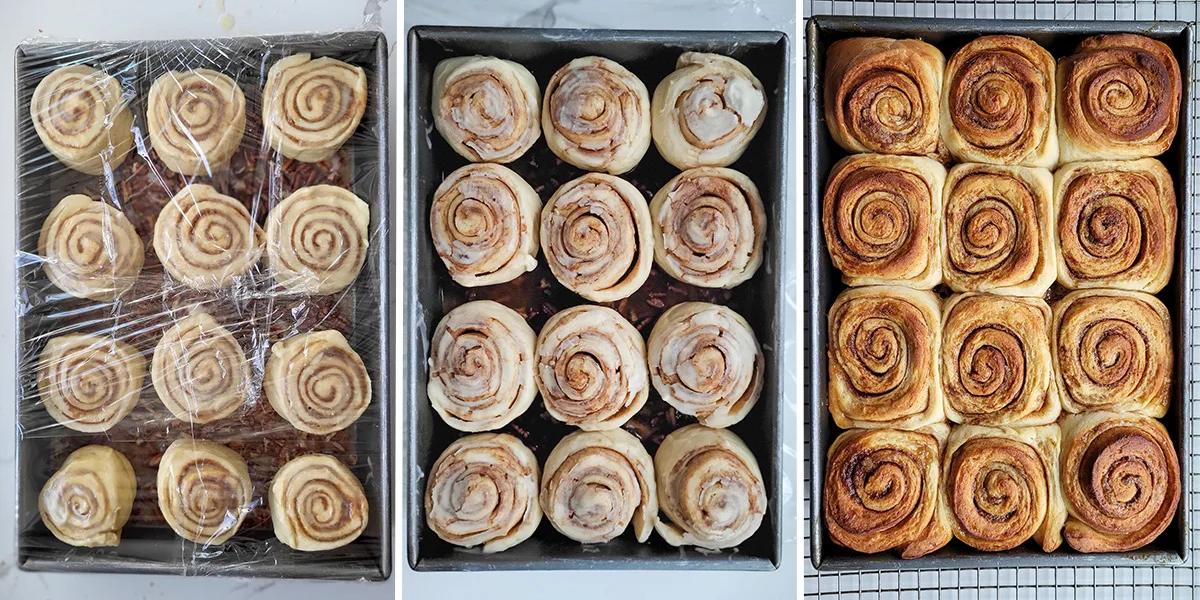
- Wrap the pan and set it in the refrigerator overnight. Alternately, you can leave the buns to rise at room temperature and bake the same day.
- In the morning take the pan out of the refrigerator and let it warm at room temperature while the oven preheats.
- Bake the buns until those in the middle are set. Rest in the pan for 5 minutes before turning the buns out onto a tray.
How to work ahead to make Sticky Buns
This is naturally a work-ahead recipe since it’s left to rise overnight in the refrigerator. The pan can be held in the refrigerator for 1 day.
You can work further ahead if you freeze the uncut log of dough. The dough can be frozen for up to a month. Defrost the log then proceed with the recipe.
FAQs
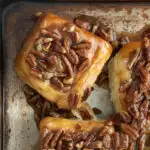
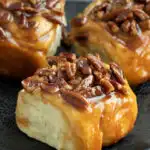
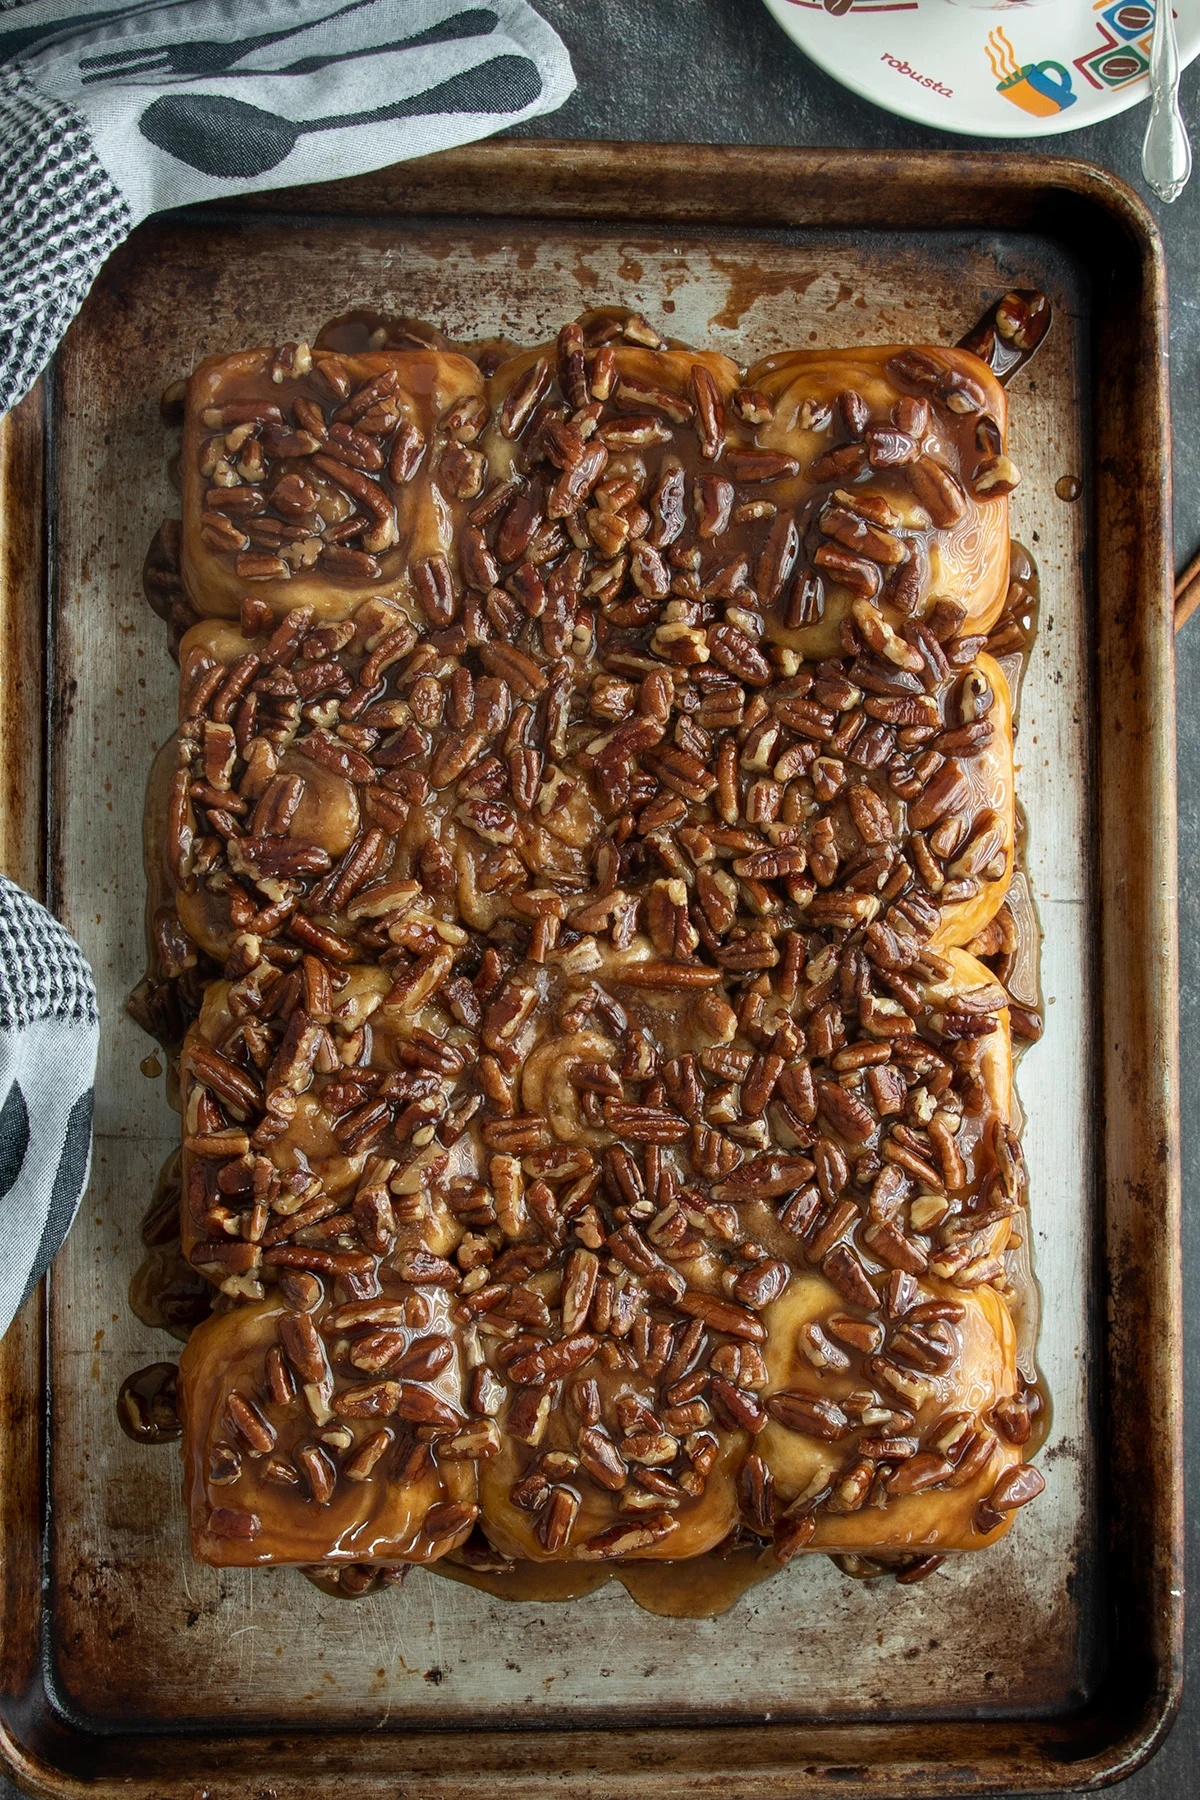
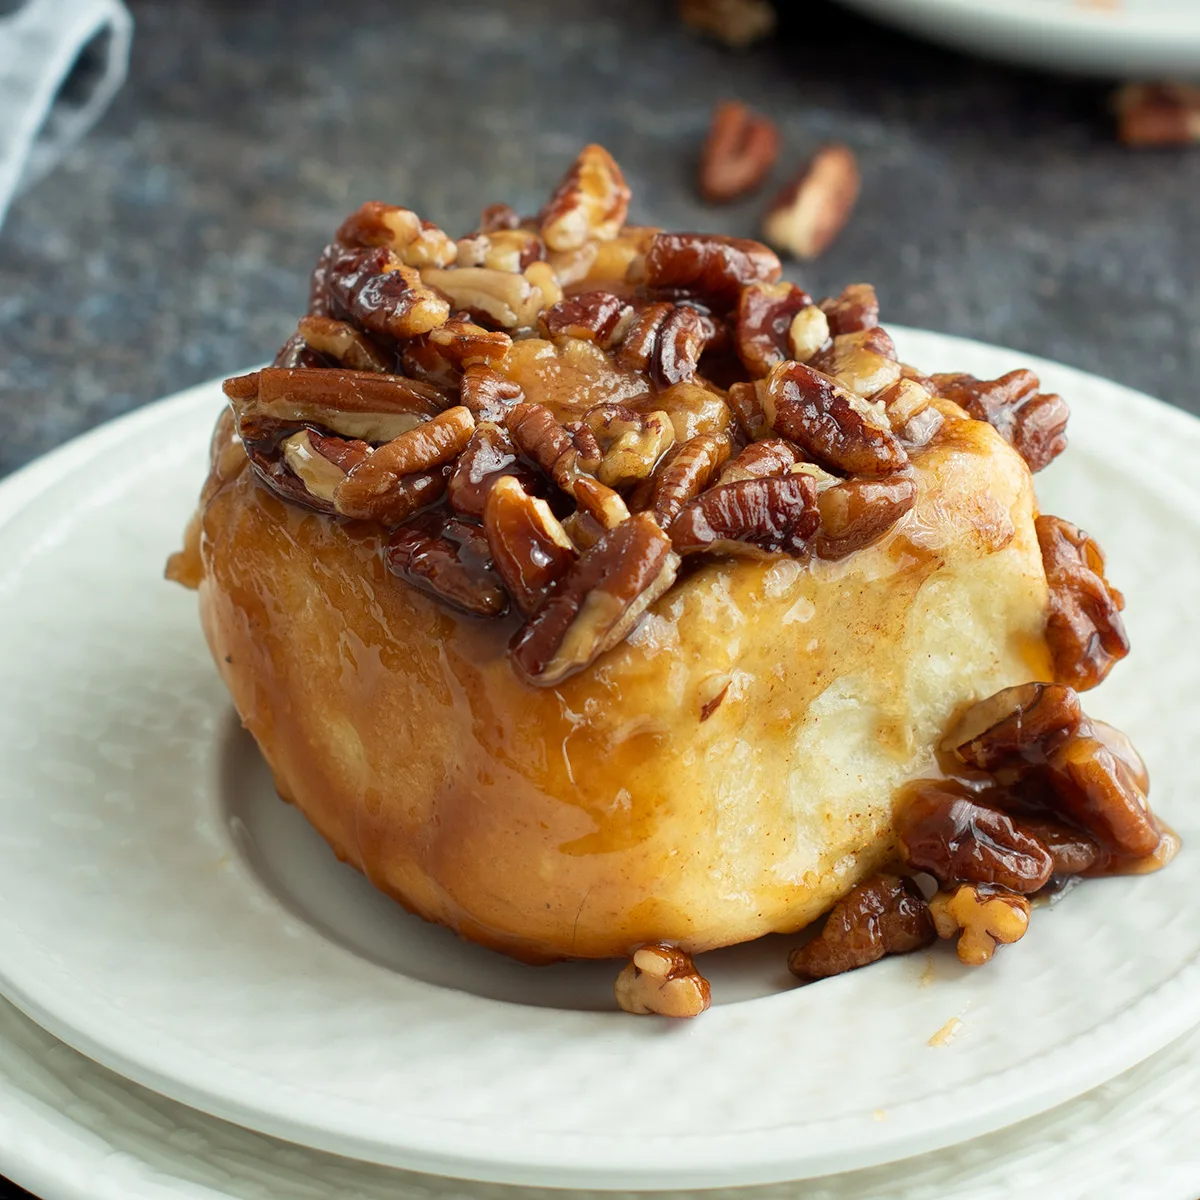
Sticky buns are filled with cinnamon and sugar and baked on top of caramel and nuts. The caramel becomes the topping when the buns are flipped out of the pan.
Cinnamon Buns are filled with cinnamon and sugar and baked in a plain pan. Cinnamon Buns are iced with a sugar glaze or cream cheese frosting.
Yes, Pecans are classic for American sticky buns. But you can bake them with just the caramel topping or with a different nut.
You can skip the refrigeration step and just leave the buns to rise at room temperature and bake the same day.
Yes, you can freeze the log of sticky bun dough and defrost and bake later. You can also freeze the baked buns. Store them in individual sandwich bags. Allow them to defrost then rewarm in the microwave or a low oven.
Sticky buns are best warm from the oven or within a few hours of baking. After a few hours or the next day they should be rewarmed in a low oven to refresh. Longer than a day they should be frozen.
Keep them at room temperature for a day or freeze for up to a month.
You might want to these other breakfast pastries: Cinnamon Buns, Croissants, Chocolate Croissants, Almond Croissants, Cheese Danish, Apple Danish, Sour Cherry Strudel.
If you love this recipe as much as I do, I’d really appreciate a star rating and a quick comment. Ratings and comments help my recipes show in search results. Thanks!

Sticky Buns Recipe
Ingredients
For the Dough
- 6 ounces warm water (¾ cup)
- 2 ¼ teaspoons instant dry yeast (1 packet)
- 8 ounces whole milk (1 cup, scalded and cooled)
- 22 ½ ounces unbleached all purpose flour (4 ½ cups, see note)
- 3 ounces sugar (⅓ cup)
- 2 ounces unsalted butter (¼ cup, melted)
- 1 large egg
- 1 teaspoon table salt
For the Topping:
- 6 ounces unsalted butter
- 7 ounces brown sugar (1 cup, packed)
- 2 ½ ounces maple syrup (¼ cup (see note))
- ¼ teaspoon salt
- 8 ounces chopped pecans
For Assembly:
- 7 ounces brown sugar (1 cup, packed)
- 1 tablespoon ground cinnamon
- 1 egg for egg wash
- 2 ounces unsalted butter (¼ cup, melted)
Instructions
Make the Dough
- In a mixer bowl combine 6 ounces warm water, 2 ¼ teaspoons instant dry yeast, 8 ounces whole milk and 2 cups of the flour. Mix to form a thick batter. Cover the bowl and set aside to rise for 30-60 minutes.
- Add 3 ounces sugar, 2 ounces unsalted butter, 1 large egg and 1 teaspoon table salt then mix to combine. Change to the dough hook if using a stand mixer. With mixer on low slowly add the remaining flour. The dough will start out soft and shaggy. Knead for 5 minutes. The dough will clear the sides of the bowl and gather on the hook. If mixing by hand continue mixing and then kneading in the flour by hand. Dump the dough onto a lightly floured surface. Knead into a smooth ball.
- Transfer the dough to a lightly oiled bowl, turning once to coat the dough. Cover the bowl and set it aside at room temperature until the dough doubles in volume, about 60 minutes.
Prepare the Topping
- Melt 6 ounces unsalted butter in a small saucepan. Lightly brush a 9" x 13" baking pan with some of the melted butter. Return the butter to the heat and add 7 ounces brown sugar, 2 ½ ounces maple syrup and ¼ teaspoon salt. Cook over low heat until the mixture begins to bubble and the butter and sugar are melted. Pour the filling into the prepared pan and sprinkle 8 ounces chopped pecans in an even layer over the caramel.
Assembly
- Combine 7 ounces brown sugar and 1 tablespoon ground cinnamon in a small bowl. Turn the dough onto a floured surface without kneading. Roll the dough to a 18" x 16" (48 cm x 41 cm) rectangle. Generously brush the surface of the dough with egg wash. You should use almost ½ the egg wash to get a good coating so the cinnamon sugar will stick. Sprinkle the cinnamon sugar over the egg washed dough. Use your hands to smooth out the cinnamon sugar to an even layer all the way to the edge of the dough.
- Working from the long side, tightly roll the dough into a log, pinch the seam to seal. Straighten out the log so it's of even thickness and is 18" (48cm) long (see note).
- Use a serrated knife to cut the log into twelve 1½" (4 cm) wide buns. Place the buns in the prepared pan. Generously brush the tops of the buns with the melted butter. Cover the buns with plastic wrap and refrigerate overnight (see note).
- In the morning take the pan out of the refrigerator. Overnight the buns should have risen to almost fill the pan. Allow the buns to come to room temperature while the oven preheat to 350 °F.
- Bake the buns until they're until golden brown and set in the center, 25-30 minutes.
- Allow the buns to cool for 5 minutes in the pan then flip them from the pan onto a serving platter or tray while they are still warm.
Would you like to save this recipe?


As an Amazon Associate and member of other affiliate programs, I earn from qualifying purchases.
Sorry, I also forgot the Rating. This is a 5 Star recipe with a 2 or 3 star baker making it.
Well, my first pan turned out great, even though I had some issues with putting it together and baking time.
I’d like to share some problems I had but do not want these to be complaints. I think it is that I am not very experienced in the art of cooking, having taken it up at 70 years old following retirement and my wife deciding she was retiring from our kitchen.
The dough came together nicely but trying to roll it out to a rectangle turned out to be an issue for me. I ended up with a rounded rectangle or squared off oval shape no matter how much I pulled on it or rolled it out. I’m hoping you have some secrets on how to do this successfully.
I DID get it to an 18″ log, but it looked more like a cigar than a log, so cutting it into the 1 1/2″ slices resulted in somewhat different volumes or shapes. I think this may have caused the baking issues as well.
After refrigeration overnight and bringing it to room temperature for 2 1/2 hours, I baked it for 30 minutes to a golden brown, but realized that the middle wasn’t set AFTER I turned it onto a platter. Four buns on the outside edge were done enough to enjoy, but I reloaded the remaining buns back into the cleaned pan and baked for an additional 15 minutes. That seemed to enable the buns to cook enough to enjoy, although they didn’t look as nice as your photo. I also noticed the caramel was very runny after 30 min, but thickened up nicely with the additional baking time.
I WILL make this again and try to duplicate your photos and put more caution into the baking process.
Thank you for your great recipes. I’ve been making your Sourdough bread, crackers, Cinnamon Raisin Bread and other items that are now staple in our home.
Sounds like you did a great job, David. Handling dough does take a bit of experience. But in the end, as long as it tastes good it doesn’t have to be pretty!
Five star for sure! (I had forgotten to rate)
I used my Grandmothers bread recipe mixed with your filling and topping recipe. Dynamite combo! This is going in my recipe box as my go to. Thank you!
Merry Christmas and Happy New Year
Merry Christmas and Happy New Year to you and yours!
Simply amazing recipe! Really, so easy to follow, and I love to have the flexible timing. They also hold really well in the refrigerator. We just finished ours off a week after they had been baked. Just 20 seconds in the microwave and they were as good as on the first day. This will definitely become our Thanksgiving morning go-to recipe!
On another note, I absolutely love your new cookbook! The tutorials and shortcuts are great!