Sourdough Pretzel Rolls


You’ll love these Sourdough Pretzel Rolls. A generous helping of sourdough starter gives these rolls a slightly sweet and complex flavor to compliment the extra dark, distinctively “pretzely” crust. Learn a trick for the best pretzel flavor.
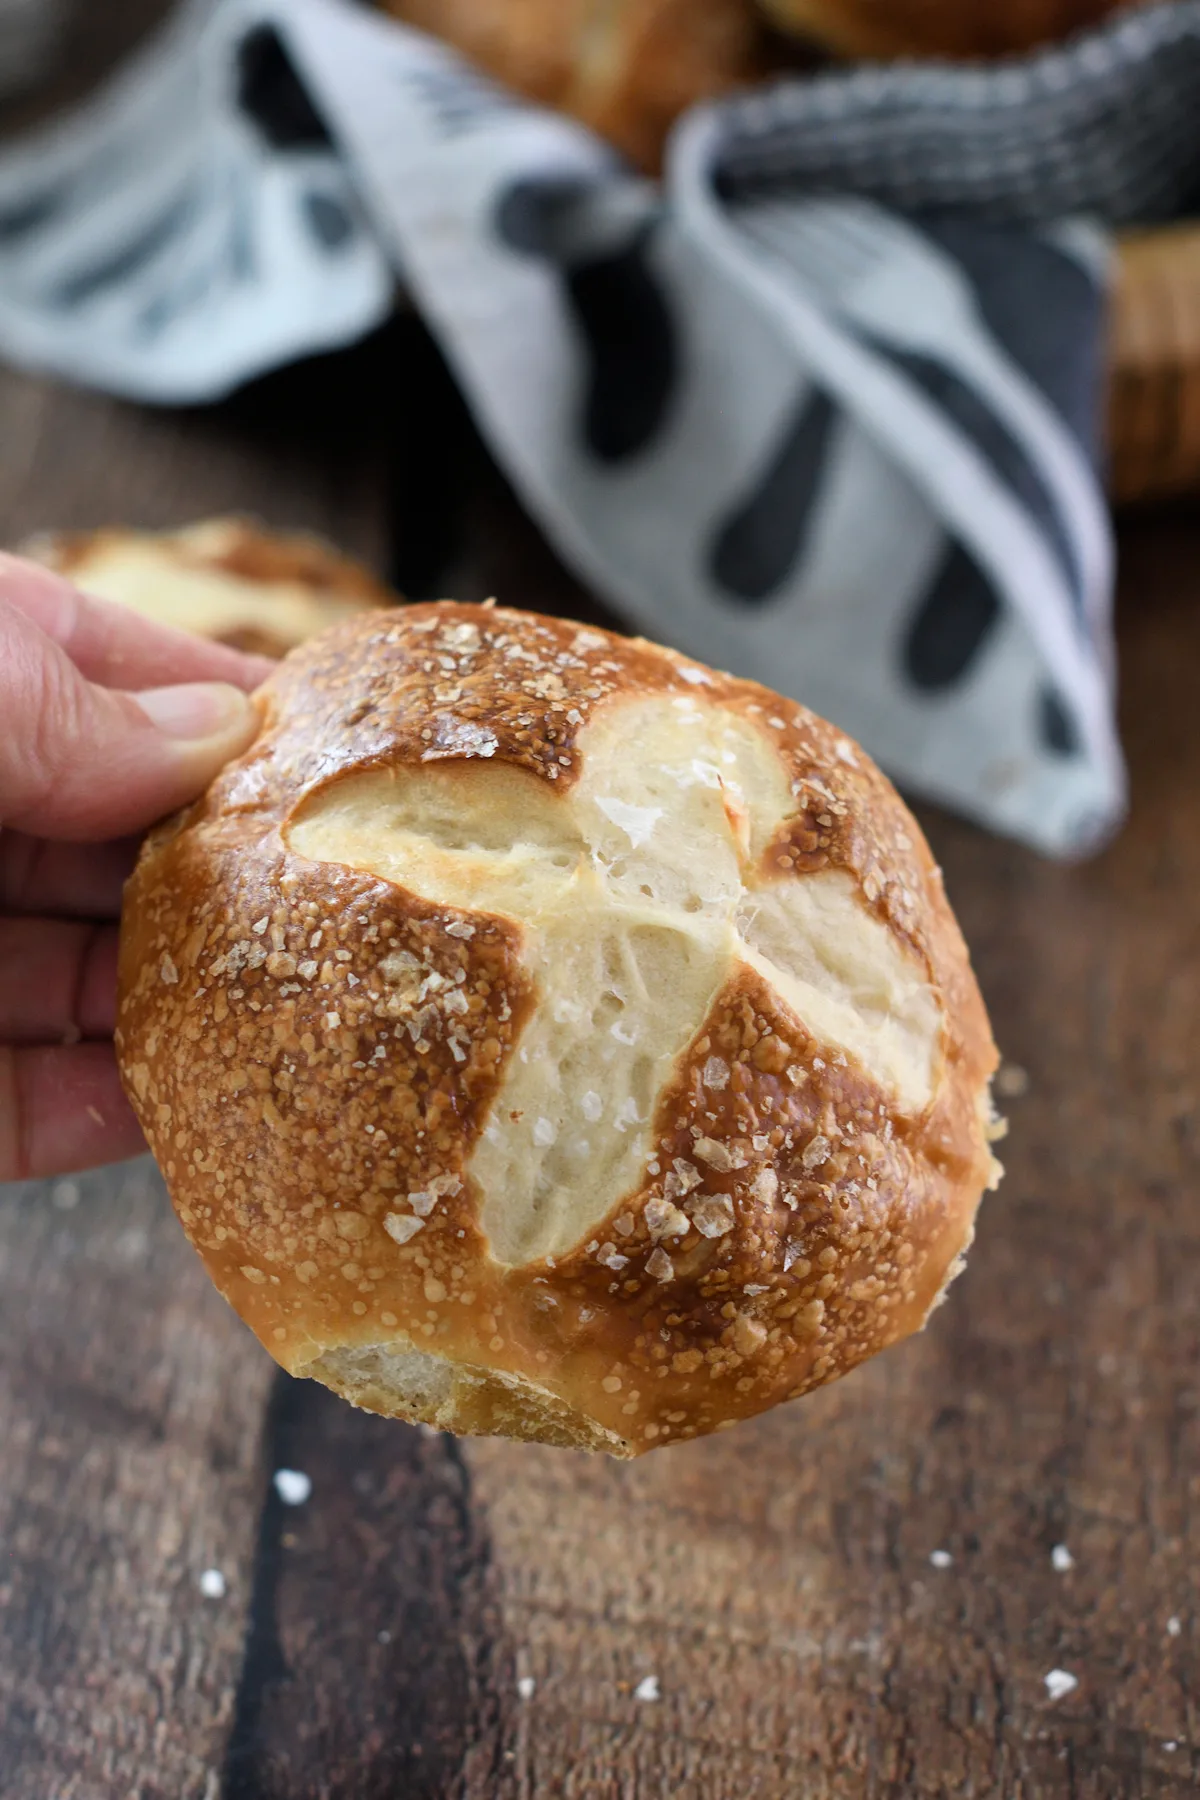
I’m a big fan of pretzels in all forms. I love the pleasantly-bitter flavor of a good pretzel crust.
What is it exactly that makes the crust taste like a pretzel? The rolls are dipped in an alkaline liquid before baking. Commercially and traditionally the alkaline used might be lye. But, being that lye is quite caustic, most home bakers turn to baking soda to create the pretzel dip.
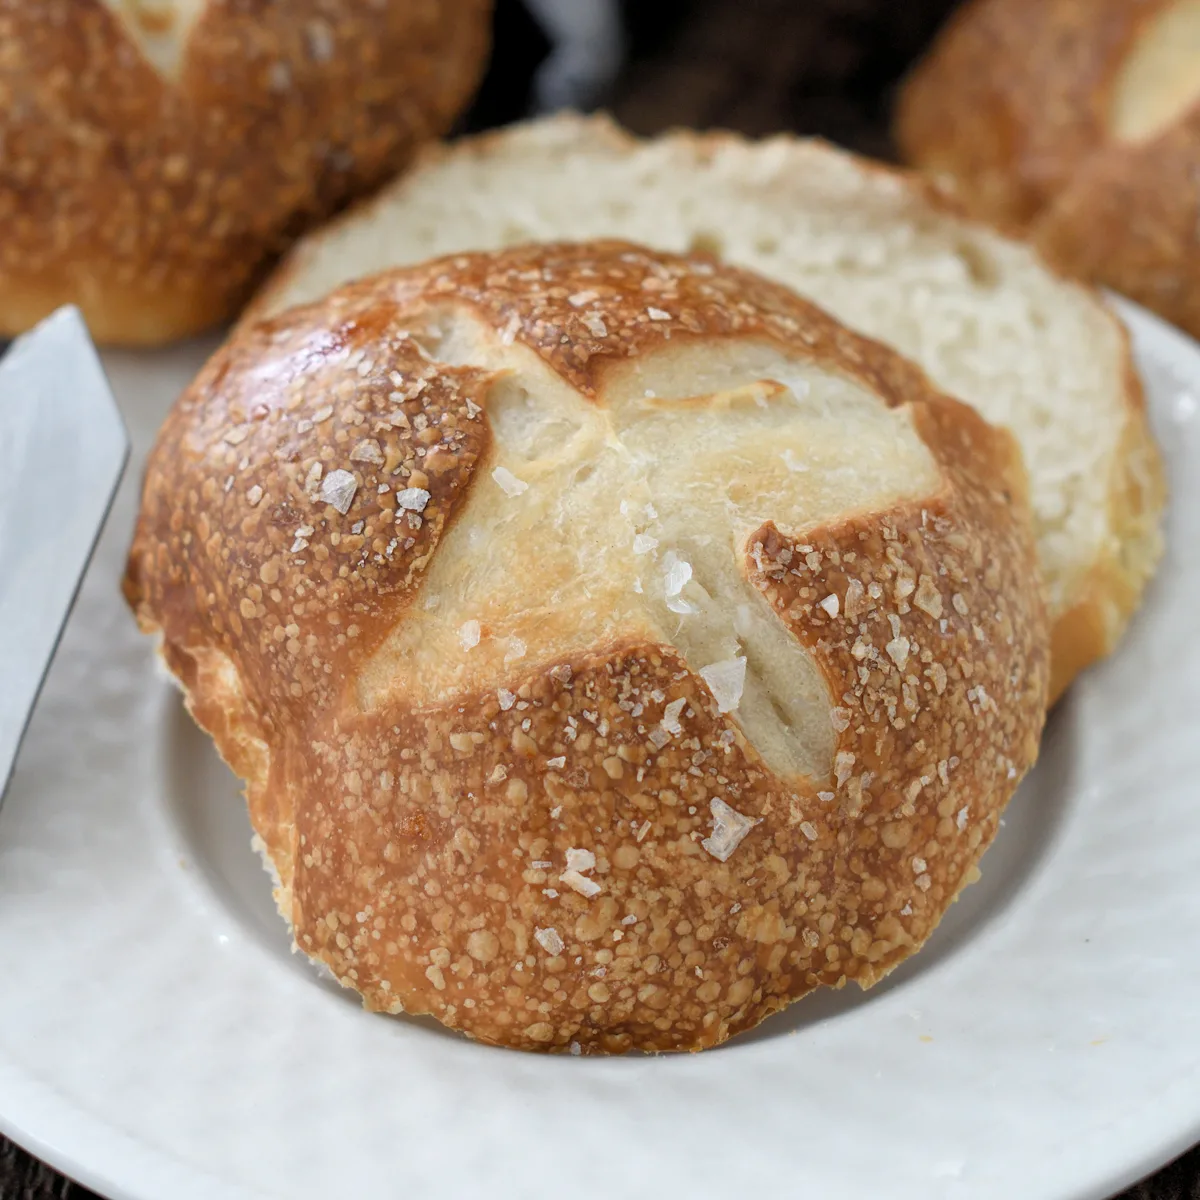
Baking the baking soda makes it more alkaline, which gives our Sourdough Pretzel Rolls a deeper color and more of the “pretzely” flavor.
By the way, if you don’t have a sourdough starter yet you can make Malt & Rye Pretzel Rolls with commercial yeast.
Scroll through the process photos to see how to make Sourdough Pretzel Rolls:

A timeline for making Sourdough Pretzels Rolls:
- If your starter needs feeding, do that the night before or early in the morning of the day you want to make the dough.
- If you want to make dough the same day that you will bake, mix the dough first thing in the morning. This means your starter should be fed the night before. Allow the dough to ferment at room temperature during the day. By later in the afternoon the rolls should be ready to shape, dip and bake and will be fresh for dinner.
- If you want to make the dough the day before baking, mix the dough in the afternoon. Allow it to ferment at room temperature during the day. Refrigerate the dough in the evening before going to bed.
- The dough can stay in the refrigerator for up to 2 days at this point.
- Take the dough out in the morning, shape the rolls, dip them into the baking soda bath and set them aside to rise. The rise will take longer since the dough is cold.
If you love this recipe as much as I do, I’d really appreciate a star rating and a quick comment. Ratings and comments help my recipes show in search results. Thanks!

Sourdough Pretzel Rolls
Ingredients
“Baked” Baking Soda
- 12 oz baking soda (1 ⅓ cups)
Dough
- 8 oz active sourdough starter (1 cup)
- 10 oz warm water (1 ¼ cups)
- 20 oz bread flour (4 cups, see note)
- 2 oz butter (melted)
- ¾ oz Honey (1 tablespoon)
- 2 teaspoons table salt
- 1 egg white
- Kosher or Sea Salt for finishing
Instructions
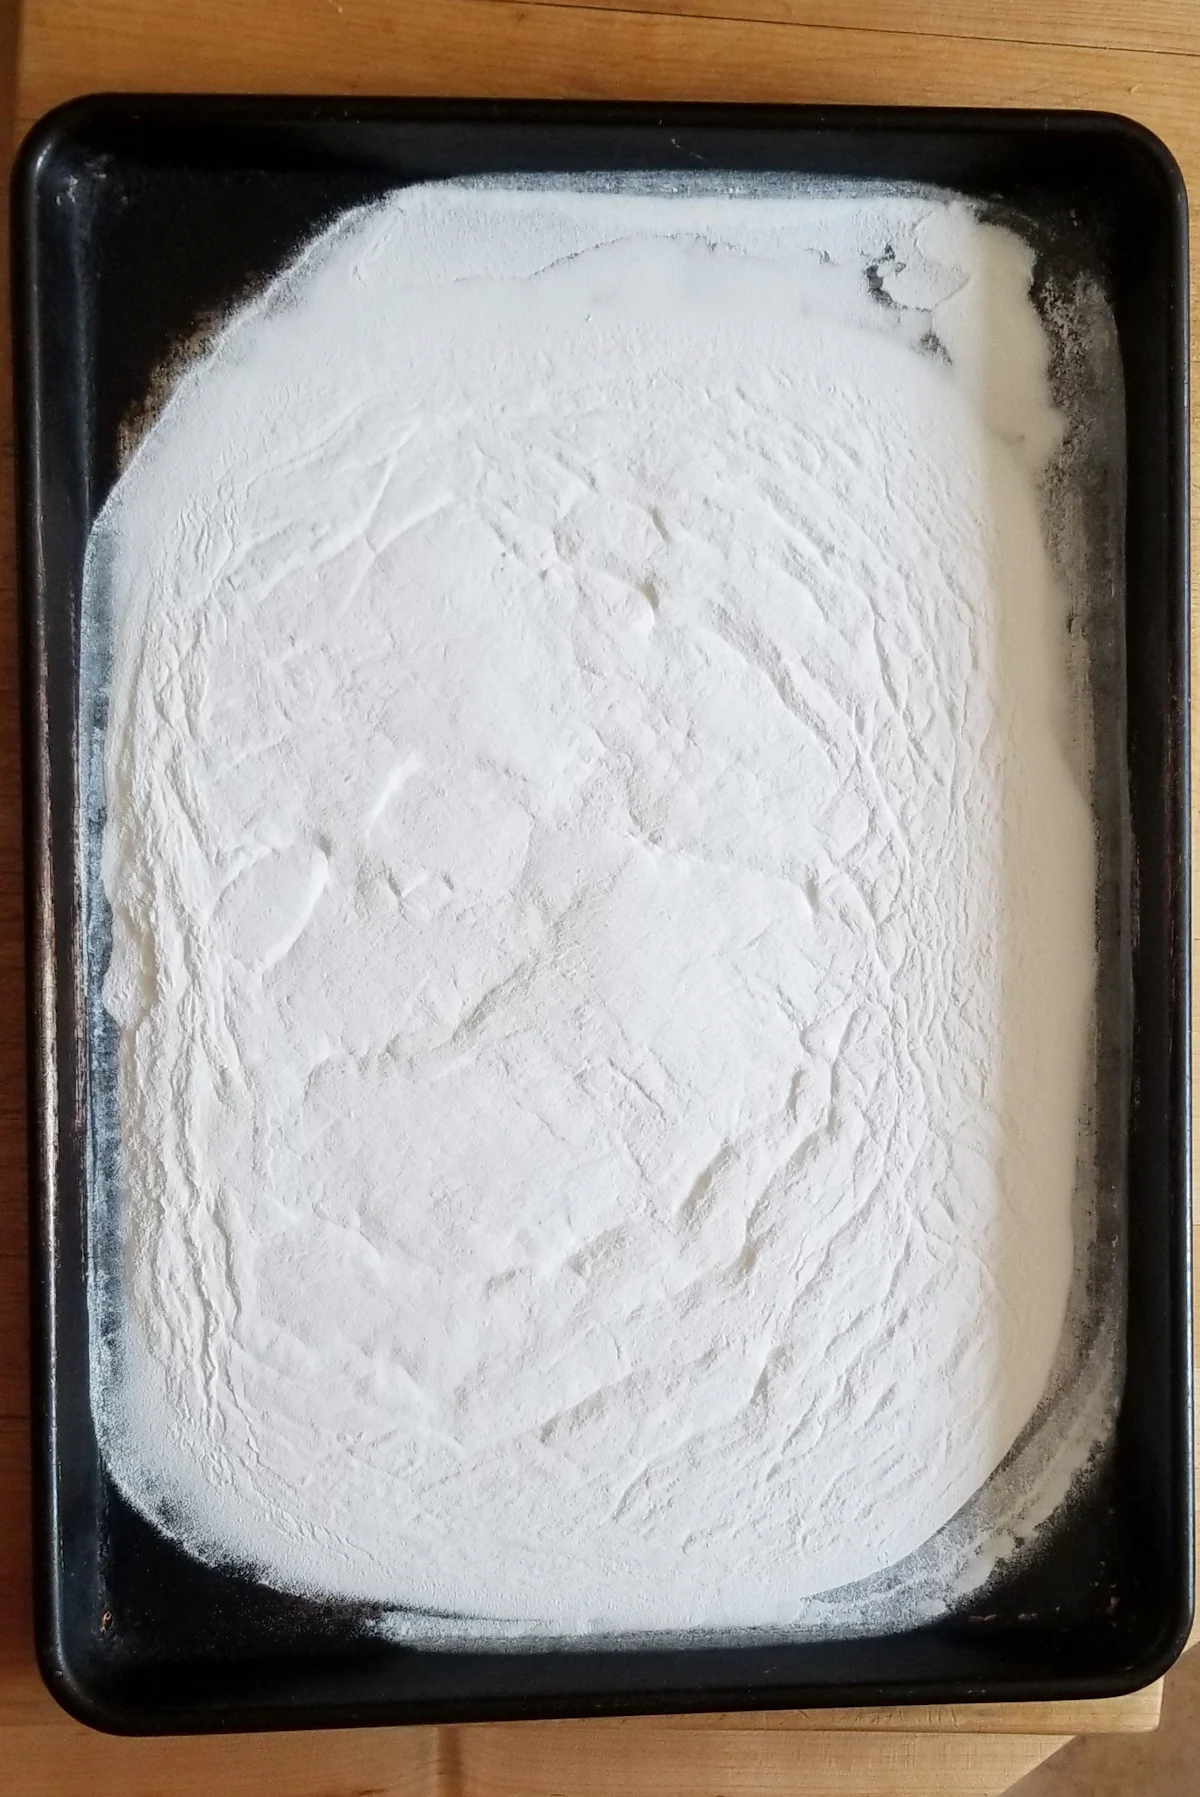
- Preheat the oven to 300 °F. Sprinkle the baking soda onto a baking sheet lined with aluminum foil or use disposable aluminum pan. Bake for 1 hour. Set aside while you make the dough. (see note)
- Combine 8 oz active sourdough starter, 10 oz warm water and and half of the bread flour in a mixing bowl. Mix to form a thick batter. Cover the bowl and set it aside for 30 minutes.
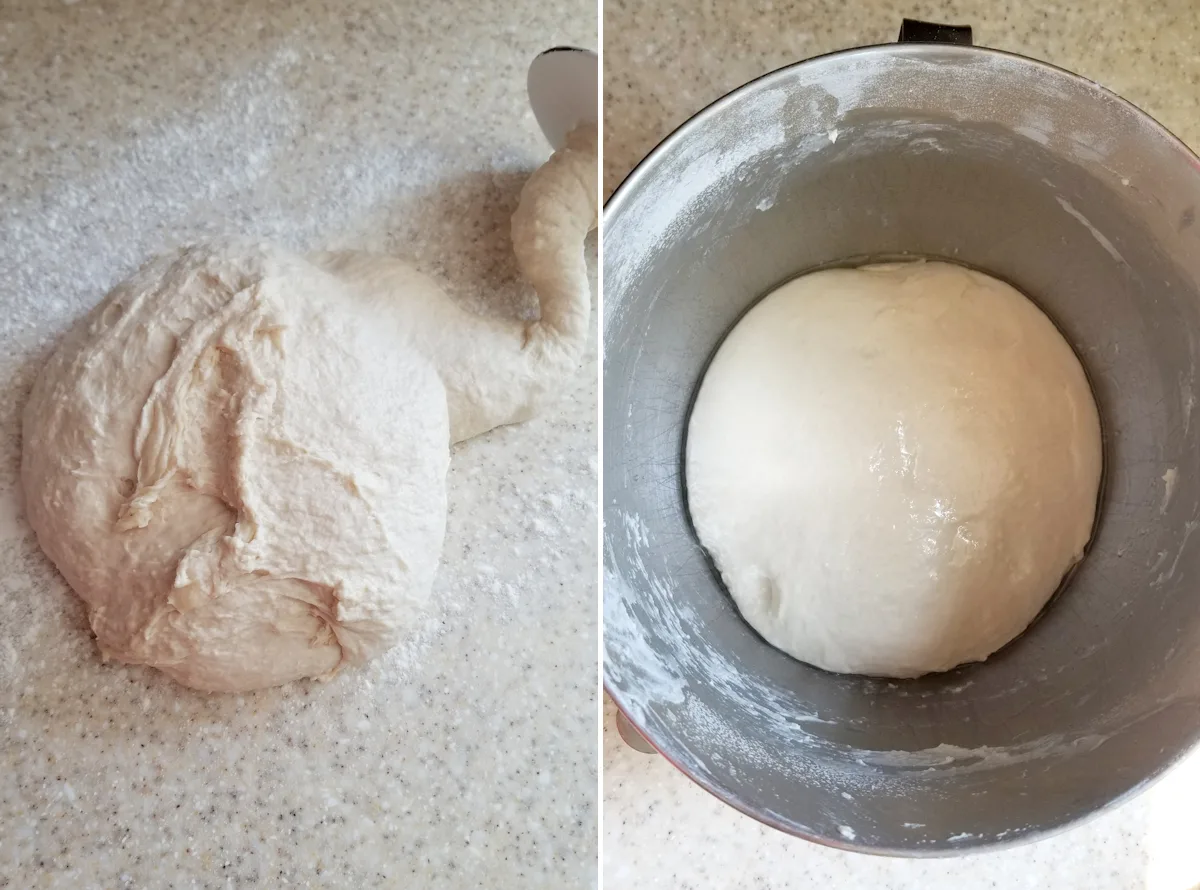
- If using a stand mixer, switch to the dough hook. Add 2 oz butter (melted), ¾ oz Honey, 2 teaspoons table salt and remaining bread flour and mix until the dough gathers on the hook and clears the sides of the bowl. If the dough is very sticky and doesn't clear the sides of the bowl, sprinkle in a few more tablespoons of flour. If mixing by hand, add as much flour as you can then turn the dough out and knead in the rest of the flour. Knead the dough for 5 minutes.
- Turn the dough out onto a floured surface, form it into a smooth ball and place it in a lightly oiled bowl. Turn the dough once to coat it on all sides. Cover and set aside in a warm spot.
- After 60 minutes uncover the bowl, lift one side of the dough and fold it into the middle of the dough. Repeat with the other three sides of the dough then flip the dough over. You're basically turning the dough inside-out to redistribute the yeast and strengthen the gluten. Cover the bowl and after 60 minutes repeat the procedure again.
- Cover the bowl and after 60 minutes fold the dough one more time. By now the dough should be lively, elastic and airy. If the dough is still sluggish give it another hour or two at room temperature.
- If you want to finish making the rolls the next day return the dough to the bowl, cover tightly and refrigerate overnight. The next morning continue with shaping. Otherwise continue shaping the same day.
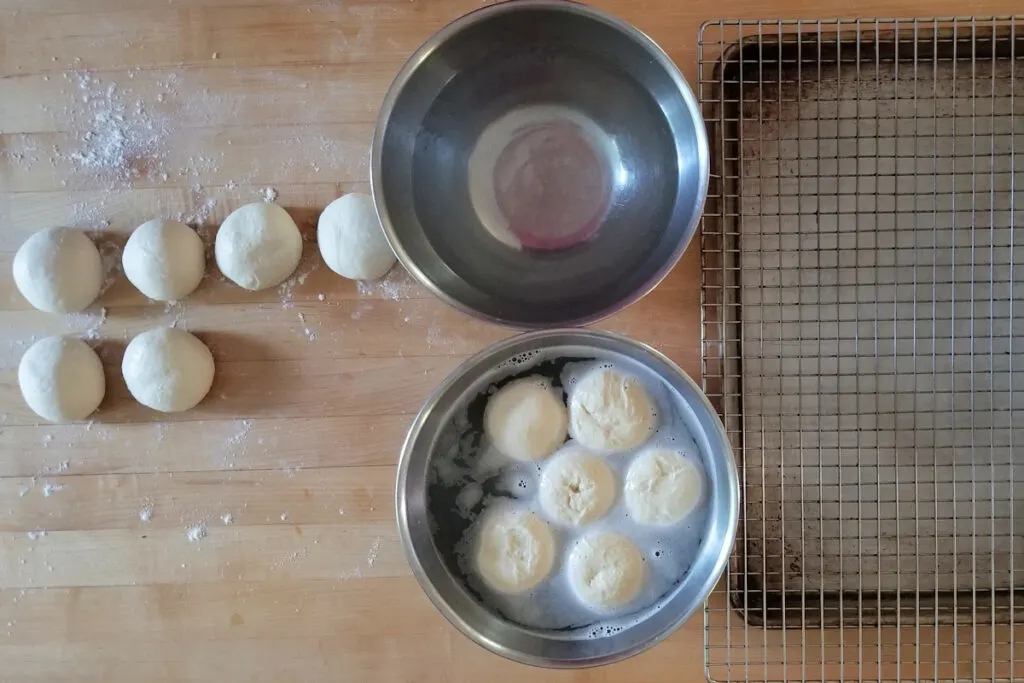
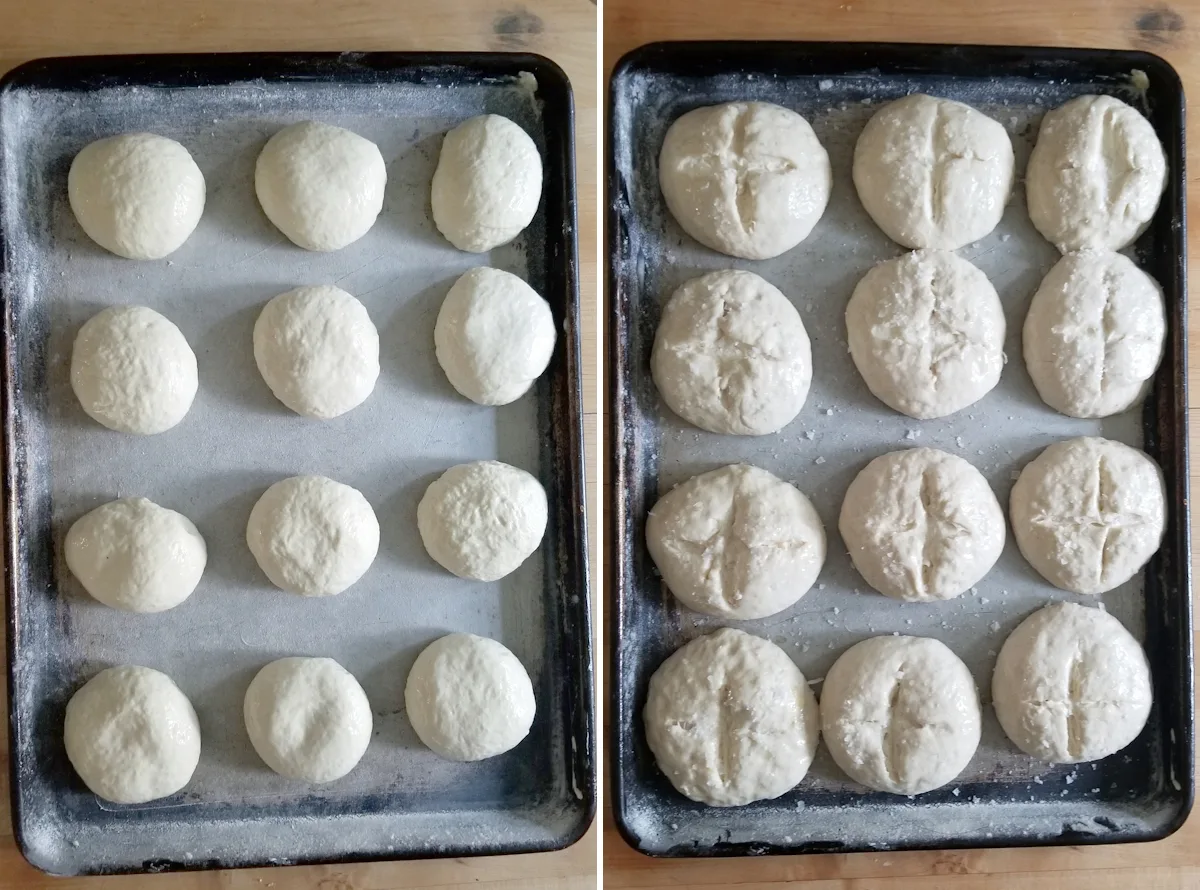
- Turn the dough out onto a lightly floured surface. Divide the dough into 12 pieces. Use your cupped hand to roll each piece into a smooth ball. Line the rolls up on the work surface and let them rest for 10 minutes.
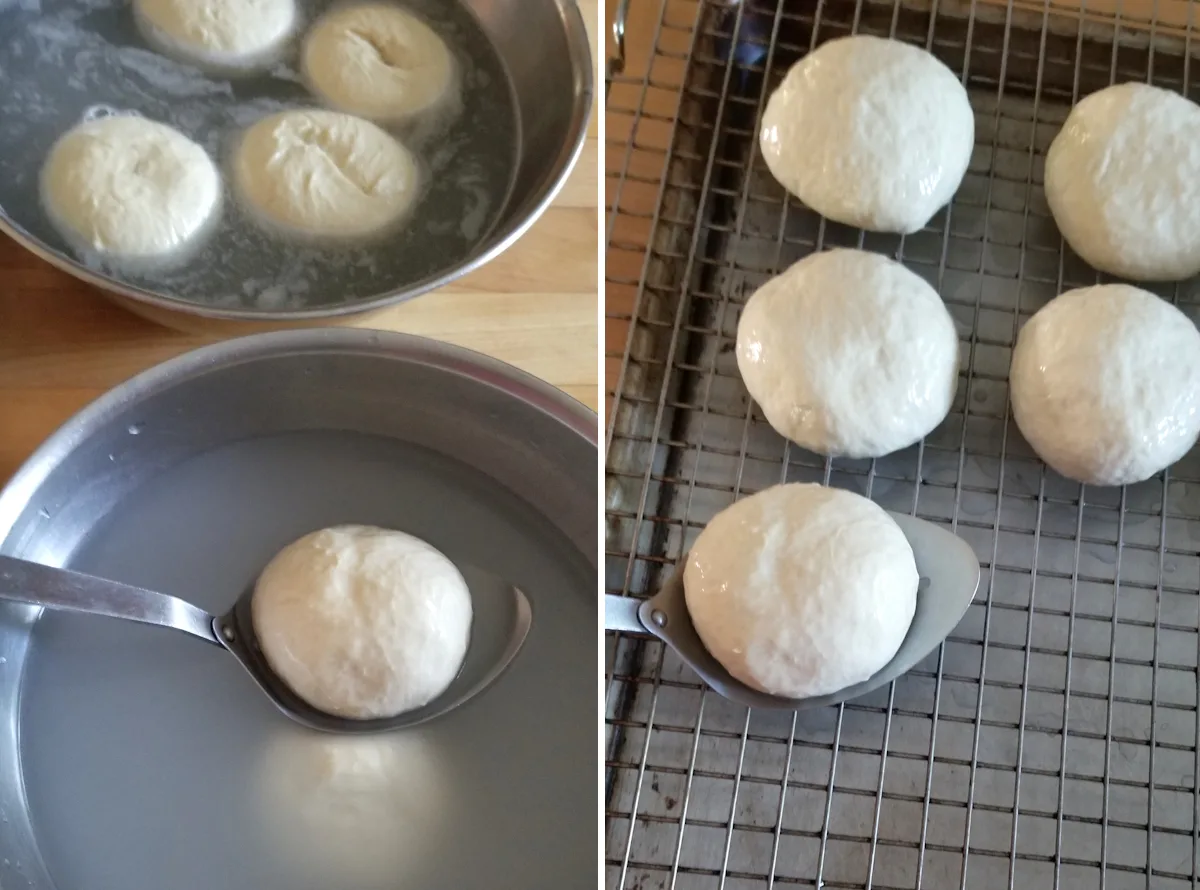
- Butter and flour a half sheet pan. In a large bowl combine the "baked" baking soda with a quart of warm water. Fill another bowl with plain water. Set a cooling rack over a sheet pan next to the bowls.
- Reshape and tighten each roll as you put it into the bowl of baking soda water. Add as many rolls as fits into the bowl. Let them sit in the water for 2 minutes. Transfer the rolls to the bowl of clean water to rinse, then set them onto the cooling rack to drain. Continue until all the rolls have been dipped. Transfer the rolls from the rack to the prepared baking sheet.
- Set the tray aside, uncovered, for 1 – 1 1/2 hours until the rolls are almost doubled in size. The surface of the rolls may look lumpy but they will smooth out during the baking. The time will vary depending on the temperature of the dough. Preheat the oven to 425 °F.
- Use a sharp knife or razor to cut an "X" in the top of each roll. Brush each roll with egg white and sprinkle with kosher salt or coarse sea salt.
- Bake until dark brown, about 20 minutes.
Would you like to save this recipe?


As an Amazon Associate and member of other affiliate programs, I earn from qualifying purchases.
I’ve tried a couple different sourdough pretzel roll recipes before finding this one. It was super easy to make and the family loved them (I have celiac and can’t eat them ). Will definitely be making these a lot. I love that I don’t have to boil them, love your baking soda method. Thank you for a great recipe.
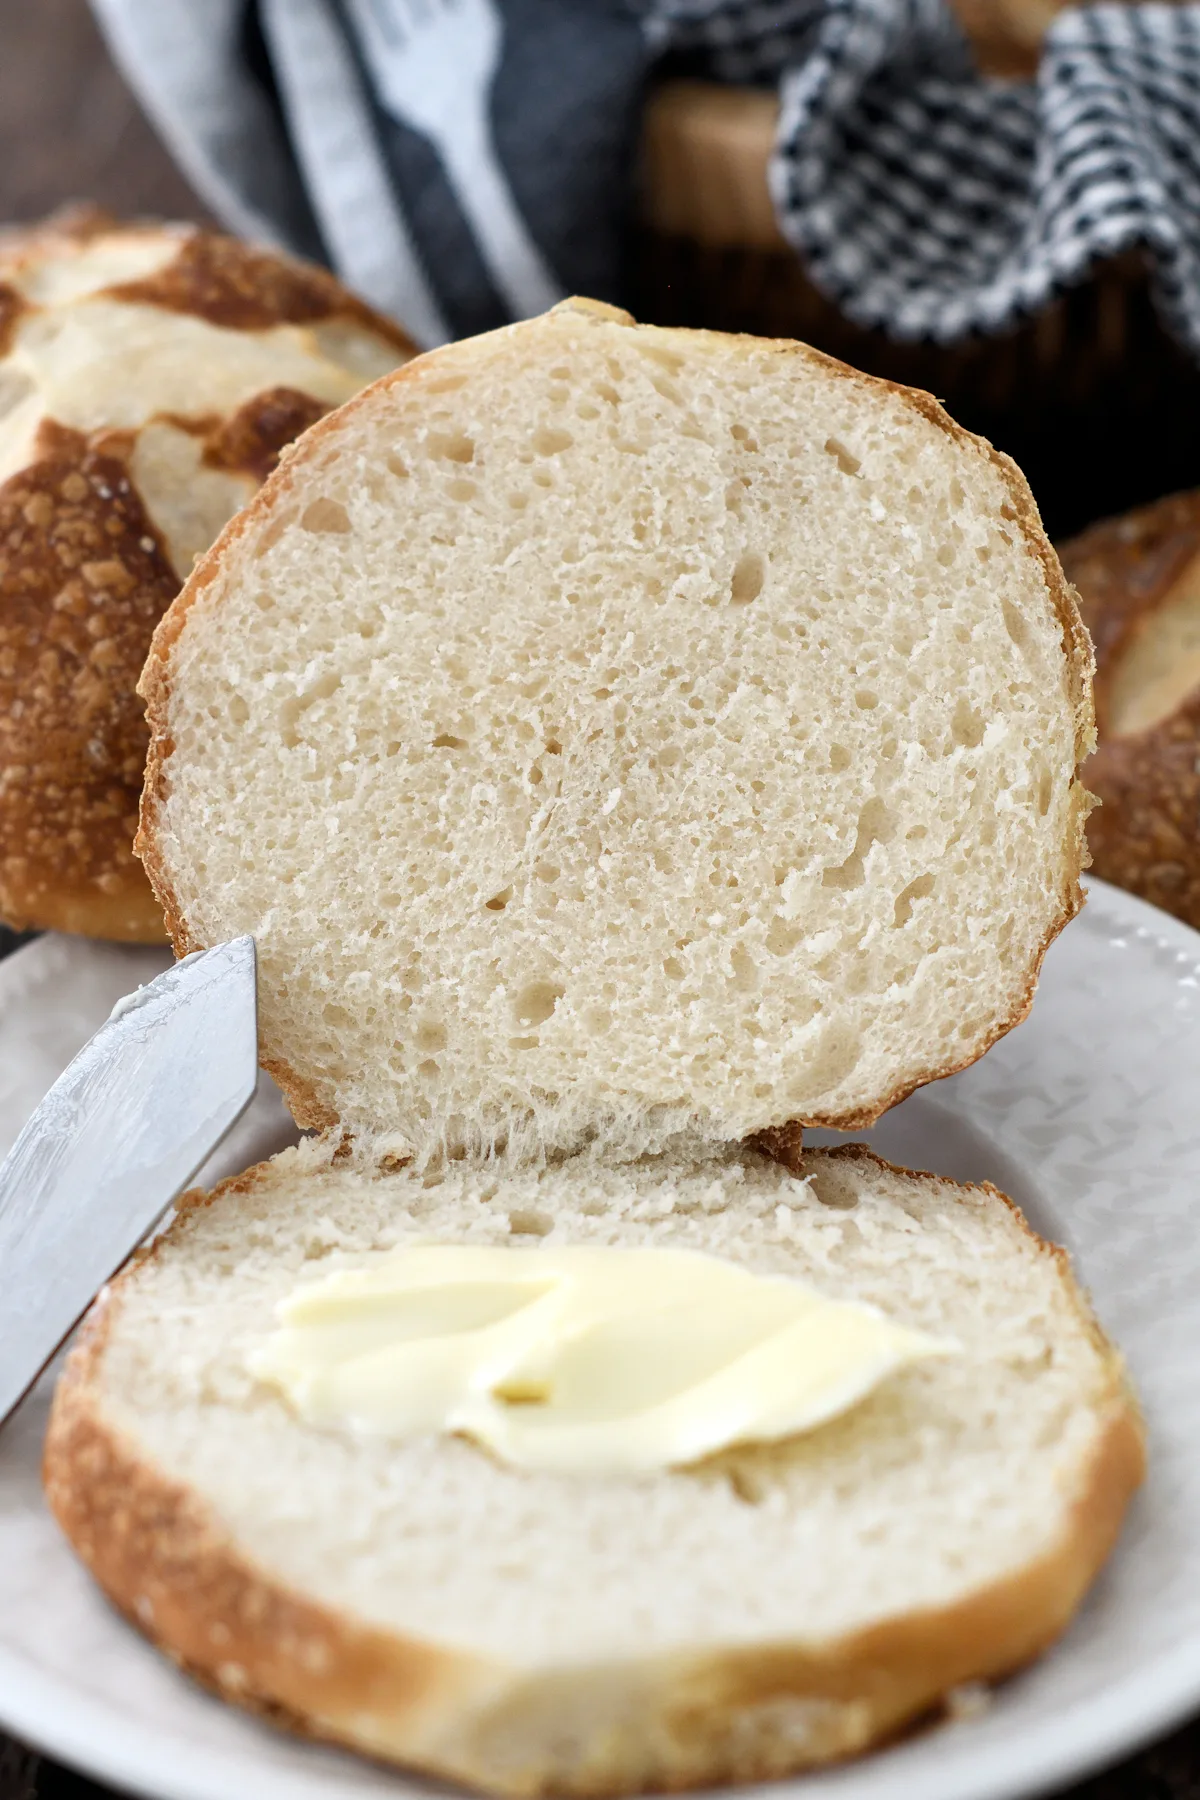
The rolls were wonderful with a thin, crispy crust and light crumb.
Has anyone tried freezing these after baking? I do that a lot with bagels, just double wrapping them individually in saran and freezing until the night before I need them.
Yes, for sure. Just rewarm them in a 200F oven straight from the freezer to revive the texture.
Wow! Another 5 star recipe here. These buns made our burger night extra special tonight. Loved the consistency of the dough coming out of the stand mixer. Couldn’t resist trying one fresh from the oven. Yum. So much better than the last sourdough pretzels I tried to make from that “royal” website that sells everything baking related. I think you’re now my first check-in when I’m seeking a new recipe.
Thank you. I was wondering if it is just a simpler way of doing it but similar results I like simple and will defiantly try it.