Sourdough Croissants


These sourdough croissants are deeply buttery, flaky, and worth the time they take to make. For fresh croissants at breakfast, the shaped dough can be refrigerated overnight and baked in the morning.
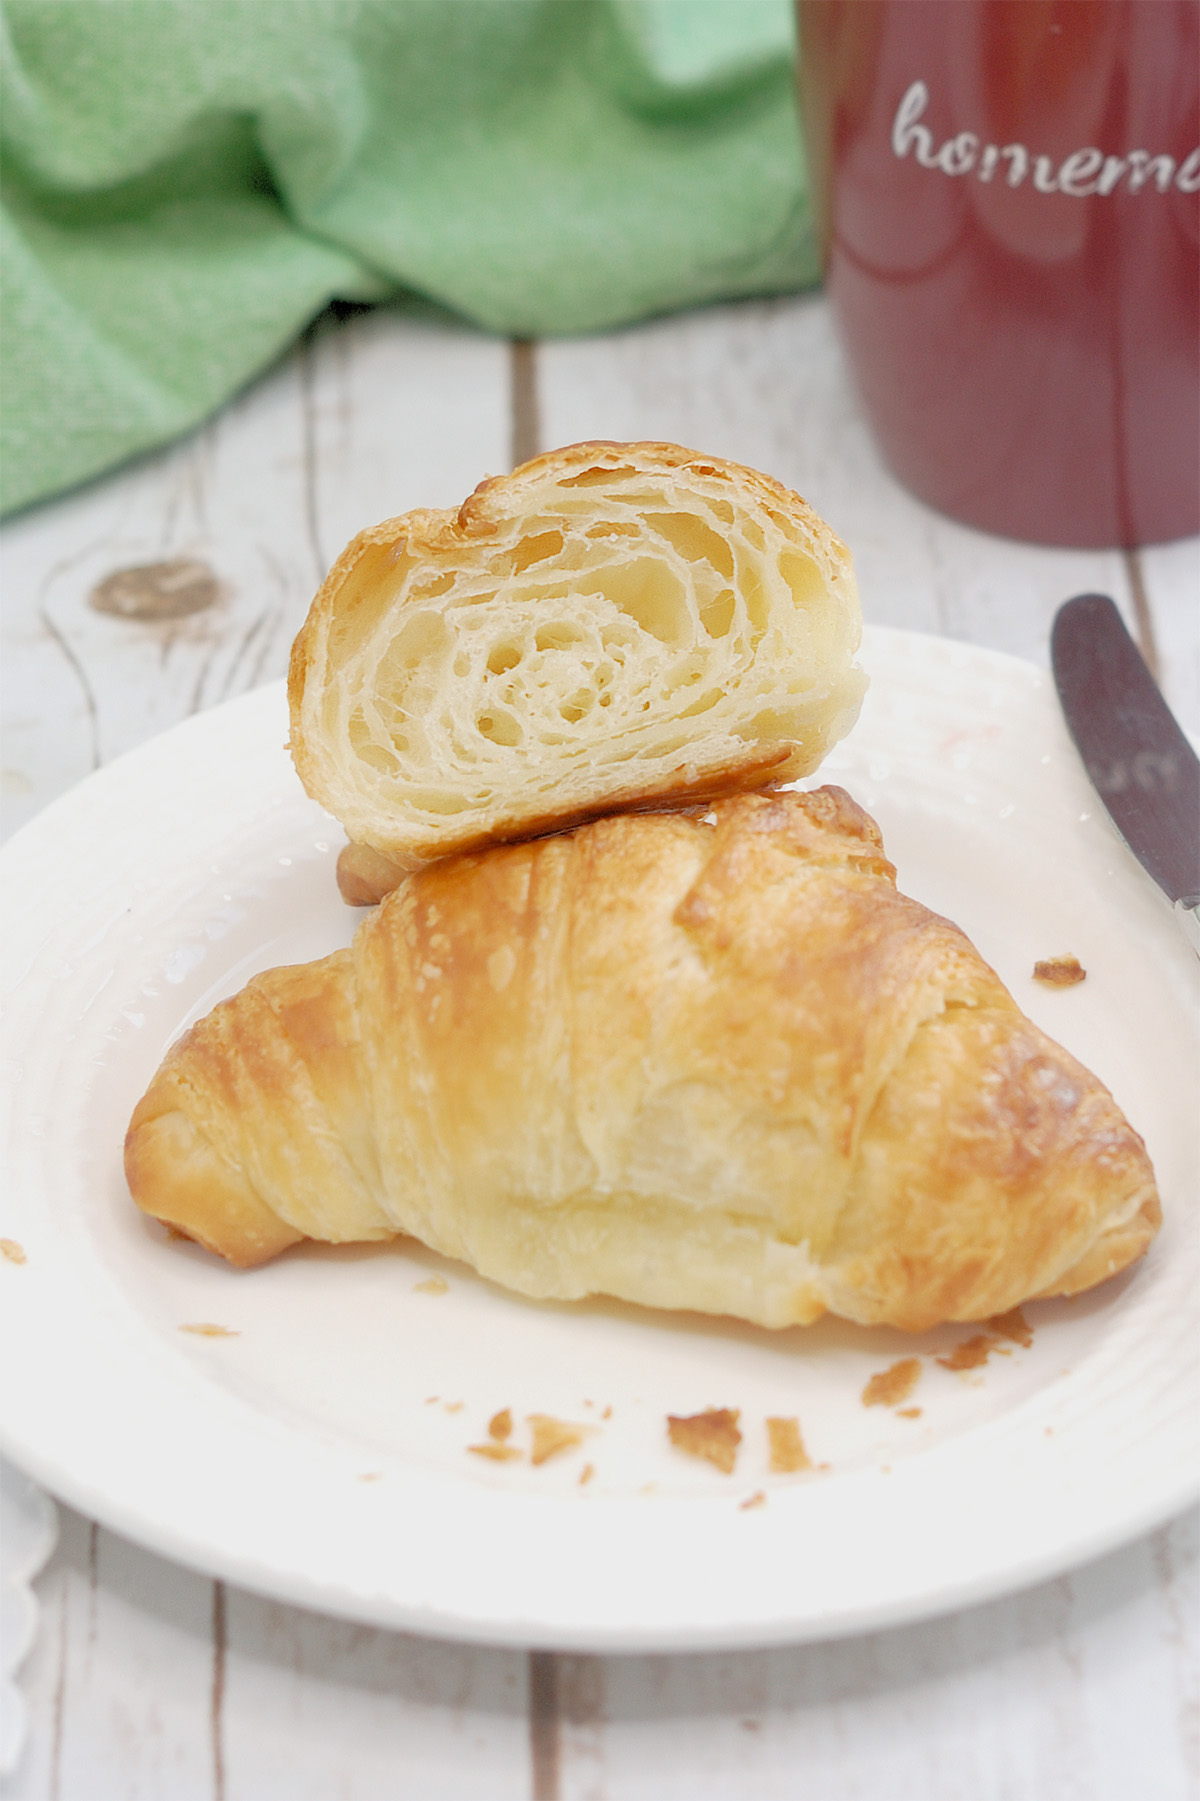
Croissants are buttery and flaky because they’re made with laminated dough—a dough wrapped around a block of butter, then rolled and folded repeatedly to create many thin layers.
Puff Pastry, Danish Dough and Kougin-Amann are all made with laminated dough.
Table of contents
About This Recipe
The difference between classic croissants and sourdough croissants is the use of a natural yeast starter to leaven the dough.
I baked over 100 Sourdough Croissants before I was ready to post the recipe. The basic ingredients were not hard to nail down, I simply replaced some of the water and flour in the dough with sourdough starter and removed the yeast.
Recipe Testing
I had two big hurdles to clear for this recipe: how to maintain bulk fermentation long enough to fully develop the dough, and how to preserve the butter layers during baking.
Because croissant dough contains milk and sugar, it’s an enriched dough. Enriched doughs ferment more slowly than lean doughs. If the dough is under-fermented, it can tear during rolling or proofing, allowing butter to leak out.
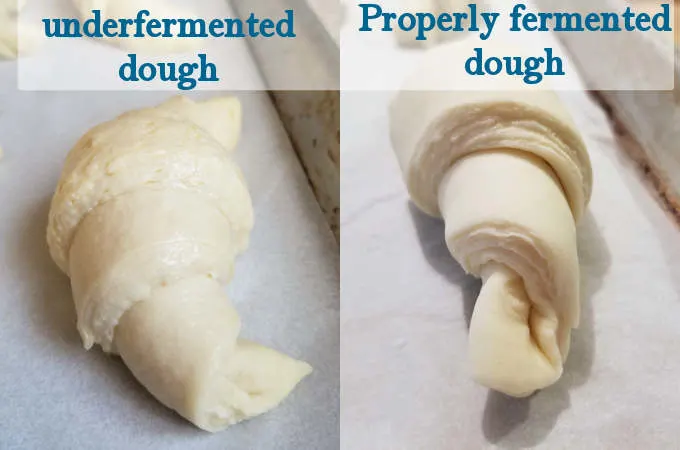
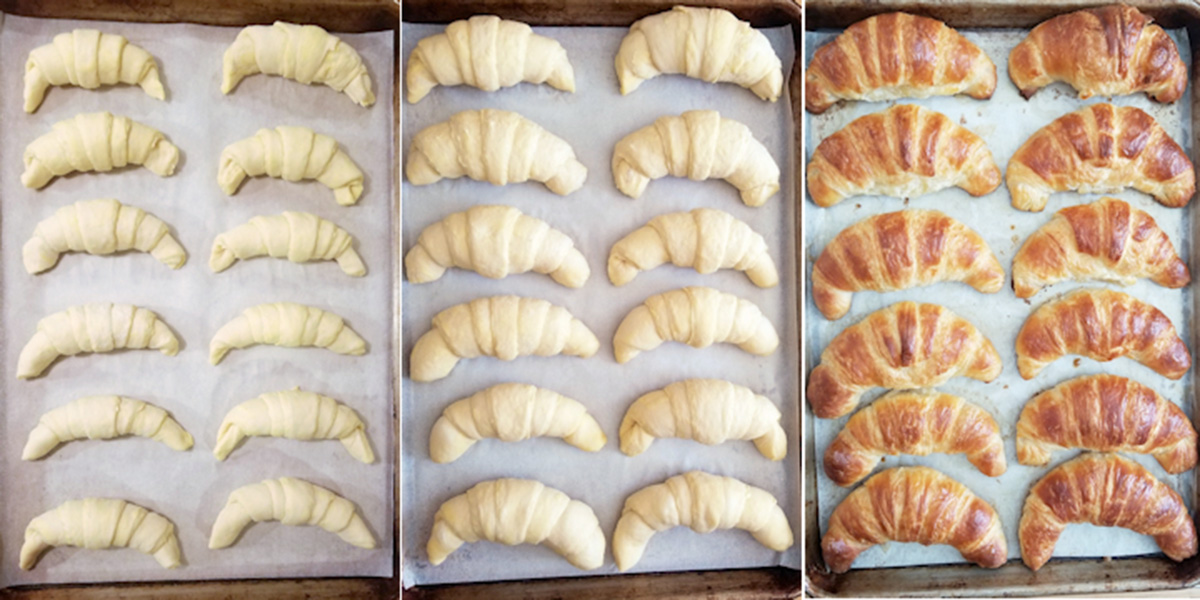
The croissant on the right was made after a full bulk fermentation. The dough was elastic, lively, and strong enough to support clean, distinct layers.
I found that the standard croissant method—chilling the dough after mixing and between every turn—slowed the natural yeast too much and compromised fermentation.
To solve this, I skipped the post-mixing refrigeration step and moved directly into lamination, completing the first two turns while the dough was still active. I chilled briefly before the final turn, then gave the dough a longer rest before shaping.
Ingredients
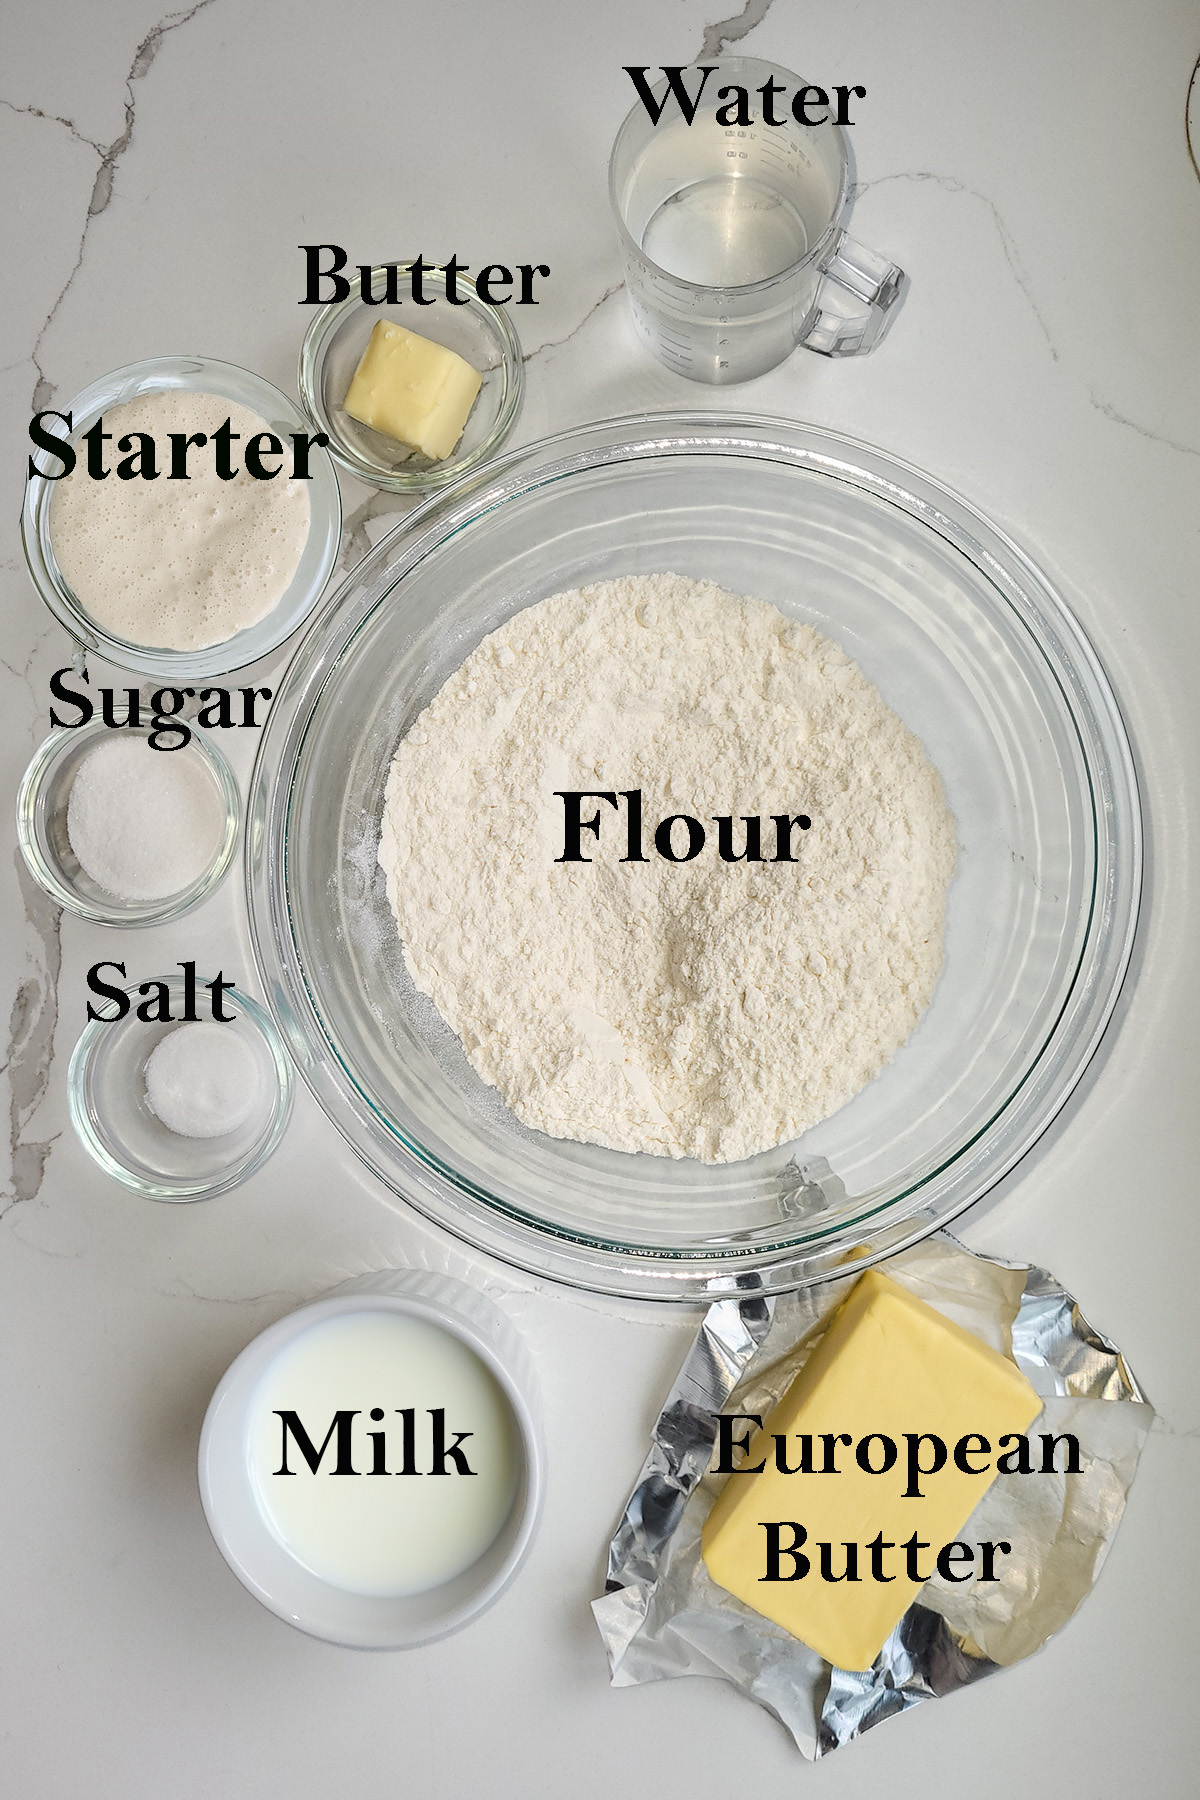
Ingredient Notes
- Sourdough Starter: This recipe uses a 100% hydration starter. It should be active and near peak when mixed into the dough.
- All-purpose flour: Medium-protein flour provides enough gluten for structure while keeping the pastry tender rather than chewy.
- European butter: I like to use European butter such as Kerry Gold for laminated dough because the low water content makes the butter more flexible. You can use American butter and still get good results.
Process Photos
Here’s what the recipe process looks like at each stage. Refer to the recipe card below for measurements and exact instructions.
Mixing The Dough & Bulk Fermentation

- Mix the dough and knead for 5 minutes. The dough should clear the bowl and cling to the hook.
- Begin bulk fermentation. Don’t rush this stage—full fermentation is key to dough strength and layer integrity later on.
- Every hour, fold the dough and flip it over to redistribute the yeast and develop the dough.
Laminating The Dough
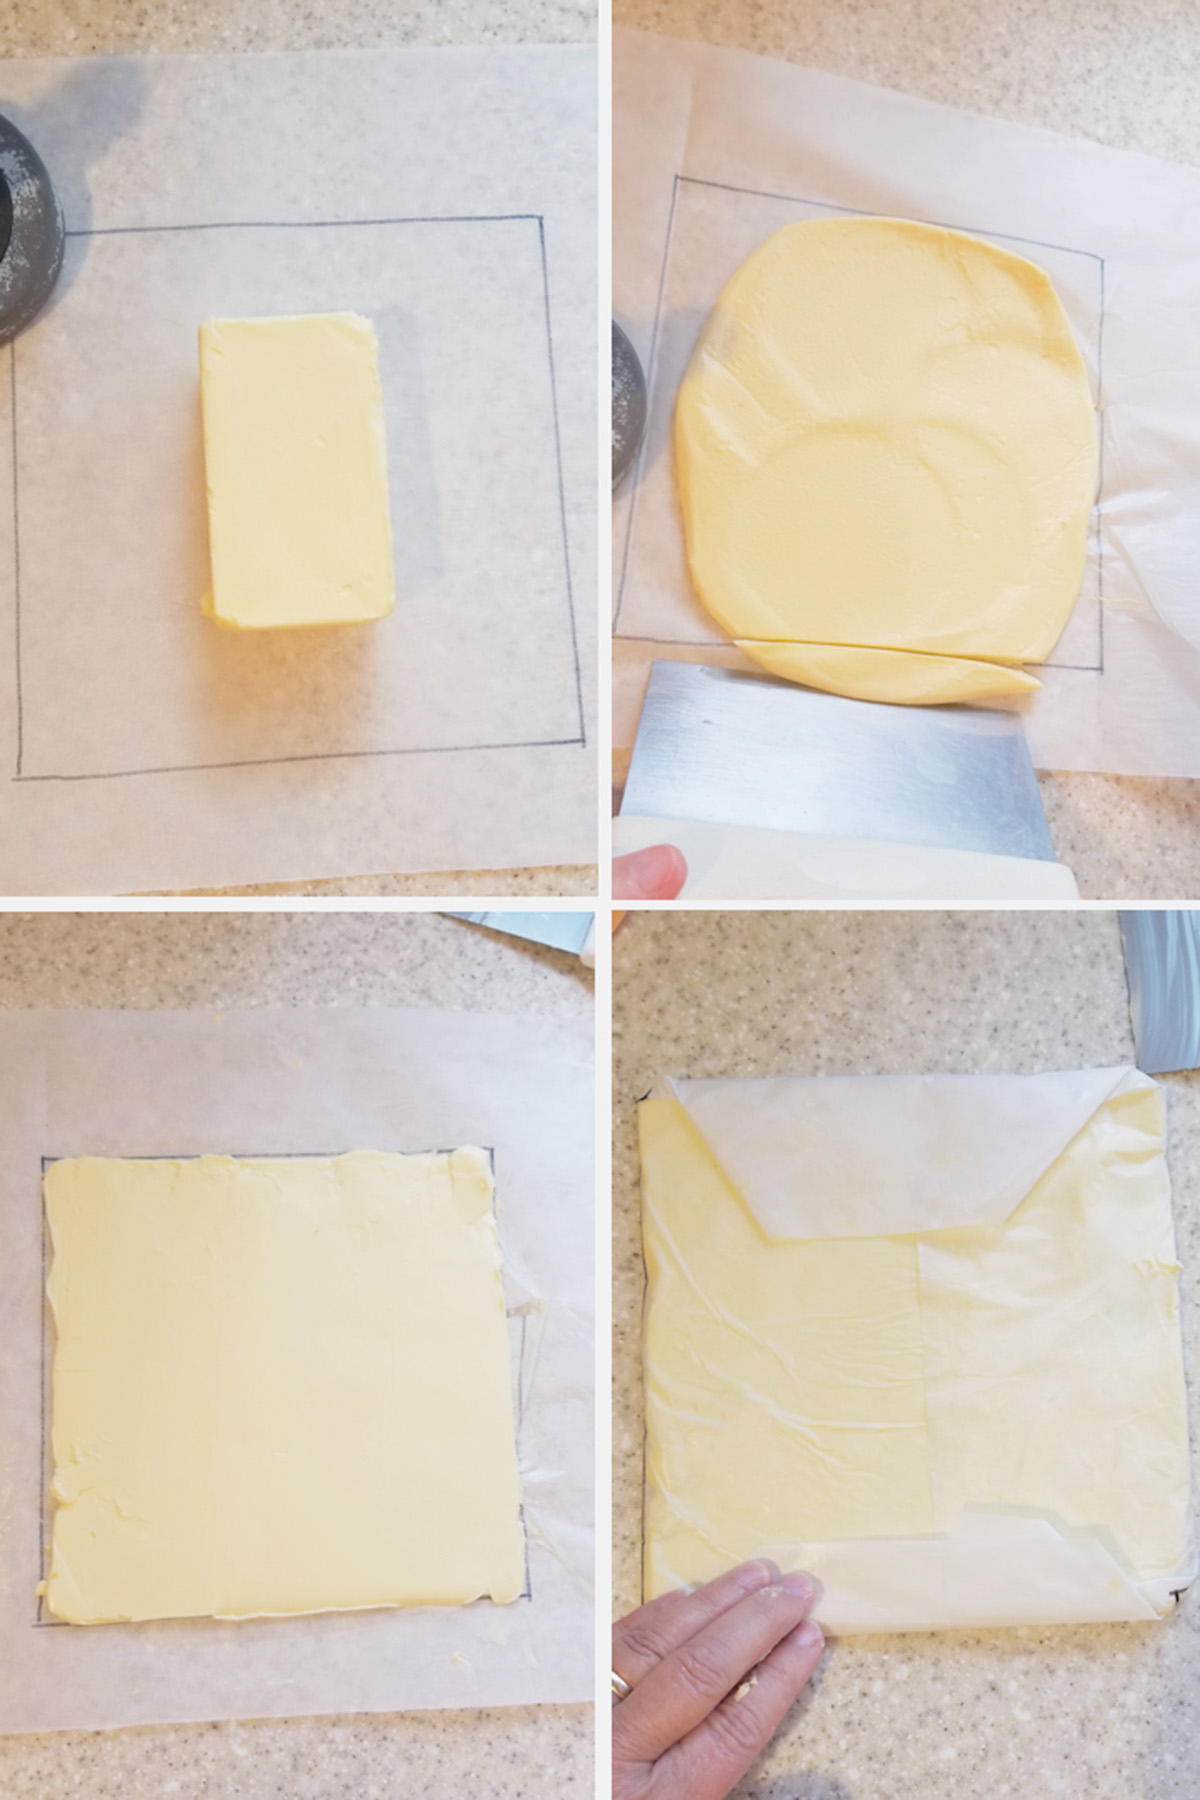
- Draw an 8″ square on a piece of parchment.
- Spread the butter out to fill the square.
- Fold the butter into the parchment and refrigerate.
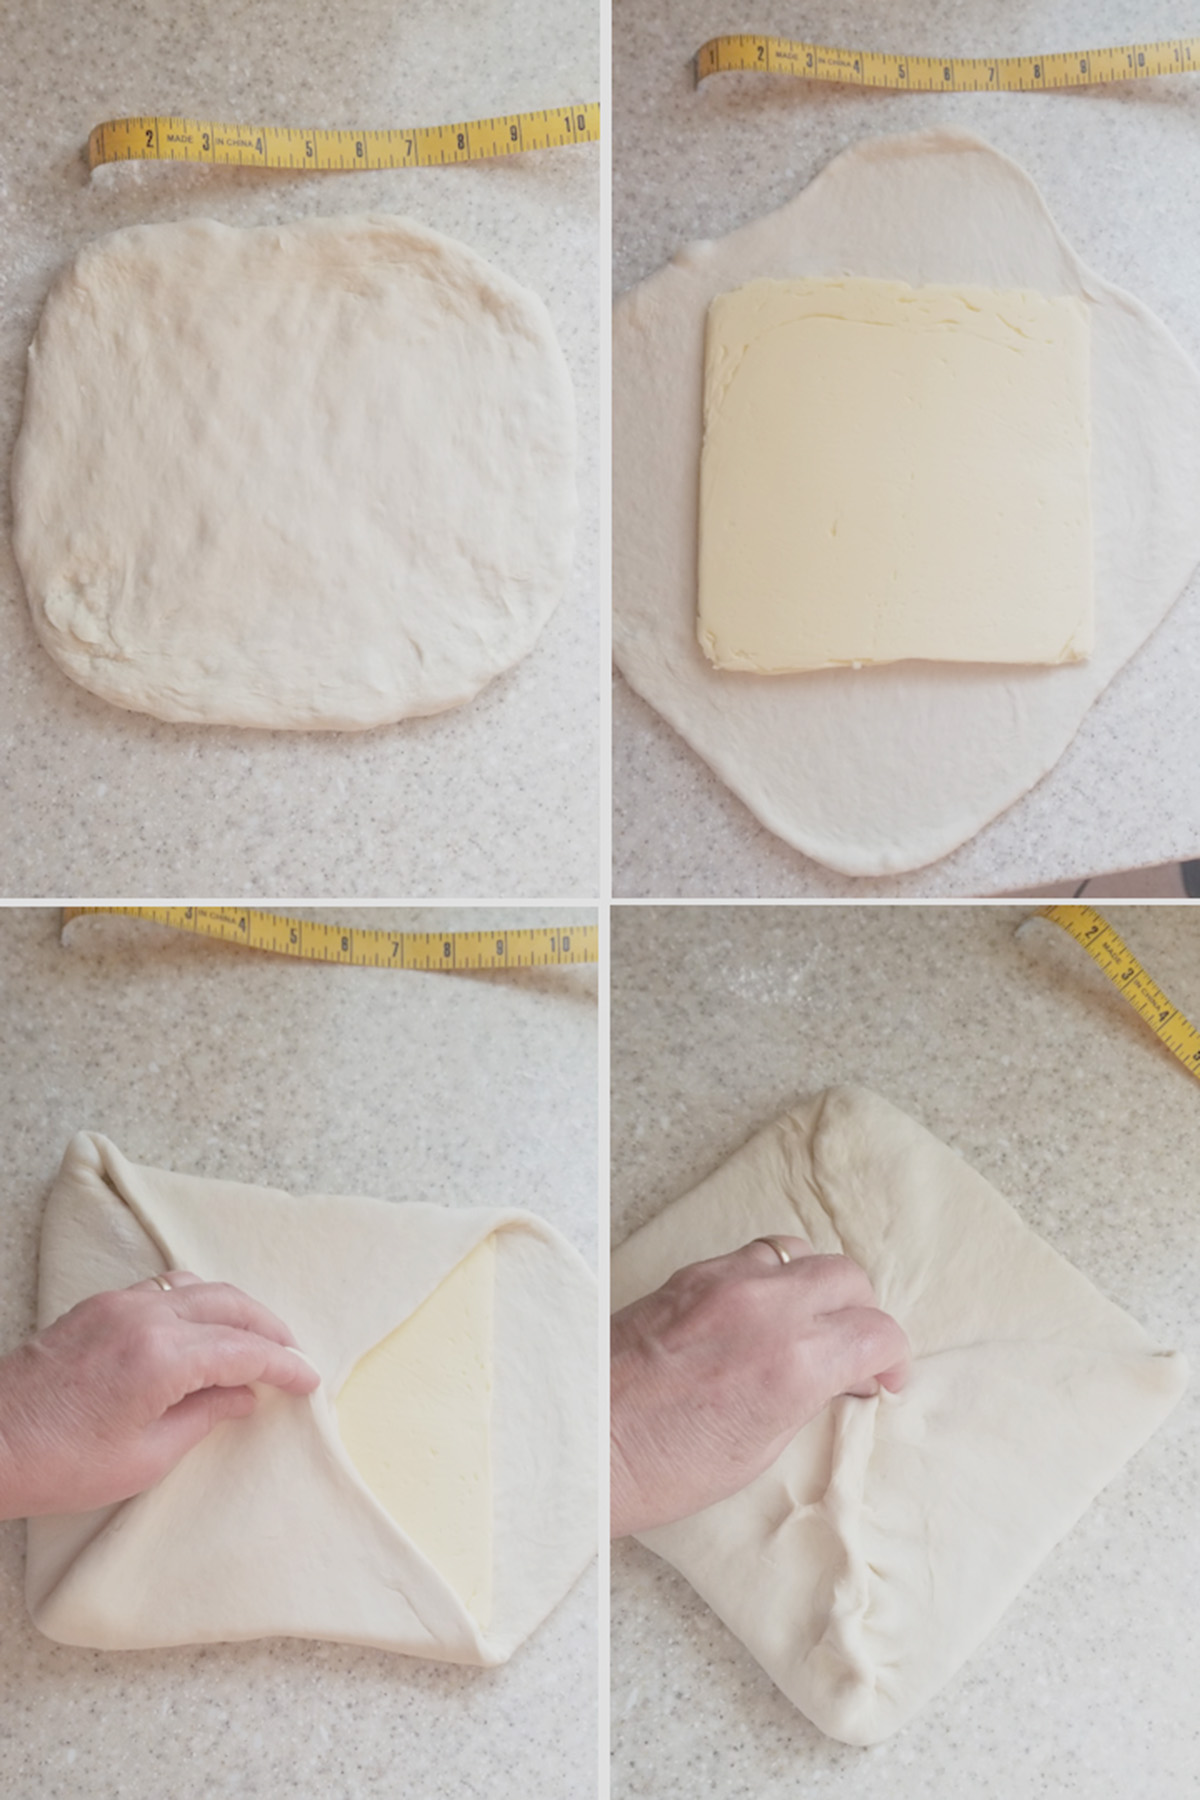
- Pat the dough to a square.
- Place the butter packet in the center.
- Fold the dough over the butter.
- Pinch the seams closed then begin rolling the dough.
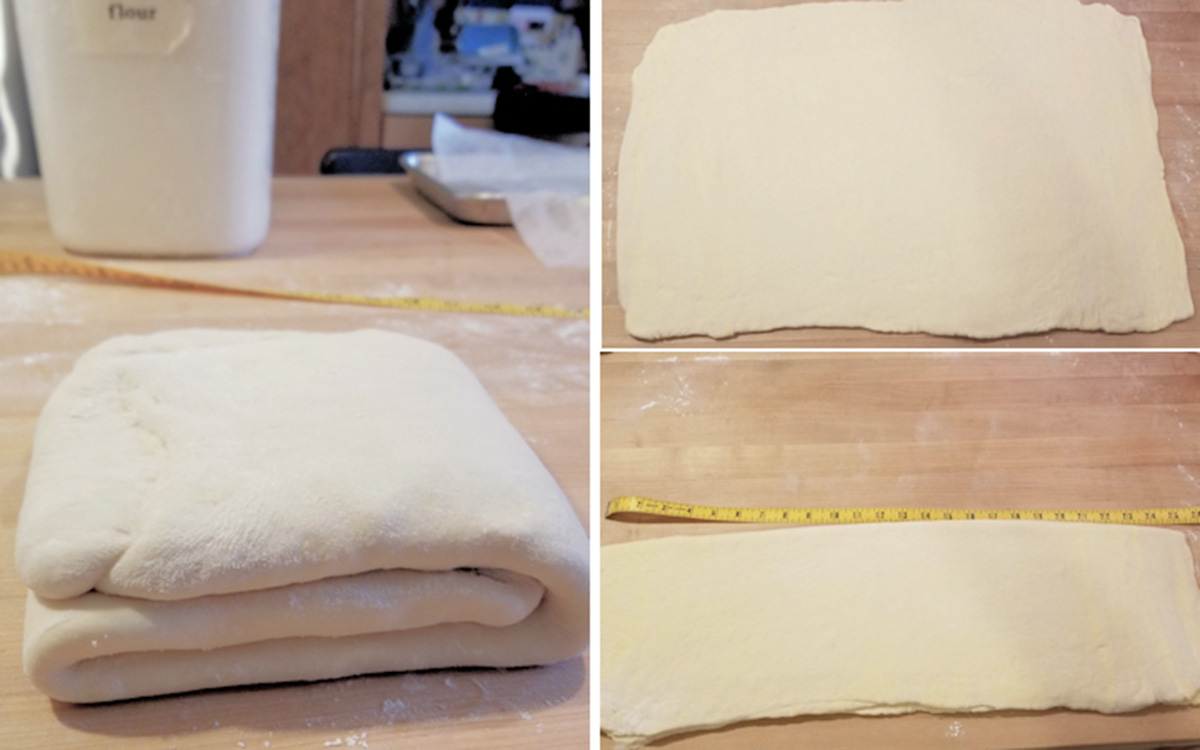
- Use the rolling pin to press on the dough before rolling to a 8″ x 24″ rectangle.
- Fold the dough like a letter. This is one “turn”.
- Repeat for a second “turn”. Chill the dough then do a third and final turn. Chill the dough for at least 2 hours before shaping the croissants.
Shaping The Croissants
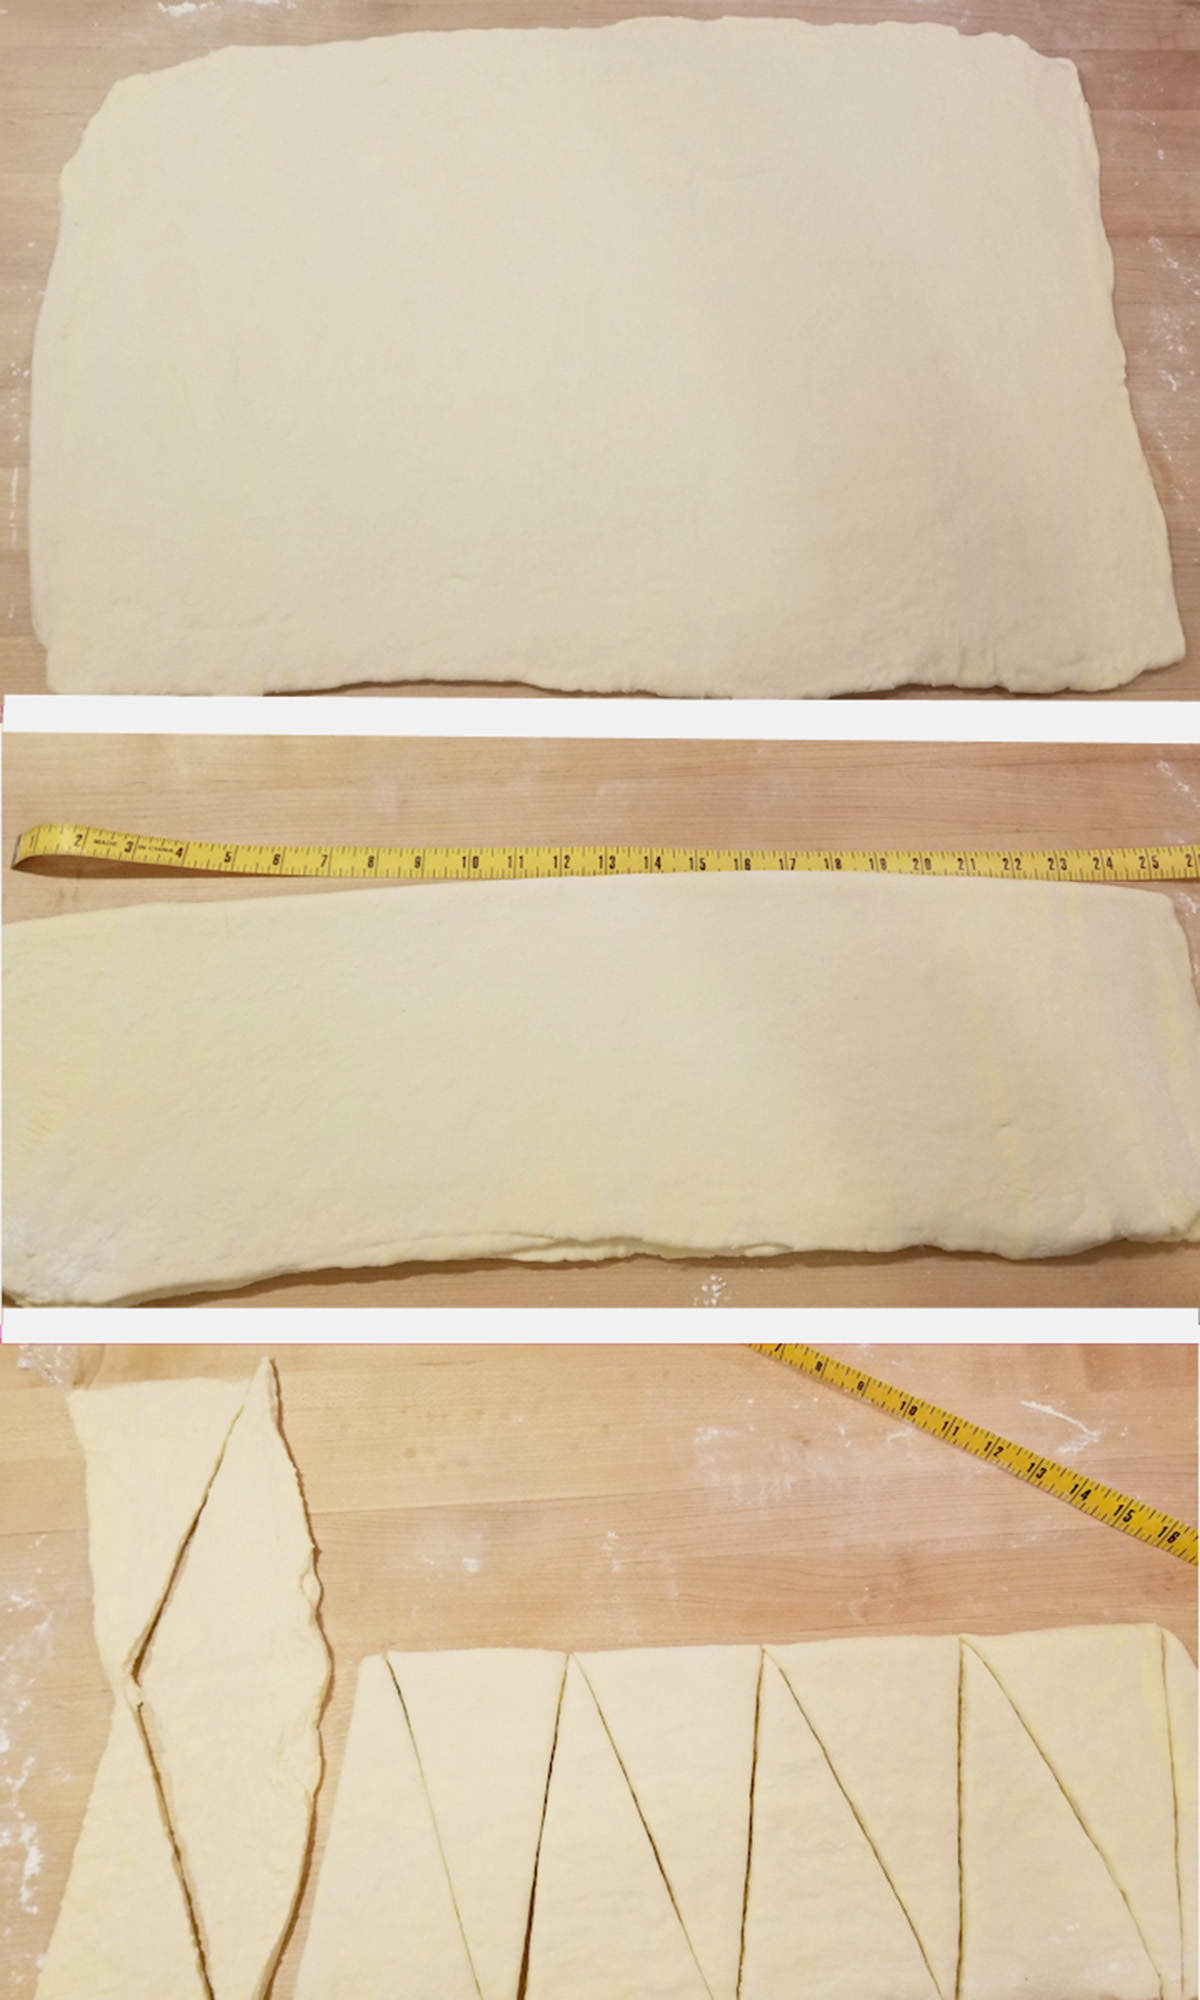
- Roll the dough into a 16″ × 24″ rectangle.
- Fold the dough in half lengthwise to form an 8″ × 24″ rectangle.
- Along the top edge of the dough, measure 2 inches from the left and make a mark. Using a pizza cutter or sharp knife, make a diagonal cut from that mark to the bottom-left corner of the dough. Save the small piece you cut off.
- Next, working from left to right:
- Measure and mark 4-inch increments along the bottom edge of the dough.
- Measure and mark 4-inch increments along the top edge of the dough.
- You should now see a pattern where each top mark sits between two bottom marks.
- Starting at the top-left corner, cut diagonally down to the first bottom mark to form a triangle. Then cut diagonally up to the next top mark. Continue alternating cuts across the dough.
- You should end up with 11 full triangles and two half triangles at the end. Pinch together the two half triangles to form another full triangle.
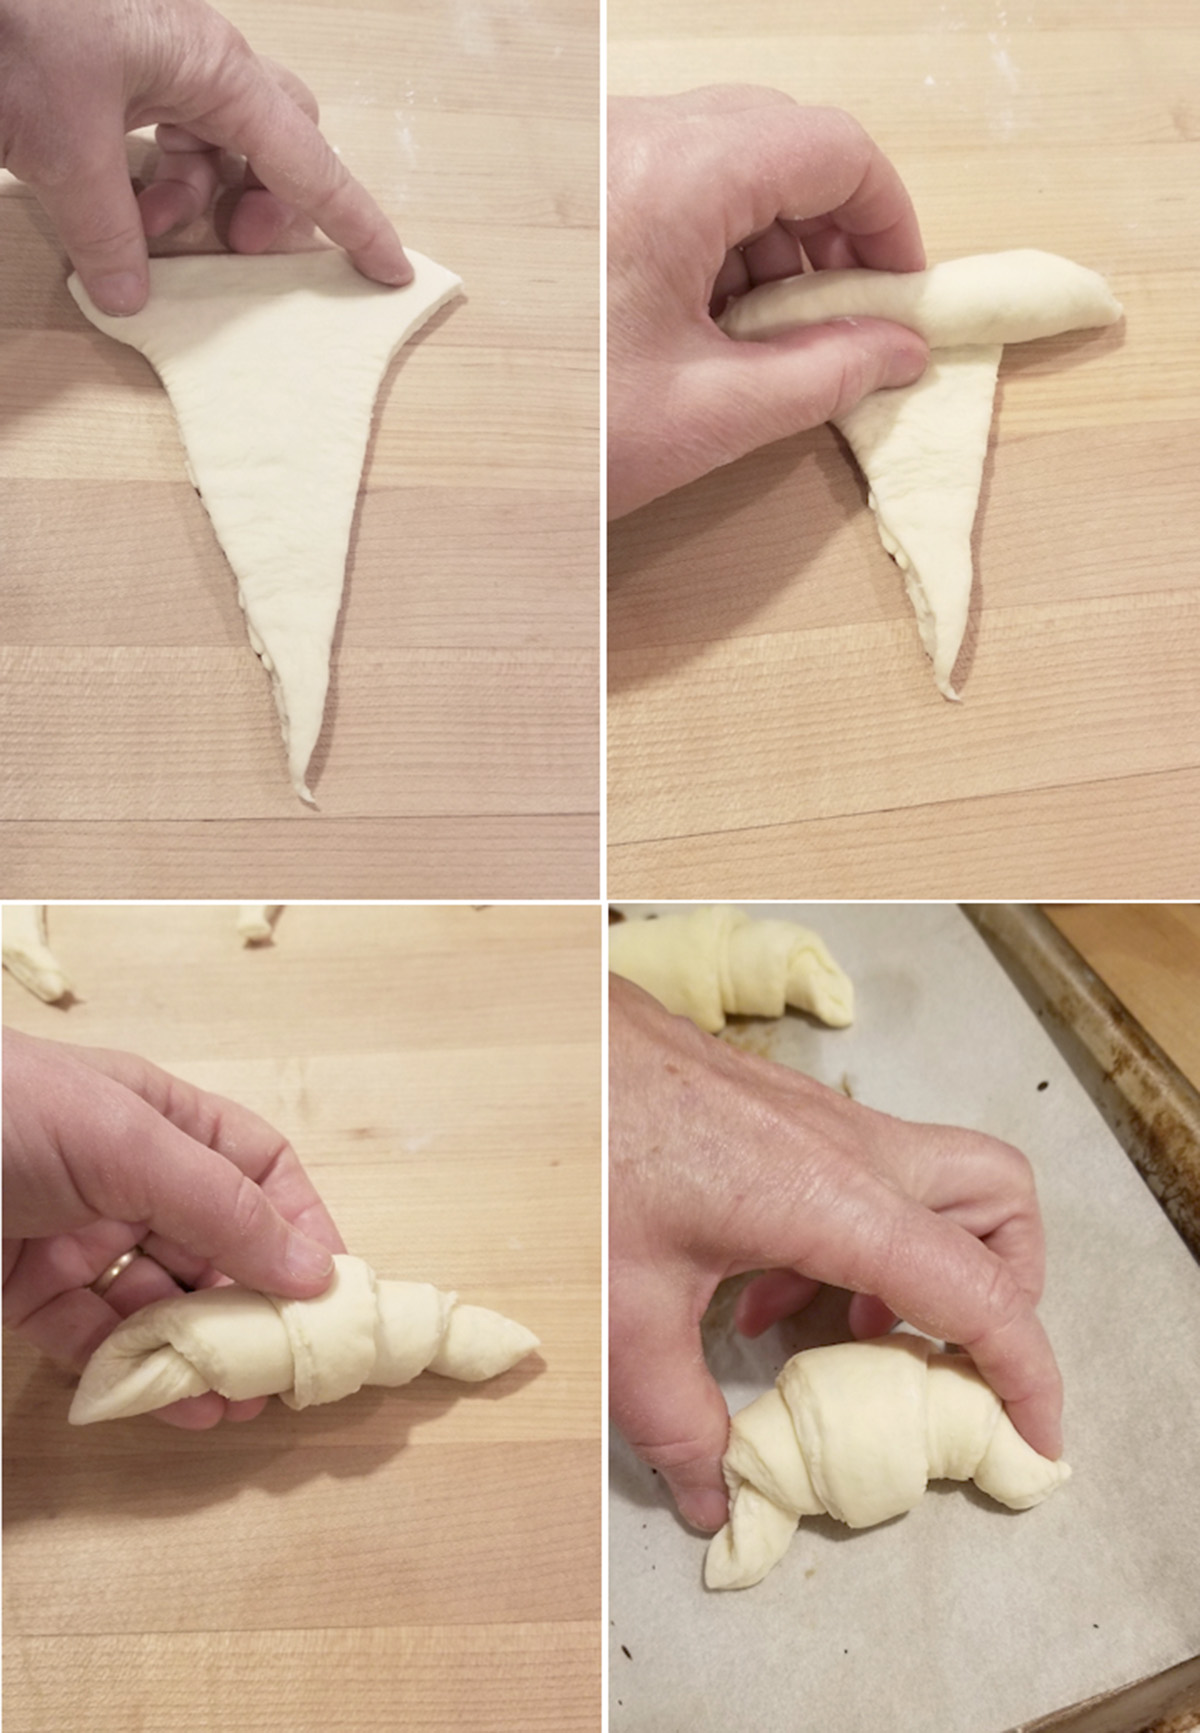
- Hold the triangle at the wide end and roll the dough while stretching from the point.
- Place the croissant on the tray and curve the two ends in to form a crescent shape.
Final Proof & Bake
- Cover the croissants and refrigerate overnight.
- In the morning, allow the croissants to finish proofing while the oven preheats. The croissant should be visibly larger, light and aerated.
- Bake until well-puffed and golden brown.
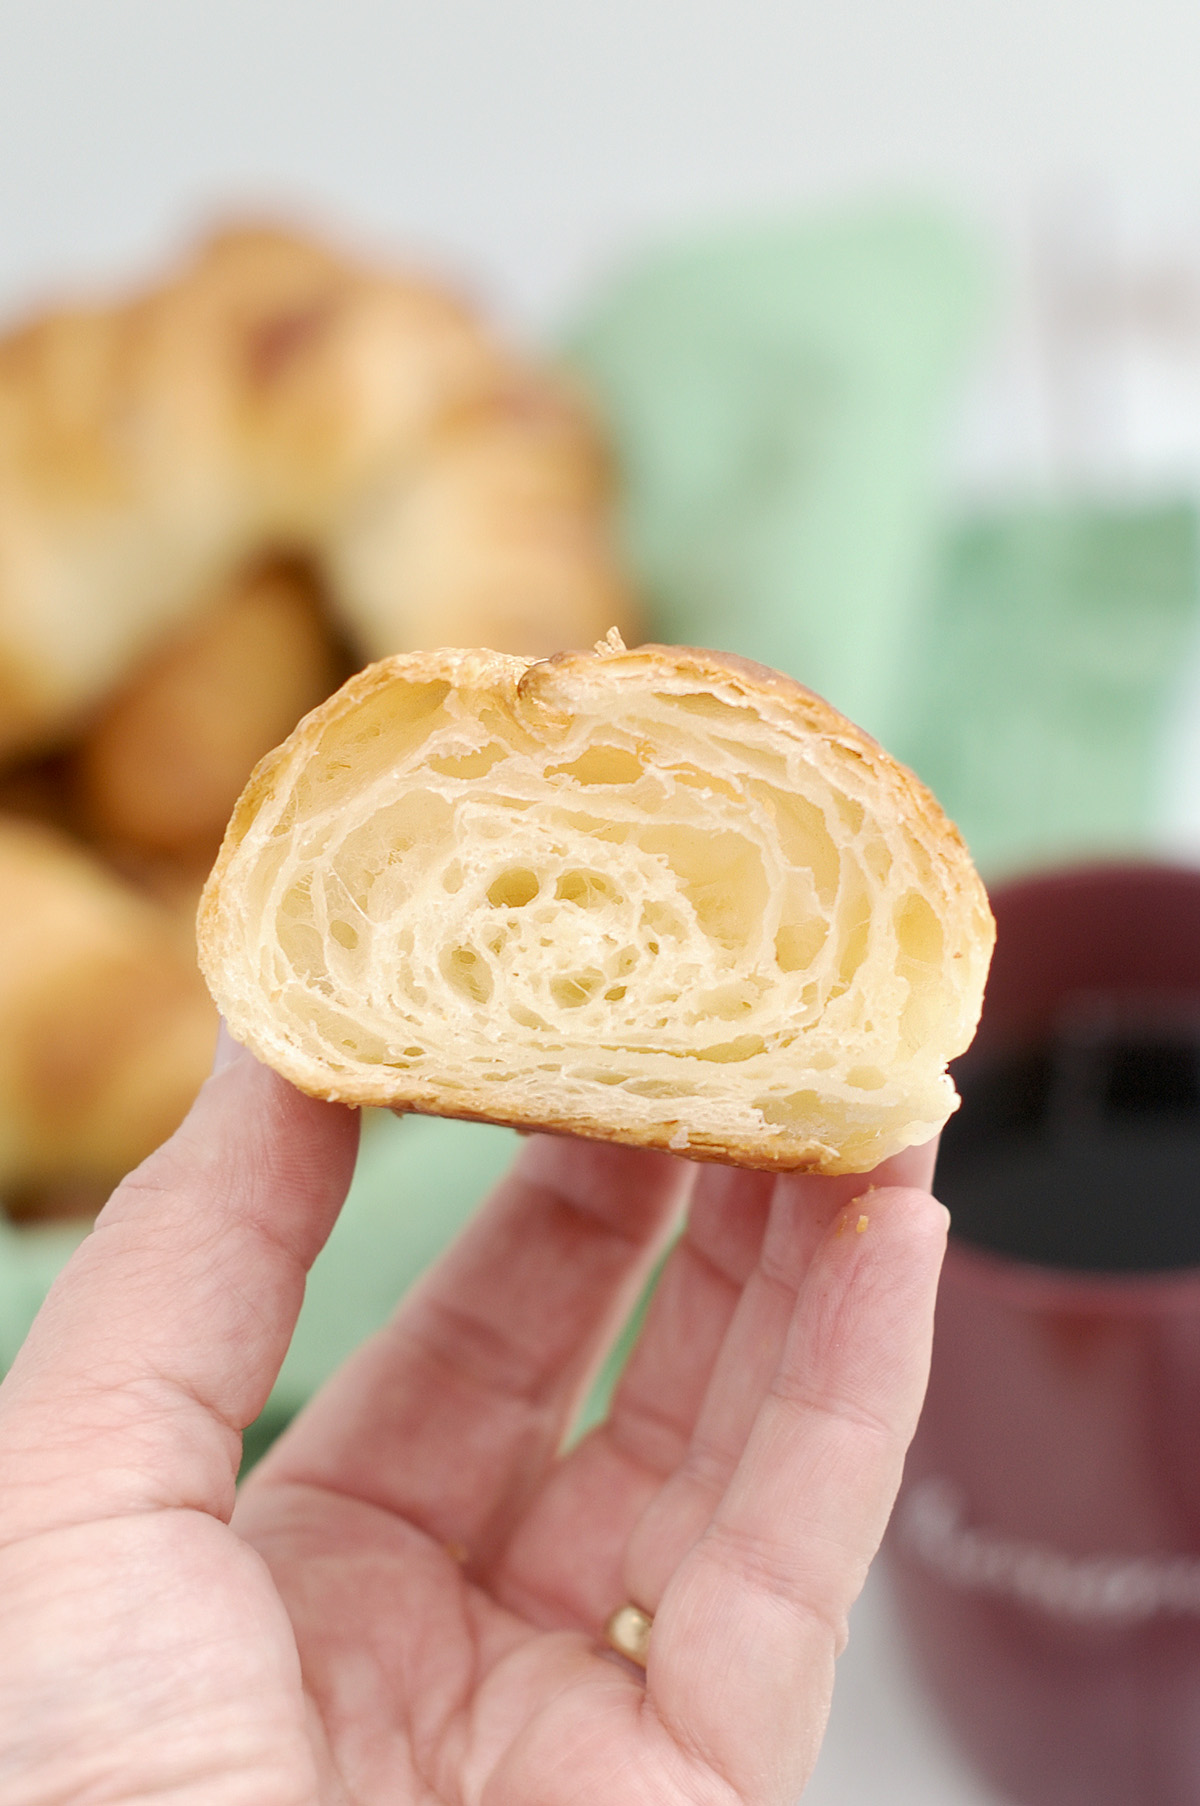
Over 100 croissants later, I can tell you that Sourdough Croissants have a depth of flavor that sets them apart from those made with commercial yeast. If you have a sourdough starter, I’m sure you know what I mean.
FAQs
If the butter begins to soften or melt at any point, stop rolling and refrigerate the dough briefly until it firms up again. Laminated dough should feel cool and flexible, not greasy. Working in a cool room and chilling as needed will help preserve distinct layers.
The times in this recipe are guidelines. Actual timing depends on how active your starter is, the temperature of your dough, and the ambient room temperature. Sourdough croissants are ready based on how the dough looks and feels—not the clock.
If you want a deeper explanation of how starter strength, temperature, and timing affect fermentation, I cover that in more detail in my Sourdough Baking Guide.
Yes. Shaped croissants can be refrigerated overnight and baked in the morning. In the morning, allow them to finish proofing at room temperature while the oven preheats, then bake as directed.
This recipe relies entirely on sourdough starter for fermentation. Using only natural yeast gives the croissants deeper flavor, but it also means fermentation takes longer and requires more patience than yeasted croissants.
Chilling the dough immediately after mixing slows natural yeast activity too much and can compromise fermentation. By moving directly into lamination, the dough stays active and develops better structure before chilling later in the process.
Yes, but you’ll need to watch the dough and butter closely. If the butter softens too much, refrigerate briefly before continuing. The goal is to keep the dough active while preventing the butter from melting into the dough.
I know you hate to throw away that sourdough discard. Check out these recipes that use sourdough discard.
Are you a chocoholic? Me too. Use this dough to make decadent and delicious Chocolate Croissants. You’re welcome!
I’ve also got a recipe for almond lovers, Almond Filled Croissants are a little decadent and a lot delicious.
If you love this recipe as much as I do, I’d really appreciate a star rating and a quick comment. Ratings and comments help my recipes show in search results. Thanks!

Overnight Sourdough Croissants
Video
Ingredients
- 8 oz active sourdough starter (1 cup, 100% hydration)
- 10 oz whole milk (1 ¼ cups, scalded and cooled to 110 °F)
- 17 ½ oz unbleached all purpose flour (3 ½ cups, see note)
- 3 oz granulated sugar (⅓ cup)
- 2 teaspoons table salt
- 16 oz unsalted butter (pliable but still cool)
- 1 egg (for egg wash)
Instructions
- Place 8 oz active sourdough starter, 10 oz whole milk and 10 oz unbleached all purpose flour in the bowl of a stand mixer with the paddle attachment. Mix to form a thick batter. If working by hand mix with a wooden spoon. Cover the bowl and let it rest for 30 minutes.
- Switch to the dough hook. Add 3 oz granulated sugar, 2 teaspoons table salt and 7 ½ oz unbleached all purpose flour. Mix until the dough gathers on the hook and clears the sides of the bowl, about 3-5 minutes on medium speed. If working by hand stir in as much flour as you can with a wooden spoon, then finish kneading in the rest of the flour by hand.
- Transfer the dough to a lightly oiled bowl, turning once to coat the dough. Cover the bowl and set it aside at room temperature. After 1 hour uncover the bowl, lift one side of the dough over into the middle of the dough. Repeat with the other three sides of the dough then flip the dough over. Repeat this procedure every hours for 3-5 hours. By now the dough should be lively, elastic and airy. If the dough is still sluggish give it another hour or two at room temperature.
- Prepare the butter package. Draw an 8" square in the center of a piece of parchment paper. Flip the paper over and set 16 oz unsalted butter in the middle of the square. Fold the parchment over the butter. Use a rolling pin or other heavy object (I use the flat side of a meat tenderizer) to flatten the butter to fill the 8"x 8" square. Trim and rearrange the edges of the butter as needed. Fold the butter into the parchment and place in the refrigerator. 30 minutes before the dough is finished fermenting, remove the butter from the refrigerator. (If your kitchen is very warm, take the butter out 10 minutes ahead.) The butter should be firm and cool but a little flexible for layering into the dough.
- Turn the dough out onto a lightly floured surface. Do not knead out the air. Roll the dough to a 10" square. Once you have a square, roll from each of the four sides to form a 3" flap of the dough, leaving the center thicker than the flaps. You should end up with a square with four "flaps" coming out from the corners. Now it's time to layer in the butter.
- Unwrap the butter and place it in the middle of the square. Fold the flaps so they overlap and enclose the butter, pinching in the corners as necessary to glue the seams together. You should now have an 8" square of dough with the butter enclosed. Use the rolling pin to gently press on the square to flatten it. Roll the dough to a 8" x 24" rectangle. Take your time to roll gently and evenly so the butter stays in one layer in the dough.
- Orient the dough so the long side of the rectangle is facing you. Brush off the excess flour. Brush the entire surface of the dough with cold water. Fold the right 1/3 of the dough towards the middle then fold the left 1/3 of dough over enclosing it like a letter. This is the first "turn".
- Orient the dough so the closed edge is on the top side and the open edge is facing you. Roll the dough again to an 8" x 24" rectangle. Brush off the excess flour. Brush the entire surface of the dough with cold water and again fold the dough like a letter. This is the second "turn". Set the dough on a sheet pan, cover with plastic and refrigerate at least 30 minutes.
- Remove the dough from the refrigerator and do a third turn exactly like the first 2. Wrap the dough and place it in the refrigerator for at least 2 hours.
- Line 2 baking sheets with parchment paper or a silicone baking mat. Roll the chilled dough to a 24” long x 16” wide rectangle. With the long side facing you, fold the top half of the dough over the bottom half to form a 24” long x 8” wide rectangle.
- Starting from the left, measure along the top edge of the dough and make a mark at 2”. Using a pizza cutter or sharp knife, make a diagonal cut from that mark to the bottom left edge of the dough. Save the piece that you cut off.
- Working from left to right, measure and mark 4” increments along the bottom edge of the dough. Working from left to right, measure and mark 4” increments along the top edge of the dough. You should have a pattern of one top mark between two bottom marks. Starting from the top left, make a diagonal cut to the next mark on the bottom edge, forming a triangle. Then cut from the bottom to the next top mark. Continue this pattern to cut 11 alternating triangles and one 1/2 triangle end piece. Save the 1/2 triangle piece you cut from the end of the dough.
- Unfold the triangles and cut each in half along the joint so you have a total 22 triangles. Unfold the 1/2 triangle pieces which you cut from either end. Pinch them together to form 2 more triangles.
- To form a croissant, hold a triangle from the wide base in one hand and gently stretch the width a little. Set the dough on the work surface with the narrow end pointing towards you. Roll the croissant towards the pointed end, holding on to the tip and gently tugging as you roll. Bend either end of the croissant towards the middle to form the crescent shape.
- Set the croissants on the prepared baking sheets, 3” apart. You should fit a dozen croissants per half sheet pan. Cover with plastic wrap and set in the refrigerator overnight. (see note)
- In the morning. Take the croissants out of the refrigerator. Allow them to proof at room temperature for 3-4 hours. The exact time needed for proofing will vary depending how active your starter was and the temperature of your kitchen. They should be at least 50% larger than they started and feel airy and puffy. Preheat the oven to 400 °F. Brush the croissants with egg wash. Bake the croissants until golden brown, 15-20 minutes. Serve warm or room temperature.
Would you like to save this recipe?


As an Amazon Associate and member of other affiliate programs, I earn from qualifying purchases.

Hi Eileen,
Thank you for the recipe! Do you use active dry yeast or instant yeast?
Thanks again!
Whatever I happen to have on hand. Usually active dry.
Hi Eileen,
My office baking expert recommended your website and I am so thankful for the recommendation. I enjoyed going through your baking lessons one by one and I made your sourdough bread, pretzel, pita and hamburger buns. Thank you.
I tried to make the croissants this past weekend. My dough looked fabulous until lamination: I took the dough out of the fridge to roll it out and it was very tight, very firm and very springy. I was barely able to stretch it wide enough for my butter layer, and even then I stretched it out in the air like a pizza dough, instead of rolling it out. Rolling just didn’t work.
Needless to say, none of my lamination turns were easy. I wasn’t able to stretch it out for the last fold and I just folded it on itself with a sigh. I managed to cut and roll them in a dense croissant like shape but they didn’t proof at room temperature and unrolled in the oven. The layers looked great, but the dough didn’t have any spring to it, it rather looked like piles or flat, buttery vol-au-vent.
I used all purpose unbleached flour. I don’t know how old the flour was, could that have made a difference?
Any idea what else I could have done wrong?
Also if you are looking for a new challenge, I would love a sourdough vol-au-vent pastry recipe… 🙂 Cheers!
You said “I took the dough out of the fridge to roll it”… Did you refrigerate the dough before beginning lamination? I have better results when I go directly from fermentation to lamination. With the milk and sugar in it, this dough is usually pretty supple. Did you knead the dough after it was mixed? The recipe has you mix the dough just until it comes together without additional kneading. Unbleached ap flour is exactly what I use. Unless the flour is rancid, the age doesn’t matter. At any point in the process if the dough gets really springy a 30 minute rest in the fridge will give it some slack.
Hi,
I would love to try this recipe but I am vegan. Any success with vegan butter?
Thanks,
I personally don’t have experience using vegan butter, but here is a quote from a previous comment on this recipe “We are vegan, so we used soy milk and vegan butter for the dairy products and I used a oil wash instead of an egg wash. These are so good!”.
I’ve made these twice (well, I’m in the middle of the second time now). Both times I’ve found that as soon as I start rolling things out with the butter inside, the butter oozes out the edges and gets all over the rolling pin, all over the counter, all over my hands. After the first turn or two, as the layers of dough get thinner, it starts escaping from the middle of the sheet as well as the edges. Any suggestions as to what I’m doing wrong, or is this just what happens when you make croissants?
Some differences that might explain it: I’m using mostly bread flour (with a little whole-wheat), rather than all-purpose because I didn’t happen to have any all-purpose in the house. And I’m making a half batch, so the rolling measurements needed to be reduced, e.g. a 6″x6″ square rather than 8″x8″. Is halving the recipe just a doomed exercise?
Start with butter that is chilled enough that it is firm but is slightly pliable. If your butter is oozing it must be too warm.
Followed this recipe and they came out PERFECT! Drizzled some chocolate on a few and they were so yummy!