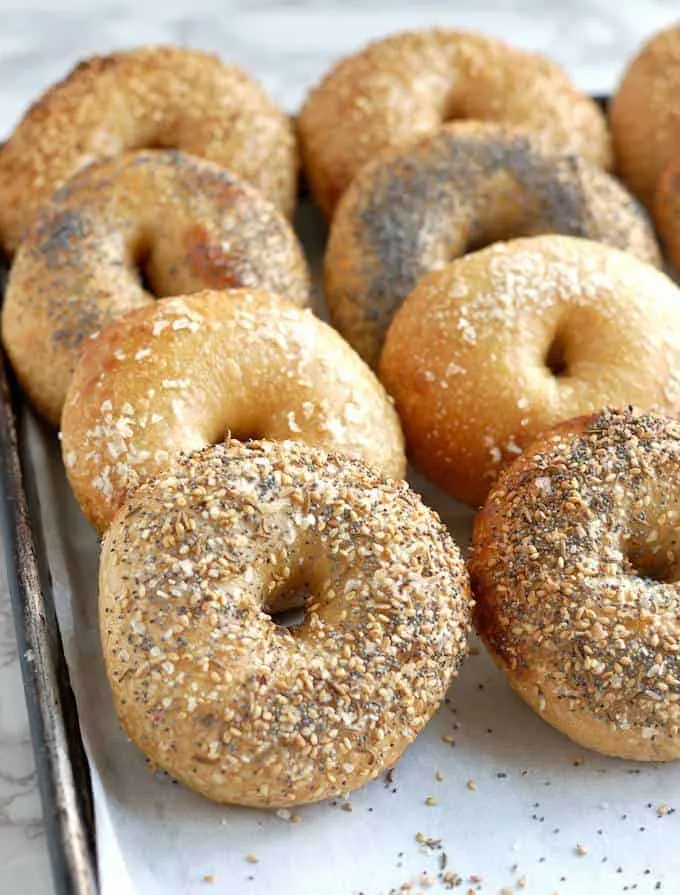
Overnight New York Style Bagels


These bagels are chewy, crusty and properly dense New York Style Bagels. The overnight rise creates the perfect texture and flavor – and you’ll have fresh, hot bagels for breakfast or brunch less than an hour after getting out of bed.
What is a true New York Style Bagel?
I promise you if you follow this recipe correctly you can make a good bagel at home. I mean, there are loads of really bad bagels in the world and life is just too short to eat a bad bagel.
Like a really great loaf of Rye Bread there’s nothing like a true New York style bagel.
A good New York Style Bagel (really, is there any other kind?) must have a nicely dense and chewy texture with a toothsome crust.
To get that characteristic chewiness we’ve got to develop some really strong gluten in the dough.
If you love baking bread and want to understand the process a little better, take a look at comprehensive Bread Baking Guide. It covers the basics of mixing, kneading, proofing, and baking so you can get perfect results every time.
If you’ve got a sourdough starter, you can make Homemade Sourdough Bagels .
Ingredients
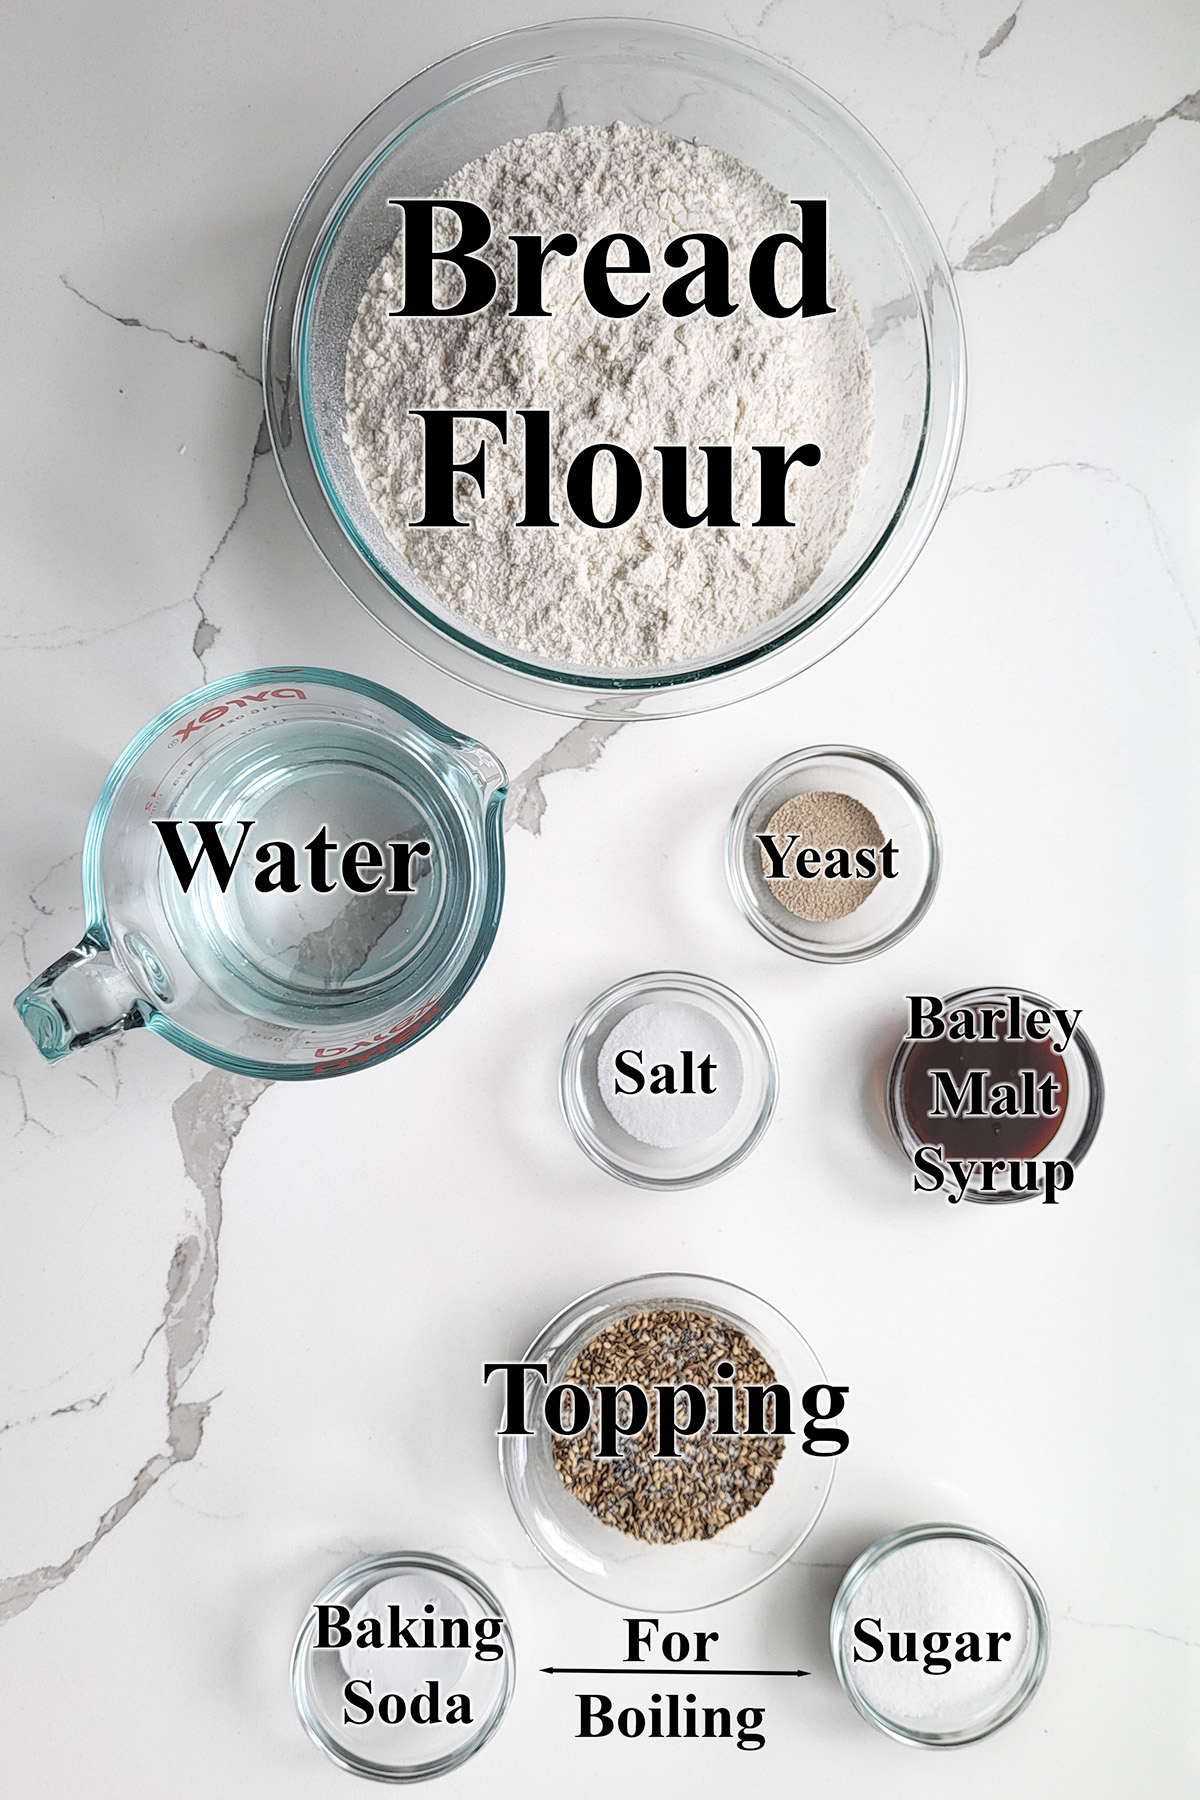
Ingredient Notes
- Bread Flour – Bagels should have a very chewy crumb from a strong gluten network in the dough. High protein bread flour develops plenty of gluten.
- Yeast – I prefer instant yeast to rapid rise yeast for a slightly slower rise. A slow overnight rise gives more time for flavor to develop.
- Barley Malt Syrup – Adds a traditional slightly sweet note to the dough. You can substitute honey or a combination or honey and molasses for the barley malt syrup.
- Toppings – Leave the bagels plain or use your favorite seed for topping. You can mix seeds with salt to make your own “everything” bagel topping”. See the recipe card for details.
- Baking Soda & Sugar – For boiling the bagels. The boiling process creates the specific shiny and chewy bagel crust.
How to make New York style Bagels
Here’s what the recipe process looks like at each stage. Refer to the recipe card below for measurements and exact instructions.
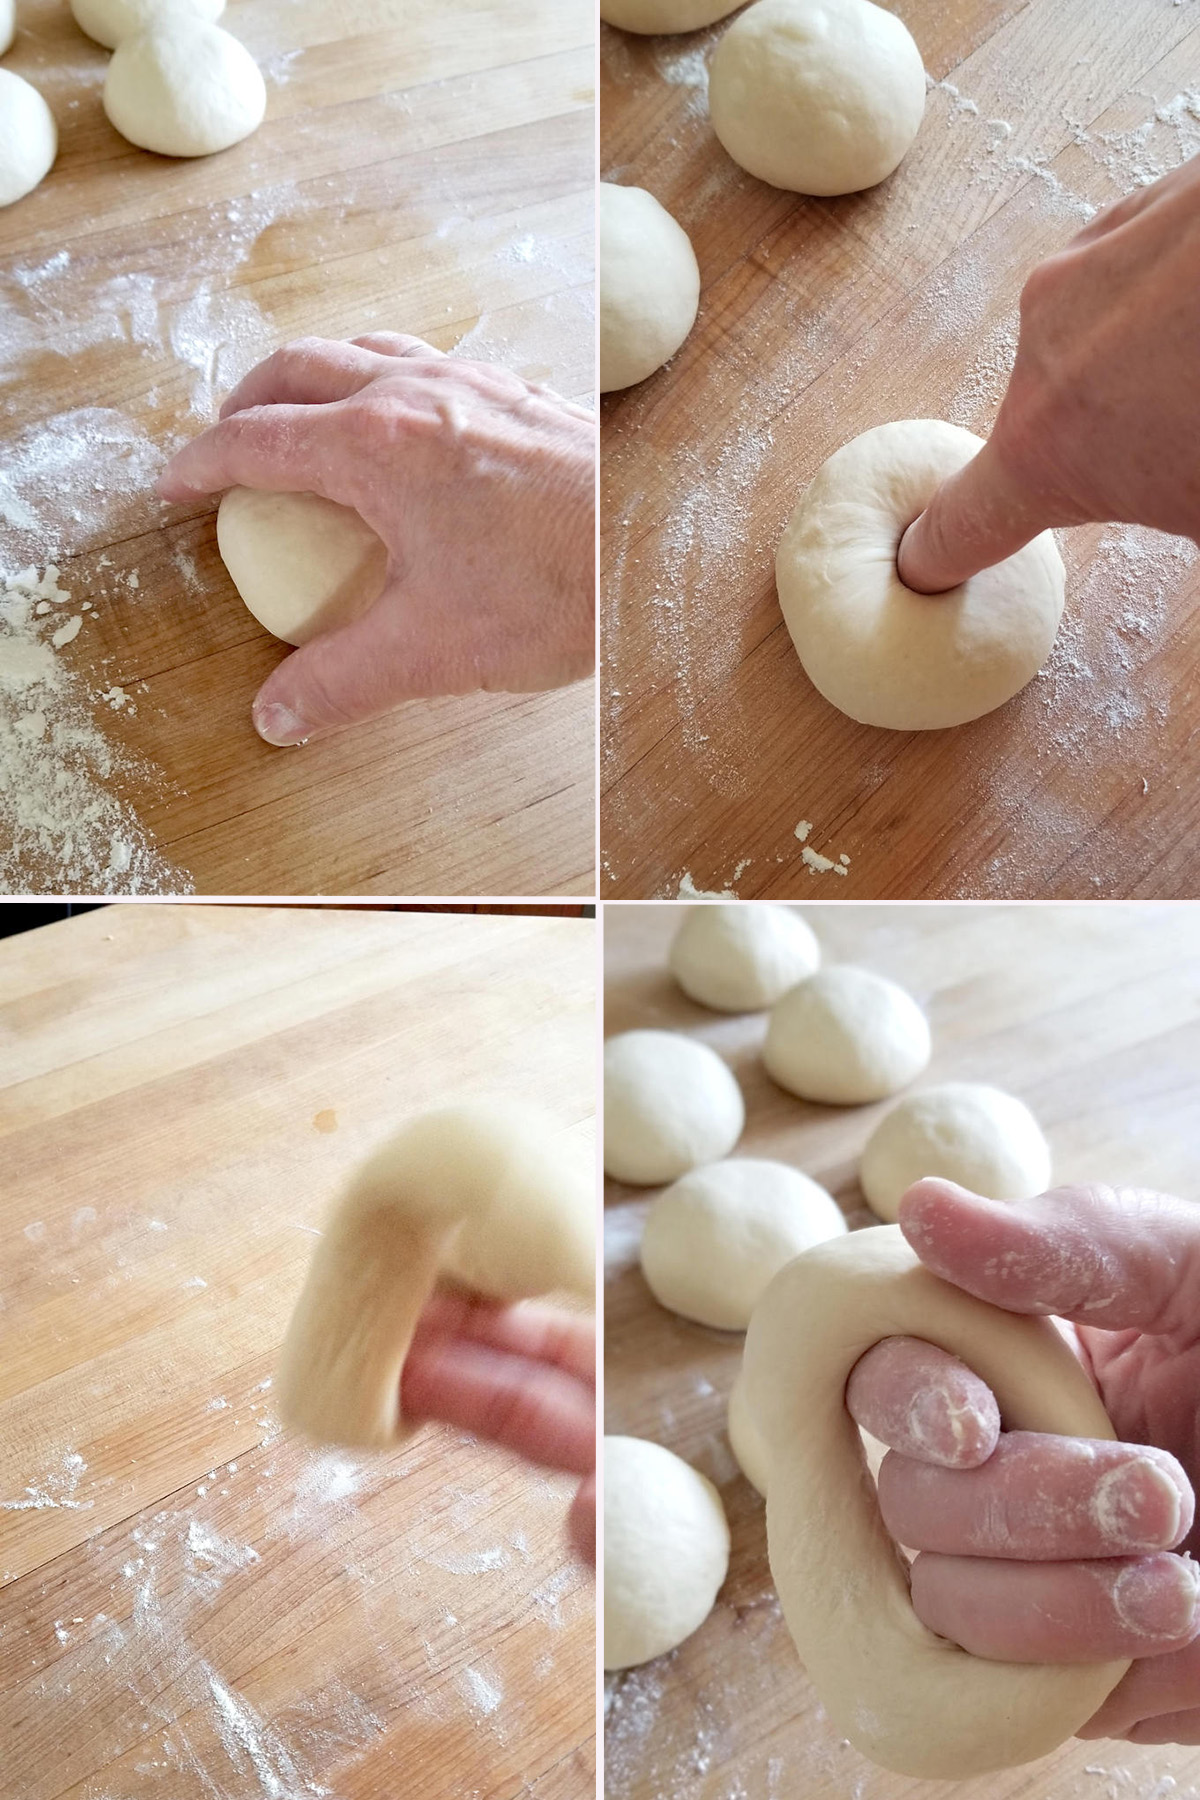
- Use a cupped hand to form the a piece of dough into a smooth ball.
- Poke your finger all the way through the center of the ball to make a hole.
- Twirl the dough around your fingers to widen the center hole.
- Set the bagel onto the baking sheet and continue with the rest of the dough.
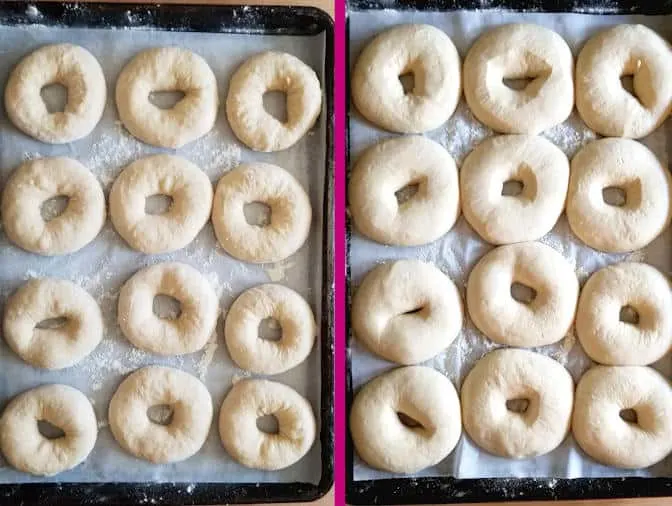
- Cover the pan and place the bagels in the refrigerator overnight.
- If you want to make the bagels the same day set them aside at room temperature for 1 hour.
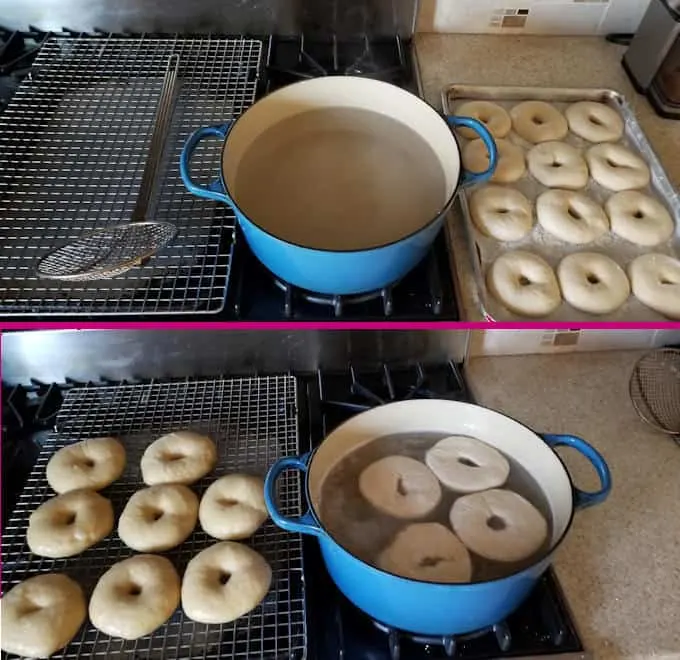
- Bring a pot of water with baking soda and sugar to a boil. Preheat the oven.
- Boil the bagels a few at a time, flipping them every thirty seconds. Boil each batch for 2 minutes.
- Transfer the bagels to a rack to drain while you finish boiling the rest of the bagels.
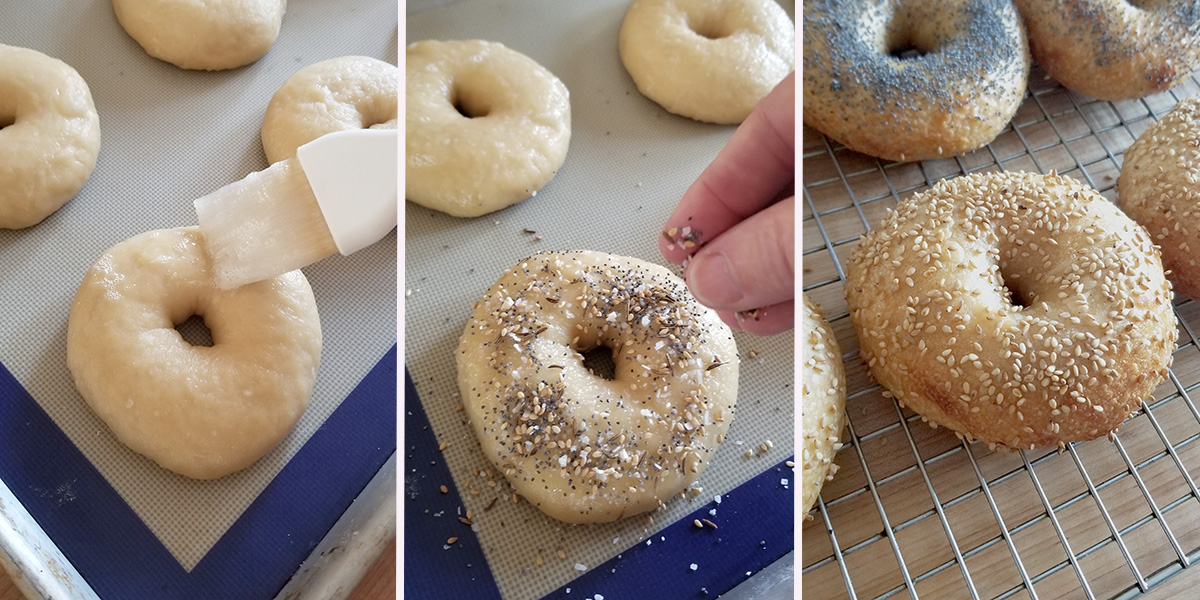
- Brush the boiled bagels with egg white.
- Sprinkle seeds or bagel topping if desired.
- Bake until the bagels are golden brown.
Recipe Tips
- Allow the sponge to rest for 30 minutes before mixing the dough. During that rest the water has time to hydrate the flour and gives us a head start on gluten develop.
- To make the bagels the same day, skip the overnight rise in the refrigerator.
- Bagels are best the day they are baked. For longer term storage slice the bagels about 3/4 the way through and pack them into freezer bags.
- Previously frozen bagels are best if toasted before serving.

You might also like to try these Cinnamon Raisin Bagels.
If you love this recipe as much as I do, I’d really appreciate a star rating and a quick comment. Ratings and comments help my recipes show in search results. Thanks!

Overnight Bagel Recipe
Ingredients
- 16 oz warm water (2 cups (about 100°F))
- ¼ oz instant yeast (2 ¼ teaspoons)
- 25 oz bread flour (5 cups, divided, see note)
- 1 ½ oz barley malt syrup ( 2 tablespoons, see note)
- 1 tablespoon table salt
- 2 oz granulated sugar (¼ cup (for boiling))
- 2 teaspoons baking soda (for boiling)
- 1 egg white (whisked lightly)
- Topping (Sesame seeds, poppy seeds, caraway seeds or coarse sea salt)
Instructions
- In a bowl for a stand mixer or a large mixing bowl combine 16 oz warm water, ¼ oz instant yeast and 3 cups (15 oz) of the flour . Mix to form a thick batter. Cover the bowl and set aside for 30-60 minutes.
- Add 1 ½ oz barley malt syrup and 1 tablespoon table salt. If using a stand mixer, switch to the dough hook. Add the remaining flour and mix to combine. Knead 5 minutes on medium/low speed. If working by hand, stir in as much of the flour as you can, then turn the dough out onto a lightly floured surface and knead in the remaining flour. Knead 5 minutes. Form the dough into a smooth ball.
- Put the dough into a lightly oiled bowl, turning once to coat the dough. Cover the bowl and set aside to rise until doubled in size, about 1 hour.
- Line a half sheet pan with parchment paper lightly sprinkled with flour or sprinkle the pan generously with cornmeal. Turn the dough out onto a lightly floured surface and knead briefly. Divide the dough into 10 even pieces. Use a cupped hand to roll each piece into a smooth, tight ball.
- To form a bagel, poke your finger all the way through the center of a ball to make a hole. Use two fingers to gently widen the hole. Continue gently stretching to form the bagel or twirl the dough around your fingers to widen the center hole (see photos). The hole should be 1 – 1 ½" wide.
- Place the bagel on the prepared sheet pan and continue to form the remaining bagels. The dough will probably spring back a bit so you can go back and re-stretch them once you're done forming all the bagels. Cover the pan with lighly oiled plastic wrap and leave at room temperature for 15 minutes then place the pan in the refrigerator overnight.
- In the morning, take the pan out of the refrigerator. The bagels should be noticeably fuller. Leave the tray out until the bagels come to room temperature, about 1 – 1 ½ hours. The time will vary based on the temperature in the room and how much the dough rose in the refrigerator. Once the dough comes to room temperature the bagels are ready to boil.
- Meanwhile, preheat the oven to 450 °F. In a large pot combine 1 gallon of water with 2 oz granulated sugar and 2 teaspoons baking soda and bring it to a boil. Reduce the heat to keep the water at a rolling simmer. Set a cooling rack over a clean sheet pan and place it next to the stove.
- Lift a bagel off the sheet pan and lower it into the boiling water, bottom side down. Depending on the size of your pot, you can boil 3-4 bagels at a time. Boil the bagels for 30 seconds then flip them. Boil the other side for 30 seconds. Repeat the process again for a total of 2 minutes boiling time. Remove the boiled bagels from the water and set them on the cooling rack to drain.
- Line two half-sheet pans with parchment paper or silicone baking mats and generously sprinkle with cornmeal (or flour). Place 5 of the boiled bagels on each sheet pan. You could fit them all on one pan but they may rise enough to stick together as they bake. I like all the sides to be crusty so I leave plenty of room between them.
- Brush the bagels with egg white. You can leave the bagels plain or add the topping of your choice. To make "everything" bagels combine a tablespoon of each of sesame seeds, poppy seeds & salt with a 1/8 teaspoon garlic powder and onion powder. Adjust toppings to your taste.
- Bake until golden brown, about 20 minutes.
Would you like to save this recipe?


As an Amazon Associate and member of other affiliate programs, I earn from qualifying purchases.

Hello Eileen, At Step 6 when I cover the sheet pan with a plastic wrap And allow to rest for 15 minutes before I store the bagels in the refrigerator overnight,..,does the plastic wrap ever stick to the bagel dough when you take it off in the morning and if so how can I prevent that? From the interpretation of your recipe I’m gathering that the bagel dough is best when covered with plastic wrap in the refrigerator over night. Yes?
Thanks in advance,
Woodie
Yes, the night in the refrigerator helps develop the flavor of the bagels. Obviously they need to be covered so the dough doesn’t dry out. If you find the plastic wrap sticking you can coat the side of the plastic wrap touching the dough with a light film of oil or cooking spray.
HI,
Since this will become my go-to recipee for bagels now, any suggestions on how to adjust this this to make a “whole wheat” version?
Thanks.
Steve in Tel Aviv
Yes, you could replace a portion of the flour with whole wheat flour. I would start with about 1/4 of the total and see how that works. You don’t want to use too much whole wheat since that would weaken the gluten.
I am am experienced baker, apprenticing in a bread bakery at the age of 13, and have been baking professionally on and off for years. I never tried bagels, but I did, pretzels (their cousin).
I made this recipe twice, both times using fresh ingredients, except for no access to the malt, so I did the honey/molasses combo.
Both times I made it, the bagels deflated as I put them into the water.
This is a sign that they were over-proofed.
The issue is… “overnight”. What is the actual time in hours that they need to be in the fridge?
Thanks,
Hi Steve, last week when I made the Sourdough Bagels, I left them in the refrigerator for a full 18 hours without trouble. Of course sourdough will behave differently than a yeasted dough. Generally, I make the dough in the late afternoon and prepare the bagels later in the evening. I would say the bagels have typically spent about 10 hours in the refrigerator.
But I honestly haven’t made the yeasted bagels recently and in the summer the dough could certainly be more active. How did the bagels look when you took them out of the fridge?
I have updated the sourdough recipe to note that in the summer I have been putting the bagels straight from the fridge into the water without waiting for them to come to room temp. Again, sourdough may behave differently. But if your bagels come out of the fridge looking like they’ve risen a bit overnight you could try putting the cold bagels right into the water. They may sink as they go in but should rise pretty quickly.
The other option would be to refrigerate the dough overnight then shape and boil the bagels in the morning.
Hi Eilieen<
Thanks for youre reply. I would say that they didn’t look much different than when I put them in, a bit on the flat side. As soon as I touched them they lost a bit of their shape, and the raw “crust became wrinkled” They didn’t puff in the water, either. I am wondering, since I am in Israel, and its pretty HOT… that they over-proofed even before they hit the fridge?
Maybe reduce the rising times before the fridge, and leaving them in the fridge the whole time?
I will also try the straight from the fridge option this weekend. I am NOT giving up. With bagels here costing $1.75 a piece… I want a hommade option.
Again, thanks for the input, I will keep trying.
Yes. The warm weather can make a big difference. Good luck.
OK, so it looks like third time was the charm!
1. Proofing times were greatly reduced 30 mins + 30 mins (watached the dough rise to double).
2. Rerigerator time was 18 hours.
3. Bagels went from fridge to boiling water.
4. They deflated a bit in the water, and were wrinkled, I was worried.
5. 20 mins in the over… puffy and perfect!!!!
Thanks so much.
I agree Steve. With the warmer weather my dough has been very active and I’ve been going straight from the fridge to the water. May have to readjust again in the fall. Glad you got a good result.
I made the recipe 3x Bagels were wonderful first time.The next two times the bagels looked perfect and round ,refrigerated and in the morning they were flat. Thought I did all the same. Cold over kneading make this happen as I kneaded by hand for 10 minutes. I really loappreciate the recipe but am frustrated. Hope you can help.
Hi Neil. Did you do anything different the second and third times? 5 minutes of kneading should be sufficient. How was the dough when your formed the bagels for the 2nd and 3rd batch? Was it nice and elastic? Are you using the same type of yeast? Do you mean they were flat when you took them out of the fridge or when you lifted them into the boiling water? I find my dough behaves very differently at this time of year than in the cooler months.
Hello! I love love love this recipe, these bagels have been an insane hit with everyone I’ve made them for!
How long do you think they are able to hold up in the fridge? I’ve had them in there for about 18 hours so far, and had intended to make them today, but plans changed and I need to make them tomorrow. Do you think they would hold another 24 hours in the fridge?
Thank you!!
Hmmm, I’ve never held them that long. I assume the bagels are already formed? If they’re not you can definitely hold the dough for up to 2 days. If the bagels are already formed I’m a little afraid they’ll over-proof and will be difficult to handle getting them into the water. If you try it let me know how it works out.