Overnight New York Style Bagels


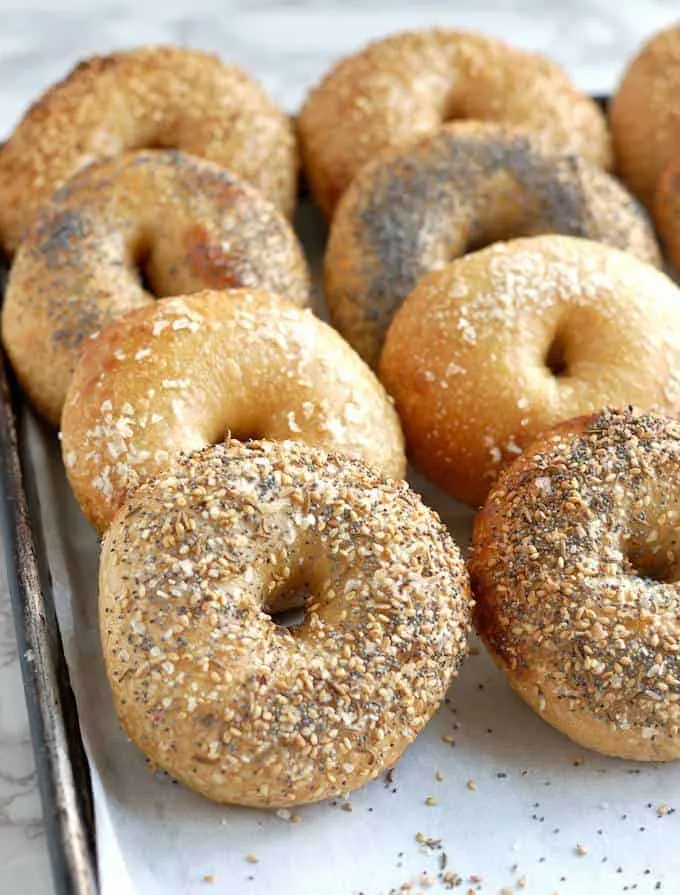
These bagels are chewy, crusty and properly dense New York Style Bagels. The overnight rise creates the perfect texture and flavor – and you’ll have fresh, hot bagels for breakfast or brunch less than an hour after getting out of bed.
What is a true New York Style Bagel?
I promise you if you follow this recipe correctly you can make a good bagel at home. I mean, there are loads of really bad bagels in the world and life is just too short to eat a bad bagel.
Like a really great loaf of Rye Bread there’s nothing like a true New York style bagel.
A good New York Style Bagel (really, is there any other kind?) must have a nicely dense and chewy texture with a toothsome crust.
To get that characteristic chewiness we’ve got to develop some really strong gluten in the dough.
If you love baking bread and want to understand the process a little better, take a look at comprehensive Bread Baking Guide. It covers the basics of mixing, kneading, proofing, and baking so you can get perfect results every time.
If you’ve got a sourdough starter, you can make Homemade Sourdough Bagels .
Ingredients
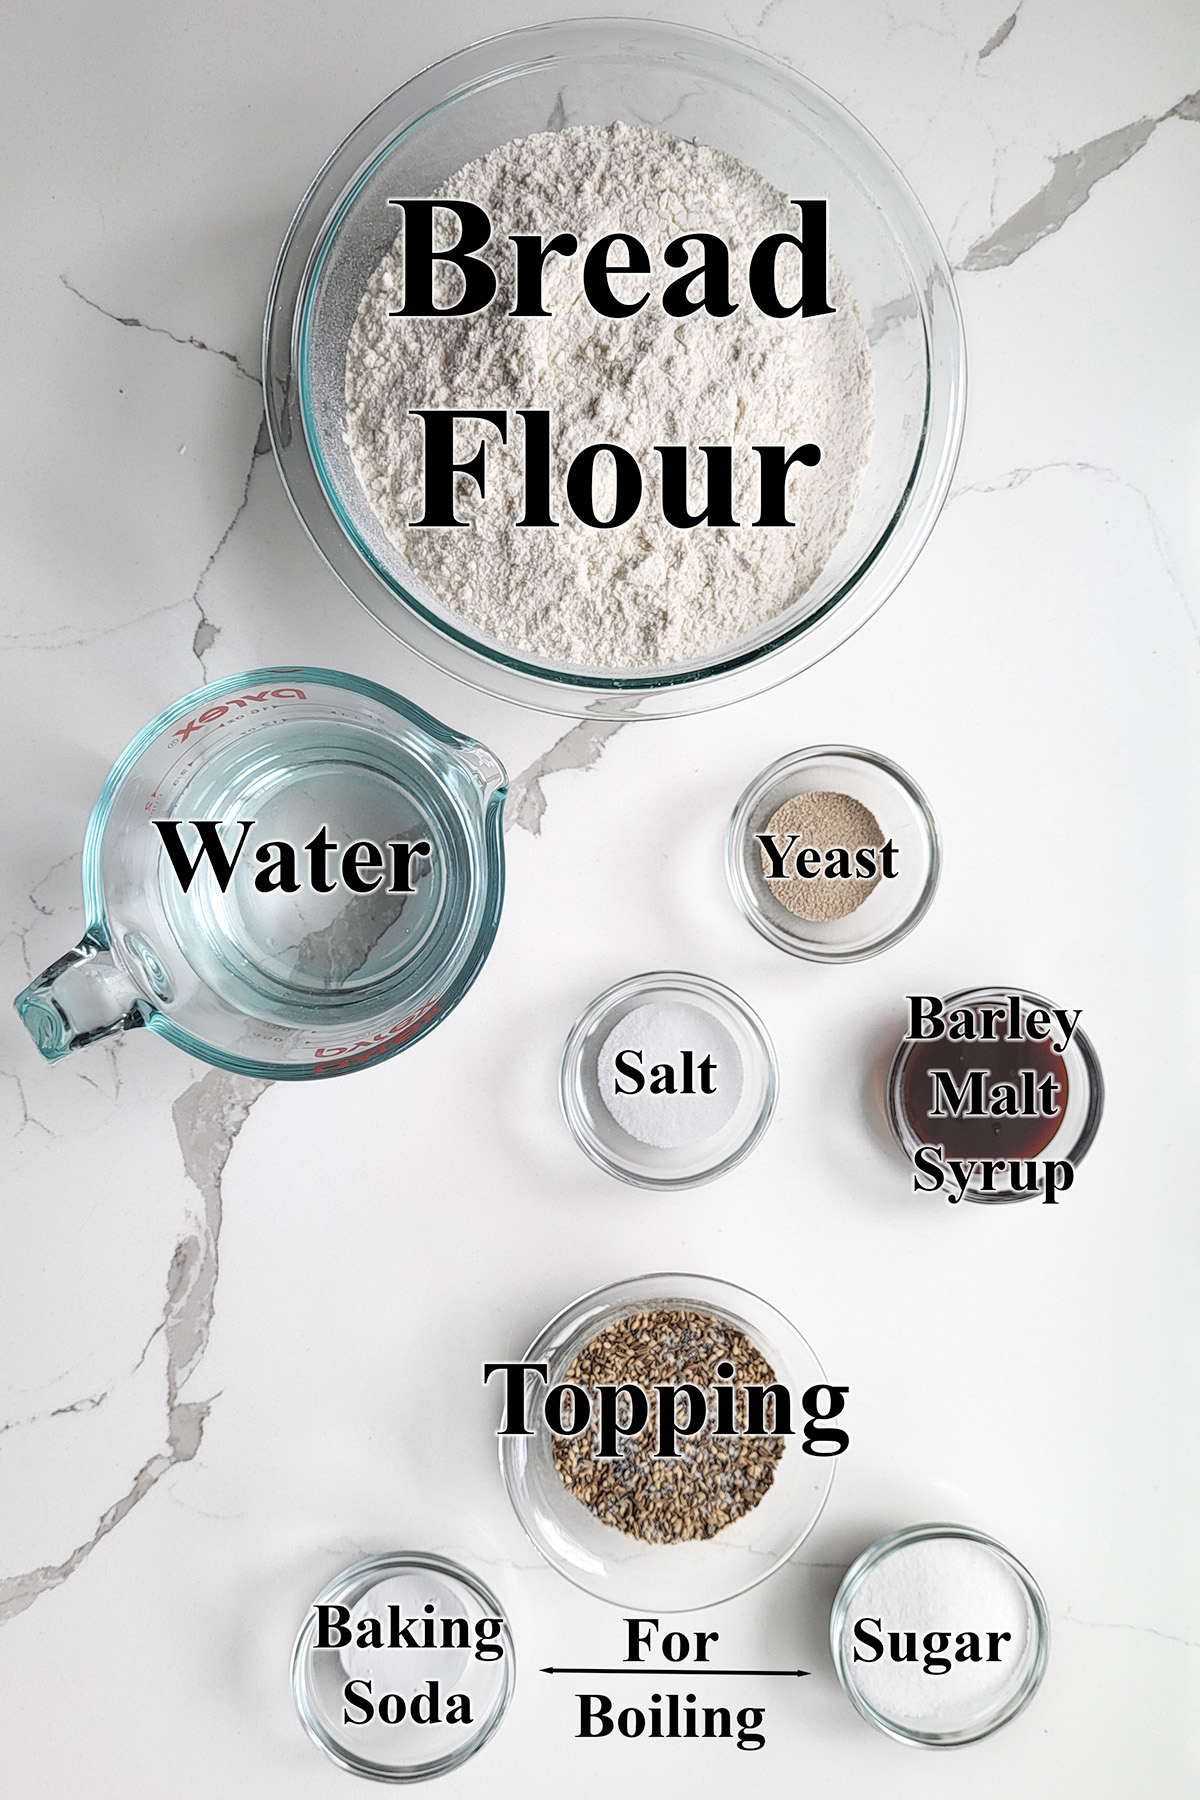
Ingredient Notes
- Bread Flour – Bagels should have a very chewy crumb from a strong gluten network in the dough. High protein bread flour develops plenty of gluten.
- Yeast – I prefer instant yeast to rapid rise yeast for a slightly slower rise. A slow overnight rise gives more time for flavor to develop.
- Barley Malt Syrup – Adds a traditional slightly sweet note to the dough. You can substitute honey or a combination or honey and molasses for the barley malt syrup.
- Toppings – Leave the bagels plain or use your favorite seed for topping. You can mix seeds with salt to make your own “everything” bagel topping”. See the recipe card for details.
- Baking Soda & Sugar – For boiling the bagels. The boiling process creates the specific shiny and chewy bagel crust.
How to make New York style Bagels
Here’s what the recipe process looks like at each stage. Refer to the recipe card below for measurements and exact instructions.
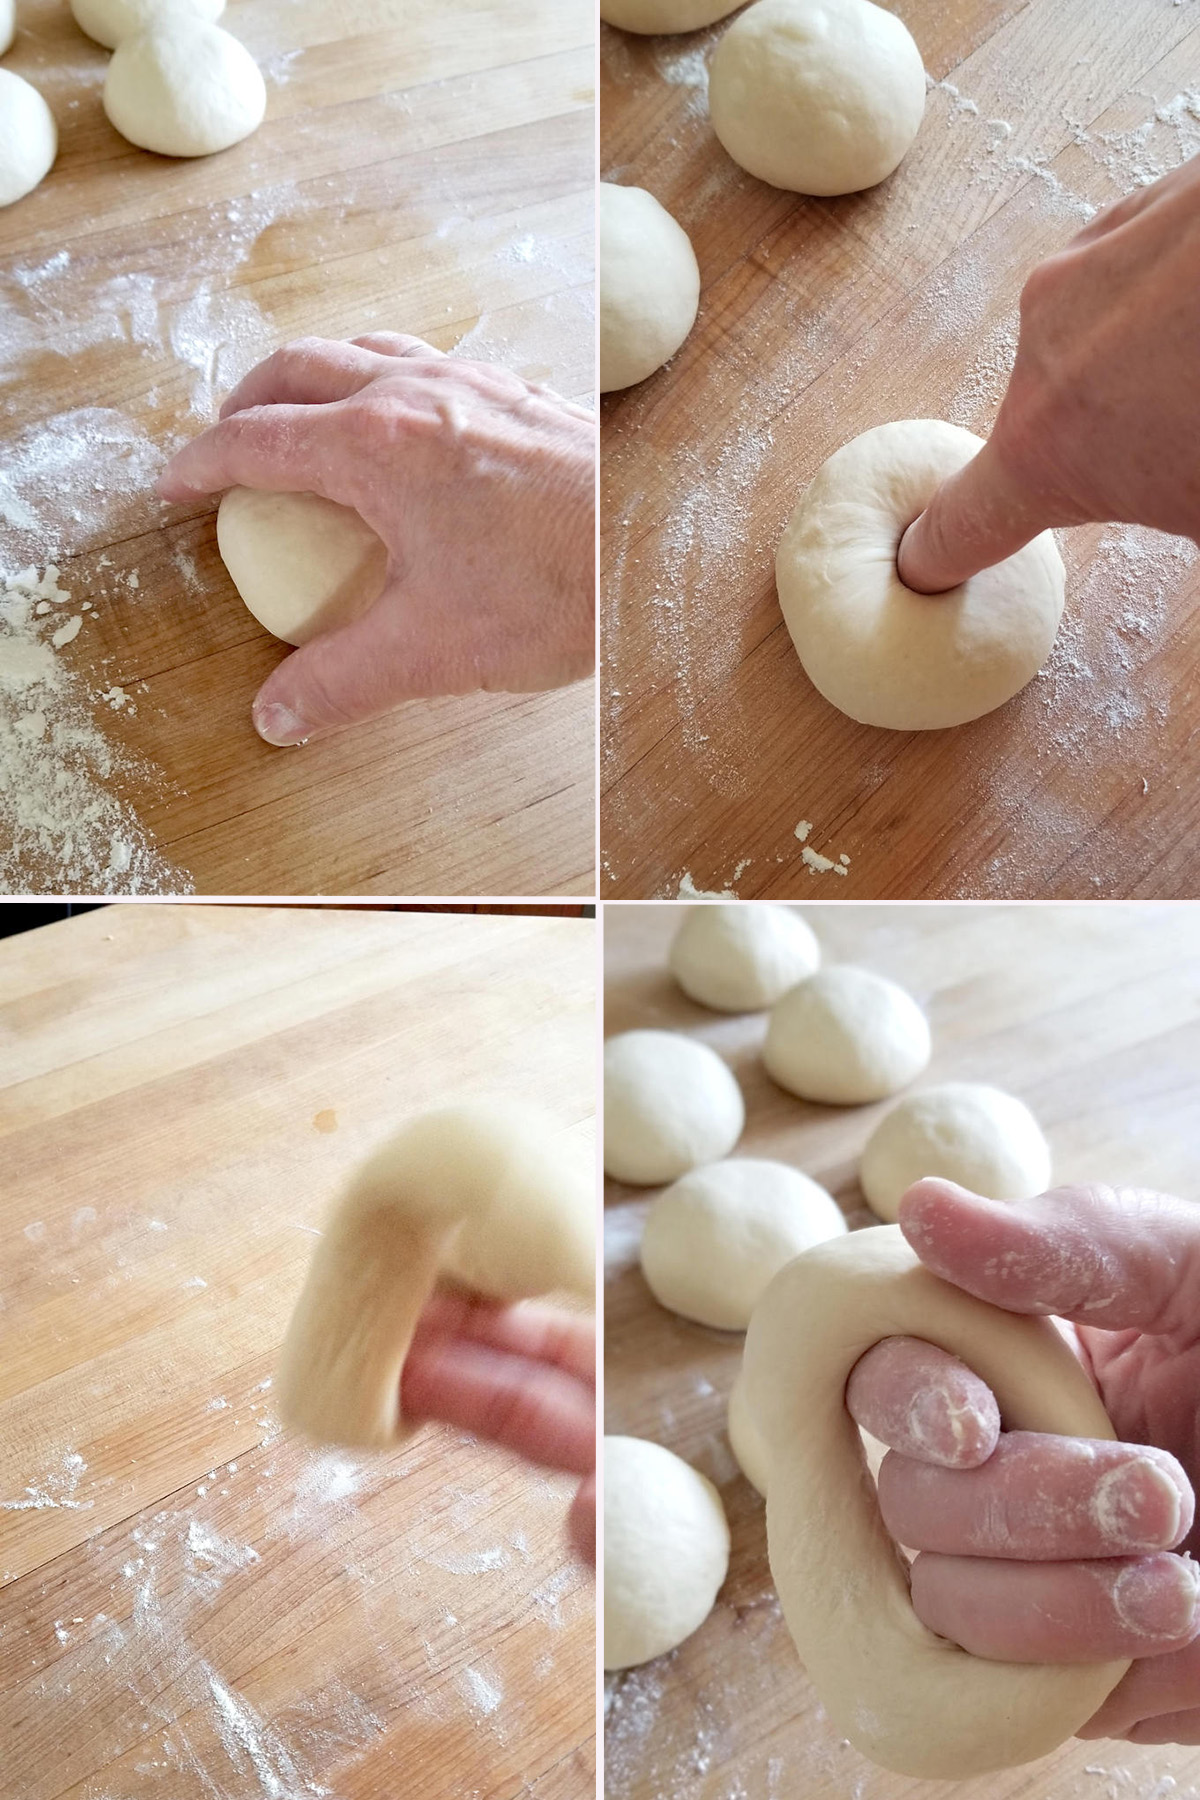
- Use a cupped hand to form the a piece of dough into a smooth ball.
- Poke your finger all the way through the center of the ball to make a hole.
- Twirl the dough around your fingers to widen the center hole.
- Set the bagel onto the baking sheet and continue with the rest of the dough.
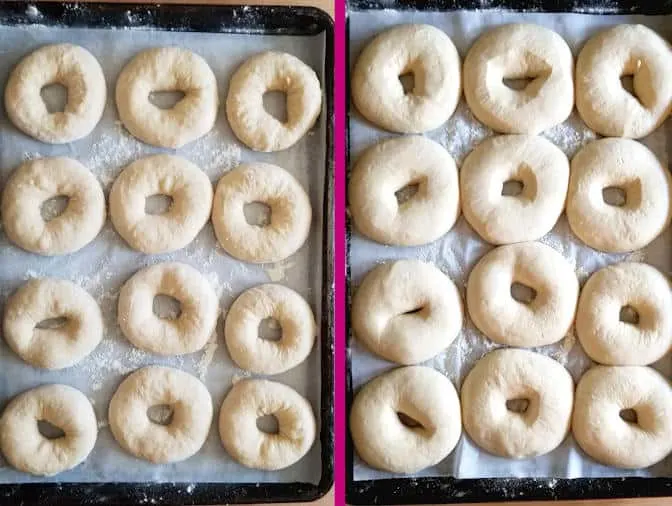
- Cover the pan and place the bagels in the refrigerator overnight.
- If you want to make the bagels the same day set them aside at room temperature for 1 hour.
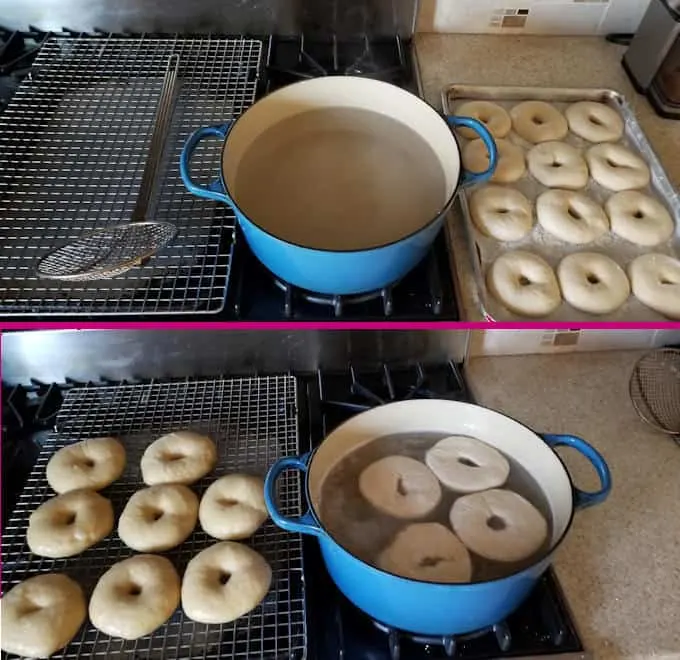
- Bring a pot of water with baking soda and sugar to a boil. Preheat the oven.
- Boil the bagels a few at a time, flipping them every thirty seconds. Boil each batch for 2 minutes.
- Transfer the bagels to a rack to drain while you finish boiling the rest of the bagels.
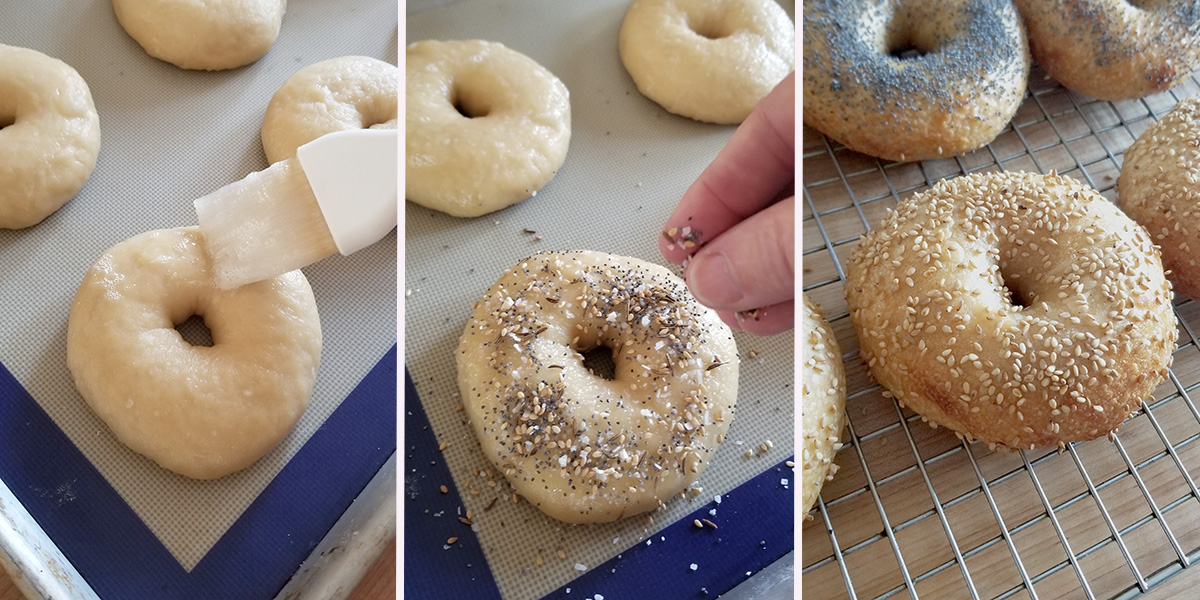
- Brush the boiled bagels with egg white.
- Sprinkle seeds or bagel topping if desired.
- Bake until the bagels are golden brown.
Recipe Tips
- Allow the sponge to rest for 30 minutes before mixing the dough. During that rest the water has time to hydrate the flour and gives us a head start on gluten develop.
- To make the bagels the same day, skip the overnight rise in the refrigerator.
- Bagels are best the day they are baked. For longer term storage slice the bagels about 3/4 the way through and pack them into freezer bags.
- Previously frozen bagels are best if toasted before serving.

You might also like to try these Cinnamon Raisin Bagels.
If you love this recipe as much as I do, I’d really appreciate a star rating and a quick comment. Ratings and comments help my recipes show in search results. Thanks!

Overnight Bagel Recipe
Ingredients
- 16 oz warm water (2 cups (about 100°F))
- ¼ oz instant yeast (2 ¼ teaspoons)
- 25 oz bread flour (5 cups, divided, see note)
- 1 ½ oz barley malt syrup ( 2 tablespoons, see note)
- 1 tablespoon table salt
- 2 oz granulated sugar (¼ cup (for boiling))
- 2 teaspoons baking soda (for boiling)
- 1 egg white (whisked lightly)
- Topping (Sesame seeds, poppy seeds, caraway seeds or coarse sea salt)
Instructions
- In a bowl for a stand mixer or a large mixing bowl combine 16 oz warm water, ¼ oz instant yeast and 3 cups (15 oz) of the flour . Mix to form a thick batter. Cover the bowl and set aside for 30-60 minutes.
- Add 1 ½ oz barley malt syrup and 1 tablespoon table salt. If using a stand mixer, switch to the dough hook. Add the remaining flour and mix to combine. Knead 5 minutes on medium/low speed. If working by hand, stir in as much of the flour as you can, then turn the dough out onto a lightly floured surface and knead in the remaining flour. Knead 5 minutes. Form the dough into a smooth ball.
- Put the dough into a lightly oiled bowl, turning once to coat the dough. Cover the bowl and set aside to rise until doubled in size, about 1 hour.
- Line a half sheet pan with parchment paper lightly sprinkled with flour or sprinkle the pan generously with cornmeal. Turn the dough out onto a lightly floured surface and knead briefly. Divide the dough into 10 even pieces. Use a cupped hand to roll each piece into a smooth, tight ball.
- To form a bagel, poke your finger all the way through the center of a ball to make a hole. Use two fingers to gently widen the hole. Continue gently stretching to form the bagel or twirl the dough around your fingers to widen the center hole (see photos). The hole should be 1 – 1 ½" wide.
- Place the bagel on the prepared sheet pan and continue to form the remaining bagels. The dough will probably spring back a bit so you can go back and re-stretch them once you're done forming all the bagels. Cover the pan with lighly oiled plastic wrap and leave at room temperature for 15 minutes then place the pan in the refrigerator overnight.
- In the morning, take the pan out of the refrigerator. The bagels should be noticeably fuller. Leave the tray out until the bagels come to room temperature, about 1 – 1 ½ hours. The time will vary based on the temperature in the room and how much the dough rose in the refrigerator. Once the dough comes to room temperature the bagels are ready to boil.
- Meanwhile, preheat the oven to 450 °F. In a large pot combine 1 gallon of water with 2 oz granulated sugar and 2 teaspoons baking soda and bring it to a boil. Reduce the heat to keep the water at a rolling simmer. Set a cooling rack over a clean sheet pan and place it next to the stove.
- Lift a bagel off the sheet pan and lower it into the boiling water, bottom side down. Depending on the size of your pot, you can boil 3-4 bagels at a time. Boil the bagels for 30 seconds then flip them. Boil the other side for 30 seconds. Repeat the process again for a total of 2 minutes boiling time. Remove the boiled bagels from the water and set them on the cooling rack to drain.
- Line two half-sheet pans with parchment paper or silicone baking mats and generously sprinkle with cornmeal (or flour). Place 5 of the boiled bagels on each sheet pan. You could fit them all on one pan but they may rise enough to stick together as they bake. I like all the sides to be crusty so I leave plenty of room between them.
- Brush the bagels with egg white. You can leave the bagels plain or add the topping of your choice. To make "everything" bagels combine a tablespoon of each of sesame seeds, poppy seeds & salt with a 1/8 teaspoon garlic powder and onion powder. Adjust toppings to your taste.
- Bake until golden brown, about 20 minutes.
Would you like to save this recipe?


As an Amazon Associate and member of other affiliate programs, I earn from qualifying purchases.

Hi,
This is a great bagel recipe that I’ve made multiple times now. Every time they taste great!! But I’ve made mistakes and modified things so here are A few tips from my Bagel baking attempts.
1) don’t forget to liberally four your baking sheet before the overnight rise. I lightly floured the first time and the bagels stuck a bit. The result was too much handling to get them into the boiling water and flat bagels that tasted great.
As I plan to make fresh bagels regularly I invested in some silicone bagel molds purchased on amazon. They are awesome and have solved my too much handling issue.
2) second time I forgot to cover the bagels before putting them in the fridge. I blame too much wine. Next day the tops of the bagels were dried out a bit. Still bake up well and tasted great, but the crust texture was a bit off.
3) as others have said, I too get a very wet dough. I am using King Arthur Bread flour and have found I need to add 3/4 – 1 cup of additional flour to get the correct consistency and up my kneading time to about 10 minutes Regardless of this, the bagels come out great! I am considering trying to reduce the water quantity next time to see how that goes.
4) just took a batch out of the oven and realized I forgot the egg wash on half the bagels (made 6 everything bagels that got the wash and 6 plain that didn’t) they look great but you can tell the bagels that didn’t get the egg wash don’t have that nice shine on the crust.
Overall this is a wonderful bagel recipe that I have enjoyed working and learning with. The one consistent thing every time I make these bagels it the taste. No matter what mistakes I make, Or things I forget to do, they always taste fantastic!!
Hi Narayani, thanks for your comments and suggestions. Regarding the sticky dough, did you allow the 30 minute rest after mixing the sponge? This will give the dough time to start hydrating the flour and developing the gluten. I really haven’t had an issue with this dough being sticky. I’ve made these bagels and my Sourdough Bagels at least 4 times over the last few weeks and have no problem with the dough texture. That being siad, do whatever works for you. Glad you like the flavor.
Hi Eileen, thanks for the reply. I usually let the sponge develop or 30-45 minutes before adding the rest of the flour. Maybe next time I’ll use my kitchen scale instead of just the cup measurements. That always seems a bit more accurate. Thanks again for the great recipe
Yes, that can make a difference. I use the “dip and sweep” method for cup measure. You know, when you dip the cup into the flour bin then sweep away the excess. A cup of “dip and sweep” flour generally weighs a little more than flour that was “spooned” into the cup. The spooned flour is usually fluffier with more air in it.
Hi Eileen & Narayani,
Firstly, Narayani you had me lol with comment no.2. I agree with you, I’ve made these twice and although dough has been sticky and i’ve added more flour each time (a lot more the 2nd try) they always come out tasting like proper bagels. So I am ok with experimenting until getting it perfect. I don’t use the cup measurements, I measure the ingredients out. I was going to ask if perhaps that was the fault in my sticky dough. I’m gonna make this again next weekend. I will try a little less water for the sponge and I will use extra flour in the kneading. Also, re flouring the sheet the 1st time i lightly floured, 2nd i floured a lot more. Also, i discovered that handling the dough from pan to pot needs to be “gentler”. I have one more question (at the moment – haha) Eileen: when adding the malt & salt to the sponge i incorporate using the mixer. Perhaps i should just add ingredients and then the flour and mix with dough hook?
Hi! Have you experimented with freezing the dough at all? I’m thinking… making the dough and letting it sit overnight, then freezing half the batch to bake fresh at a later date. Do you think this would work? Thank you!!
It should work to freeze the dough. Just bring it back to room temp and proceed with the recipe. I always just bake the entire batch and slice and freeze any leftovers. They toast up perfectly.
Hello and Happy New Year! I’m making these for the 2nd time and again the dough is very (very) sticky. I’ve followed your instructions and dosages. I’m using bread flour as instructed. However, perhaps the bread flour sold here (I’m in Greece) is thinner? First time I made these the dough was sticky, I added a lot of extra flour before removing from stand mixer. The bagels came out delicious but they were flat. This time i took the sticky dough out of the mixer, moved on to next step for rising, however when i took it out of the bowl it could not be knead/shaped into balls. I ended up spending 15 mins hand kneading and continuously adding more bread flour. I must have added about another cup, dough is still sticky but not as much as before. Should the dough be “bouncy”? Next time should I add more flour in the mixer until dough bounces back when pocked? At the moment, I’ve oiled the bowl again and will let it rise for an hour, i presume the dough needs to rest. Hope they turn out ok. Apologies for the long comment, I’m new to baking.and can’t find a decent bagel here in Greece, so for my sanity, I need to master this hahaha.
No need to apologize, I’m glad you’re so determined to make a good bagel. I can’t say for sure, but I would bet that the flour might be different in Greece. I made several batches of bagels lately and the dough is not especially sticky and should be quite elastic by the time you’re finished kneading. I use King Arthur bread flour, which has a protein content of 12.7%. Maybe you can try and find out the protein content of your flour for comparison? You’re bagels could come out flat if the dough is not elastic enough to hold in the air as they bagels rise. When I make this dough, it is strong enough that I really have to stretch and pull the dough into the ring shape, and it will pull back at you.
Thank you Eileen for taking the time to reply. So, they again are edible and taste like what bagels taste like but they are flat. The problem mainly is that since they are flat they are tough to bite into because the outer later is crunchy/hard and there is hardly any soft inside. Yeah, my dough was nothing as you described yours. The flour I’m using is 12.2% protein. Does that make a huge difference? Going forward, next time I try, should I perhaps use less water in the 1st step, say 1 cup instead of 2? Should i perhaps add a cup or two of flour? Although having added an extra cup at least both the times I made these (& this second time might have actually been more than a cup)… perhaps 1 cup less of water and 1 cup more of flour to start..& then when kneading in my mixer judge if extra is needed add?
A cup more or less of water and/or flour would totally change the recipe, so I definitely wouldn’t recommend such a drastic change to the ingredients. Since it is a lower protein flour you could add a few more tablespoons of flour while kneading the dough. But the dough should certainly spring back and be quite elastic when you’re done kneading. But even if the dough is a little too wet, if you have enough gluten development they will still rise. The problem could also be how you’re handling the dough. When you take the bagels out of the refrigerator in the morning have they risen at lease 50%? When you boil them do they puff up a bit? Also, when you lift the risen bagels off the sheet to transfer them to the boiling water you need to work gently so you don’t deflate the bagels. Make sure you well-flour the sheet pan so the dough doesn’t stick as you lift them.
Hi. I made this recipe and thought I had followed it correctly, but then my bagels all burned on the bottom. I used silicone baking mats on top of my sheet pans. Do you know why this could have happened? I’m a little lost!
Hi Abby. I’m not sure what happened. Honestly, I don’t bake with silcone mats often, but I suspect it’s more about your oven. Do you have an oven thermometer to check if your oven temp is accurate? Also, try baking on a higher rack. If you have more than one sheet pan you can slide a second pan under if the bottoms are baking too fast.
Hello! Wow, wow. Thank you for this incredible recipe. As a Native New Yorker now in Colorado, oh I have struggled to find good bagels! My daughters and I made these last night and enjoyed them this morning! Our favorite topping was salt (Maldon) and chopped fresh rosemary. We also made “Everythings” with fresh pressed garlic and variety of herbs. YUM.
I followed the recipe and they turned out perfectly! Crust — amazing, cooked perfectly inside (15 minutes for ours). I do need a proper utensil for taking them out of the pot of water as I was using tongs and they had a few indentions.
I am going to try the sourdough next. Thanks again!
Sheila
Well, since you’re a native New Yorker I take that as the ultimate compliment. So glad you enjoyed them.