Your Guide to Mixing & Kneading Bread Dough
In this guide, you’ll learn how to mix and knead bread dough for the best texture, structure, and rise. Mixing and kneading are where bread begins. This step brings the ingredients together and builds the gluten network that gives the dough its strength and structure. Whether you use a stand mixer (as I do) or prefer to knead by hand, understanding how and when to develop gluten is key to making consistently good bread.
Table of contents
Why Mixing & Kneading Matter
Bread is made from just four basic ingredients; flour, water, yeast, and salt. But how you mix and handle those ingredients has a big effect on the final loaf.
The type of flour and yeast you choose can change both texture and flavor. The kneading technique you use also affects the crumb, crust, and rise. Follow your recipe’s directions closely at first, and as you gain experience you’ll develop a feel for how to adjust the process to suit your taste.
Tools & Equipment
Gather your tools before you start. The right setup makes the process easier and neater. (As an Amazon associate I earn from qualifying purchases)
- Digital Scale: I do provide volume measurements in my bread recipes, but weighing ingredients is more accurate and produces more consistent results. (Honestly, I recommend using a kitchen scale for all baking.)
- Large Mixing Bowl: Essential if you’ll be mixing by hand.
- Stand Mixer: You can mix and knead by hand, but a strong stand mixer makes the process faster and easier, especially for heavier doughs.
- Bowl Scraper: A curved plastic scraper helps move dough from bowl to bench with less mess.


Step-by-Step Process
Mixing the Dough
The first step in bread making is simply to combine the ingredients. I usually start with the wet ingredients, then gradually add the flour.
Some recipes specify a temperature for the liquid. I don’t stress over exact numbers. If the liquid feels slightly warmer than body temperature, it’s warm enough to activate the yeast but not so hot that it will harm it.
There are two ways to incorporate yeast into dough:
- Dry Method: Add instant yeast directly to the dry ingredients.
- Rehydration Method: Dissolve active dry yeast in the liquid before combining with the dry ingredients.
Visit the Yeast Ingredient Science page to learn the difference between instant and active dry yeast.
Some recipes include a short rest called an autolyse, when flour and water sit together for 20–30 minutes before adding salt and yeast. During this time, starch and protein in the flour absorb water and begin forming gluten. Because salt competes with flour for moisture, it’s added after autolyse.
What Is Autolyse?
Autolyse is a short rest period when flour and water are mixed before adding yeast and salt. This gives gluten a head start and helps dough become smoother, stretchier, and easier to knead.
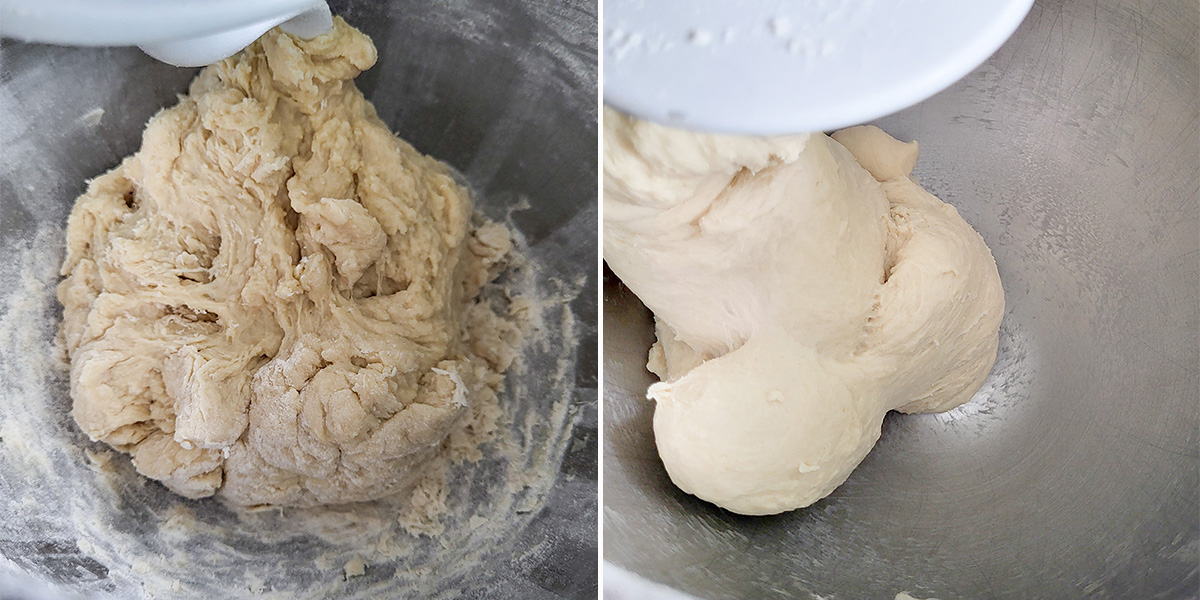
As soon as flour meets water, enzymes begin converting starch to sugar—the yeast’s food source. Gluten proteins absorb water and form weak coils, creating a rough, “shaggy” dough.

Developing the Dough
Once all ingredients are combined into a shaggy mass, it’s time to develop the gluten through kneading.
Whether by hand or in a mixer, kneading stretches, folds, and compacts the gluten strands so they align and strengthen. As the dough develops, it becomes tighter, smoother, and more elastic.
Kneading time varies depending on flour type, hydration, and method.
Types of Kneading and their Effects
Hand Kneading
Hand kneading is very effective but takes more time, usually 10–15 minutes. You’ll often see videos of people kneading dough by squishing the dough through their fingers and squeezing. This is not what you want to do.
Kneading is not a squeezing motion. It’s a push-turn motion. Push the dough forward with the heel of your hand, fold it over, and give it a quarter turn with each push. The push-turn motion aligns the gluten. Continue until the dough feels smooth, elastic, and springs back when pressed.
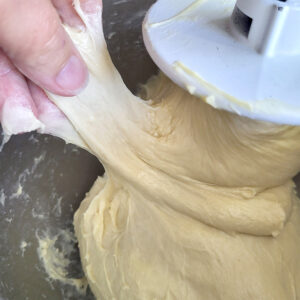
Kneading by Mixer
Kneading with a stand mixer is faster and more consistent. Run the mixer on medium speed for about 5 minutes. The dough will become cohesive, gather around the hook, and clear the sides of the bowl—that’s your cue it’s ready.
No-Knead Bread
Some doughs skip kneading entirely. “No-knead” bread is made with high hydration and long fermentation (10–12 hours). Occasional folds align the gluten gradually, building structure over time.
Checking for Readiness
With experience, you’ll develop a sense of when dough is properly developed. If you’re unsure, try the windowpane test:
Pinch off a small piece of dough and gently stretch it between your fingers. If it stretches thin enough to let light through without tearing, the gluten is well developed and the dough is ready.
Troubleshooting Kneading Issues
When Kneading by Hand
The most common problem is adding too much flour. Start with clean, dry hands and a lightly floured surface. Sprinkle flour only as needed—too much can make the bread dense.
When Kneading by Mixer:
Over-kneading can happen if the mixer runs too long or too fast. Keep it at medium speed and stop once the dough clears the sides of the bowl. If the dough becomes stiff, dense, and tears easily, it’s overworked.
Now that your dough is fully developed, it’s time for Fermentation →