🧁 Creaming vs. Reverse Creaming: How Mixing Technique Shapes Cake Texture
Why the order of mixing butter, sugar, and flour changes everything.
When I was in culinary school, our very first “cakes” lesson was the classic quatre quarts pound cake. We were required to cream the butter and sugar by hand with a wooden spoon. At the time, it seemed almost absurd, no one in a professional kitchen mixes pound cake that way.
But the exercise made its point: technique matters. The way ingredients are combined affects not just the texture of a cake, but its structure and flavor, too.
🎂 What Is the Traditional Creaming Method?
The creaming method starts by beating butter and sugar together until light and fluffy. The sharp sugar crystals cut into the butter, creating countless tiny air pockets.
Those air pockets expand during baking, helping the cake rise. Eggs are added one at a time to maintain emulsion, and flour is folded in last.
As soon as the flour is added, gluten begins to form — that’s why proper mixing time is so important. Overmixing at this stage can toughen the crumb.
Results:
- Fine, tender crumb when done correctly
- Slightly firmer texture than reverse creaming
- Can trap irregular air pockets if overmixed
🥣 What Is Reverse Creaming (Two-Stage Mixing)?
In the reverse creaming method, the order is flipped. Flour, sugar, and butter are blended together first.
This coats the flour’s protein molecules in butterfat before any liquid is added. Because gluten doesn’t form until flour meets water (from the eggs), that fat barrier slows gluten development and produces a softer, more velvety texture.
To understand why butterfat and flour interact this way, you can read more about Fats in Baking and Flour as a Baking Ingredient in my Baking Ingredient Science series.
Eggs are then added gradually, forming a smooth, thick batter that bakes up evenly with minimal tunneling.
Results:
- Tighter, more uniform crumb
- Soft, melt-in-your-mouth texture
- Less rise, but more structural consistency
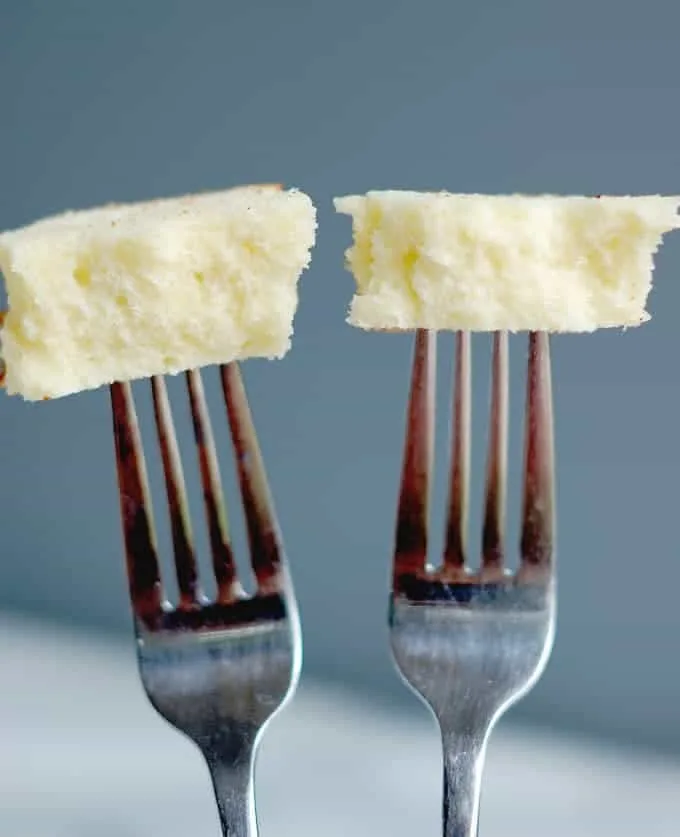
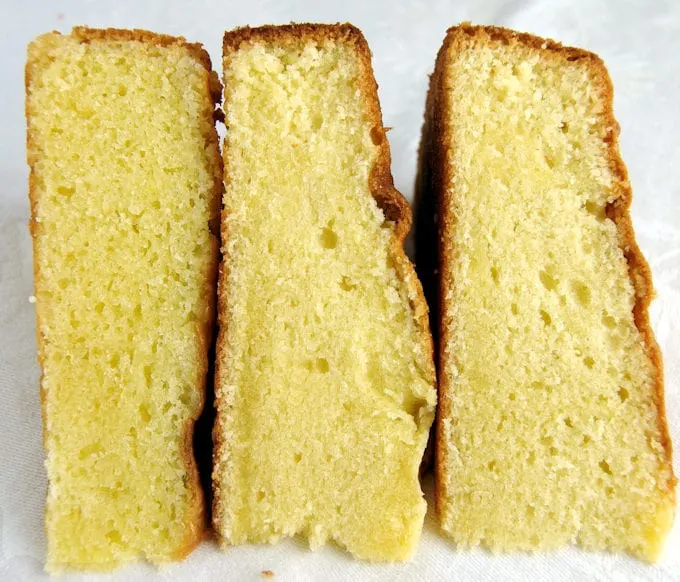
🧪 Creaming vs. Reverse Creaming: Side-by-Side Test
To compare techniques, I baked two identical pound cakes using the same proportions — 8 oz each of cake flour, granulated sugar, unsalted butter, and eggs — at ideal room temperature (65–70°F). Both were baked in identical 9×5″ pans at 325°F in a convection oven.
Results:
- The traditional creamed cake had a slightly higher dome and a bouncier crumb with a few visible air pockets.
- The reverse-creamed cake had a tighter, finer crumb and softer texture — when pinched, it broke apart more easily.
In short: same ingredients, different technique, noticeably different results.
Baking Sense Tip
Use the reverse creaming method when you want a fine, velvety crumb — especially for layer cakes or delicate pound cakes.
Use traditional creaming when you want a bit more lift and structure, such as for butter cakes that will hold frosting or heavy fillings.
🧩 Takeaway
Mixing method matters just as much as ingredient balance. The reverse creaming method produces a slightly denser but more tender texture — ideal for modern butter cakes. The traditional method yields more volume and an airier crumb. Understanding both gives you control over your final cake’s structure and mouthfeel.
📚 Continue Learning
This lesson is part of my Cake Recipe Science series, where I explain how each ingredient and mixing method shapes a cake’s structure, texture, and flavor. Explore the full series to learn how flour, sugar, eggs, fats, and leavening work together to create the perfect cake crumb.
← Previous: Salt and Chemical Leavening Back to: How Cake Recipes Work →