Homemade Sourdough Bagels – With Video


Sourdough bagels are chewy, crusty and properly dense. They have an extra deep flavor thanks to the sourdough starter in the recipe. This recipe take more than 12 hours to make, but the vast majority of the time is hands-off.
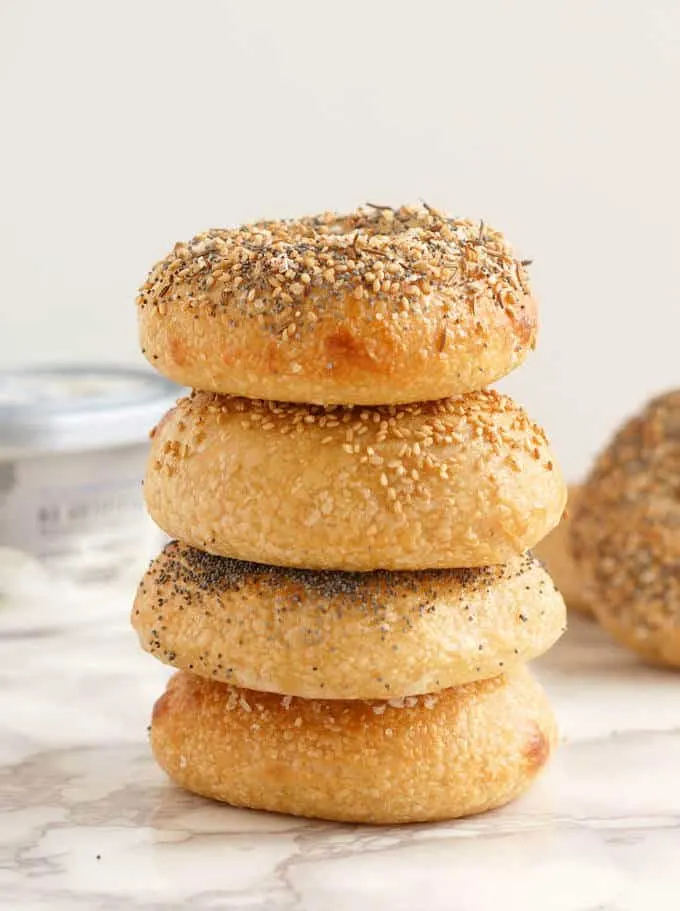
I’ve said it before, I think a good bagel should have a nicely dense and chewy texture with a toothsome crust. Forget the frozen hockey pucks from the grocery store, and the bagels from chain bakeries that are way too fluffy to be a real bagel.
Homemade bagels are not hard to make and they freeze beautifully. If you set aside a little time over a weekend, you can stock up the freezer for weeks to come.
This Sourdough Bagel recipe is a variation of my popular recipe for New York Style Bagels.
If you don’t already have one, I can show you how to make a sourdough starter and how to feed a sourdough starter.
Ingredients
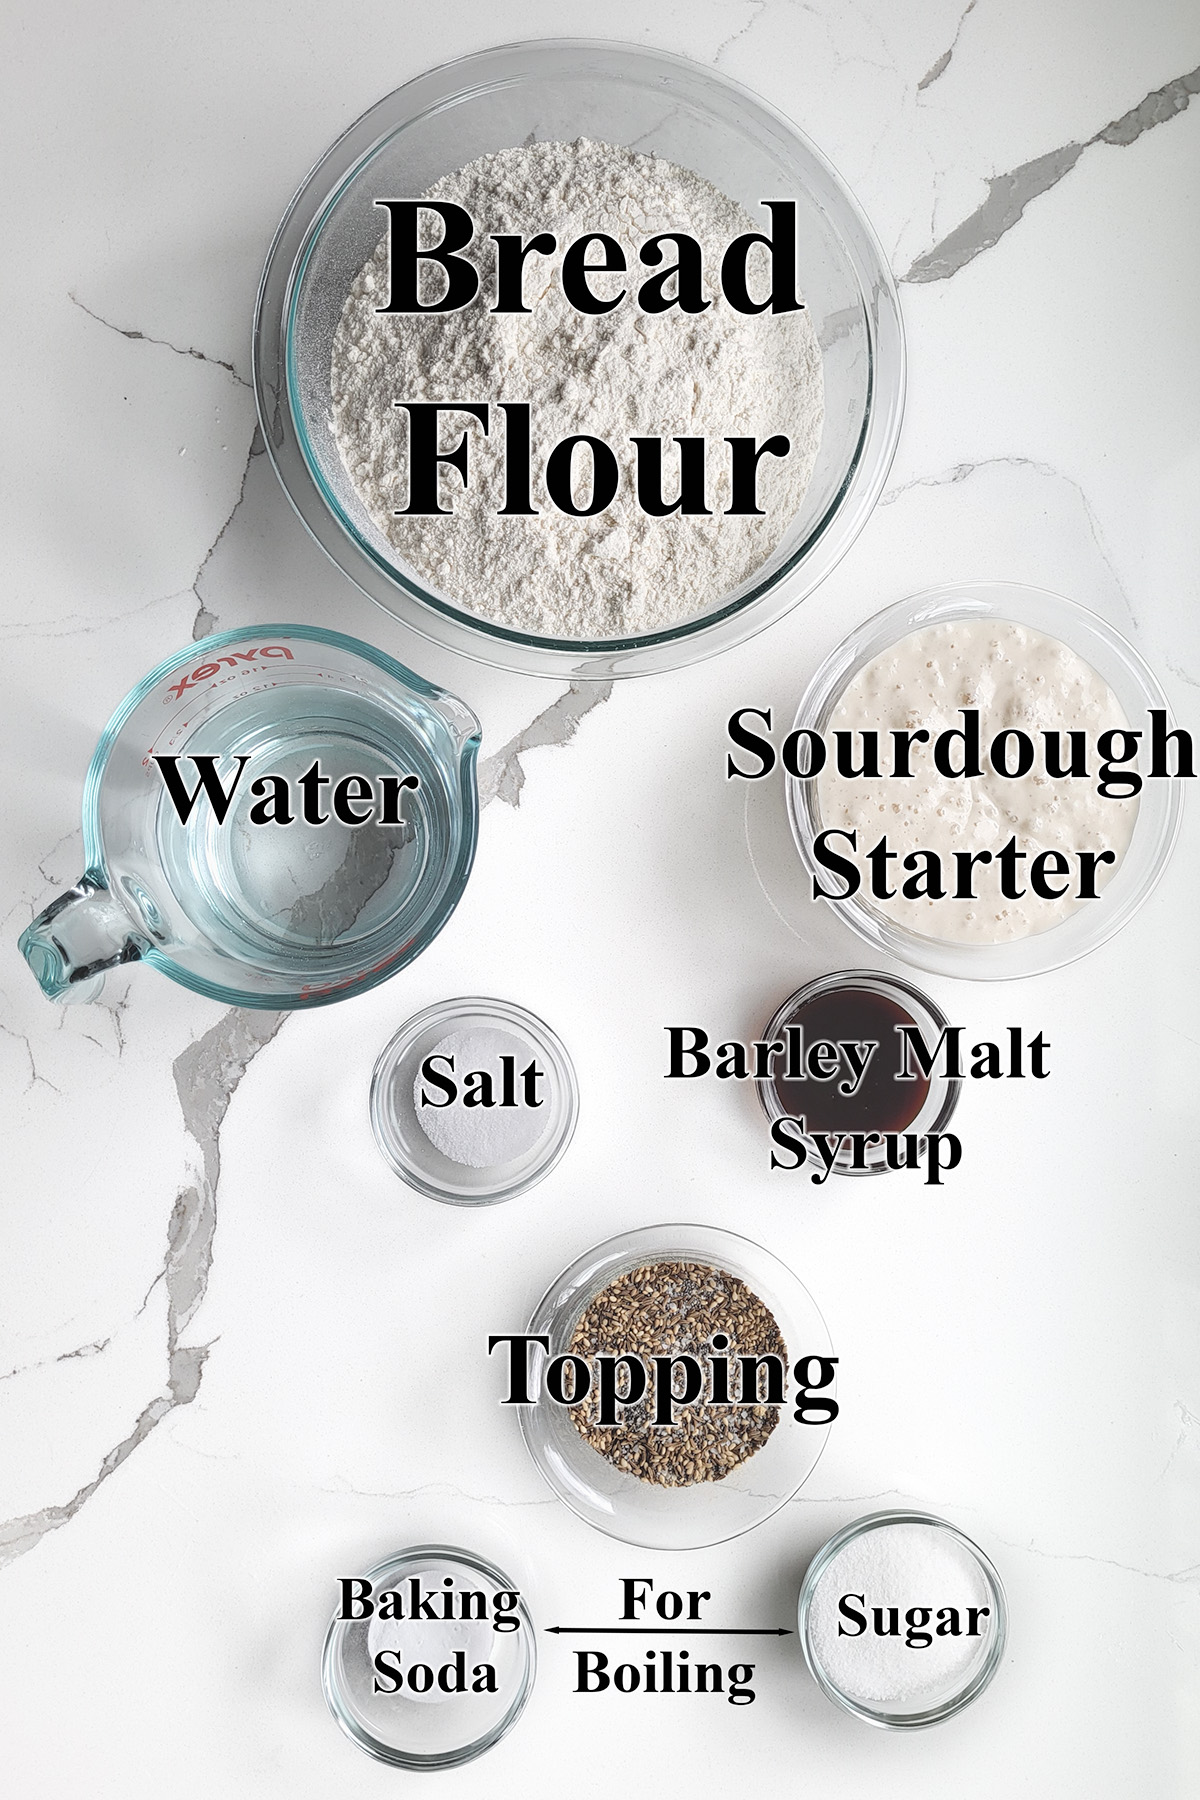
Ingredient Notes
- Bread Flour – Bagels should have a very chewy crumb from a strong gluten network in the dough. High protein bread flour develops plenty of gluten.
- Sourdough Starter – The recipe was developed using 100% hydration starter. You will need to adjust the liquid or flour in the recipe if you’re starter isn’t at 100% hydration. Your starter should be fed and active when you mix the bagel dough.
- Barley Malt Syrup – Adds a traditional slightly sweet note to the dough. You can substitute honey or a combination or honey and molasses for the barley malt syrup.
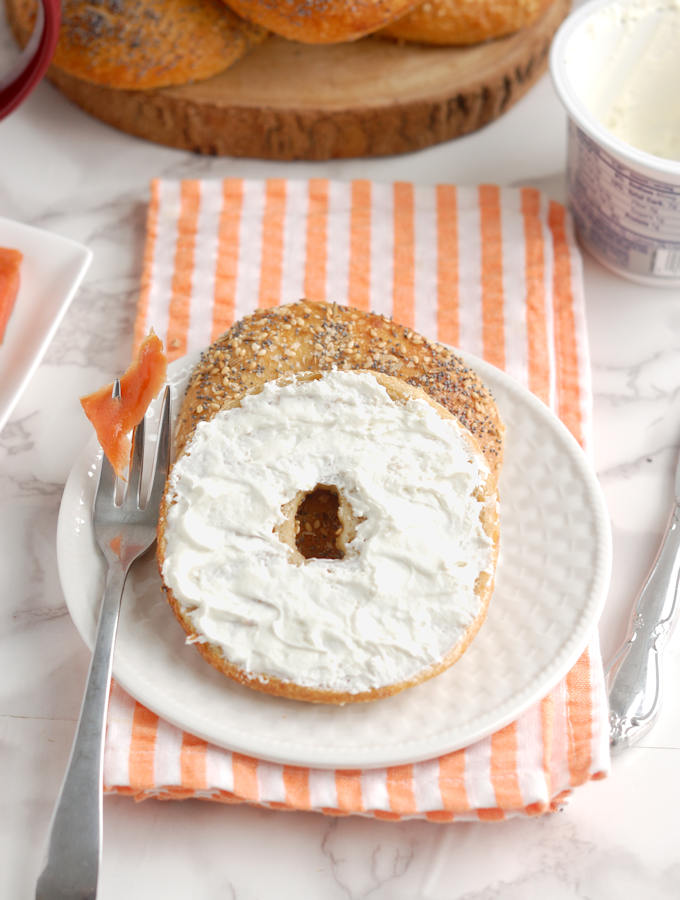
- Toppings – Leave the bagels plain or use your favorite seed for topping. You can mix seeds with salt to make your own “everything” bagel topping”. See the recipe card for details.
- Baking Soda & Sugar – For boiling the bagels. The boiling process creates the specific shiny and chewy bagel crust.
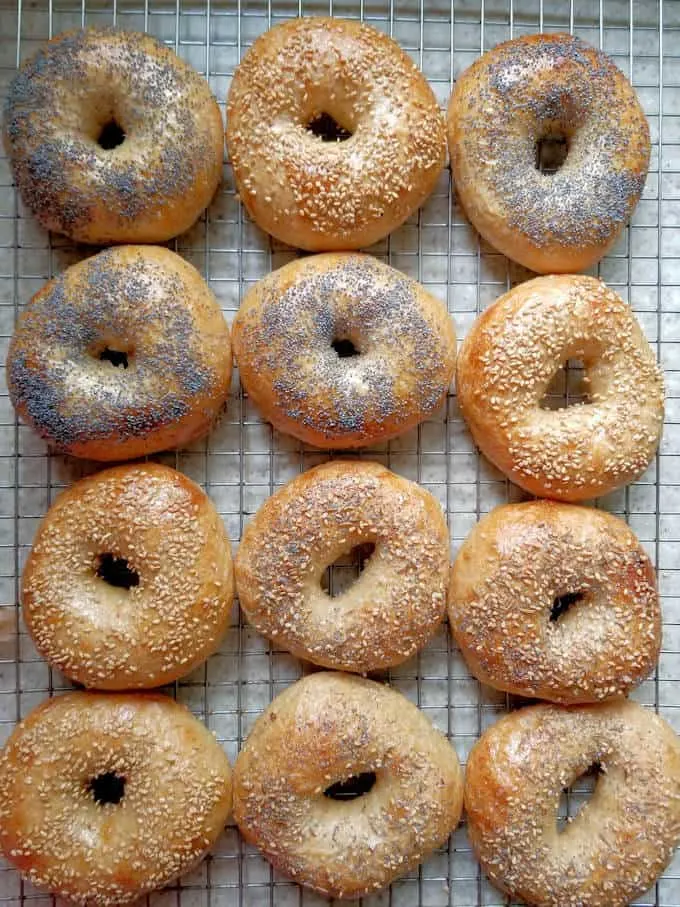
Process photos for making Sourdough Bagels
See the recipe card for detailed measurements and instructions.
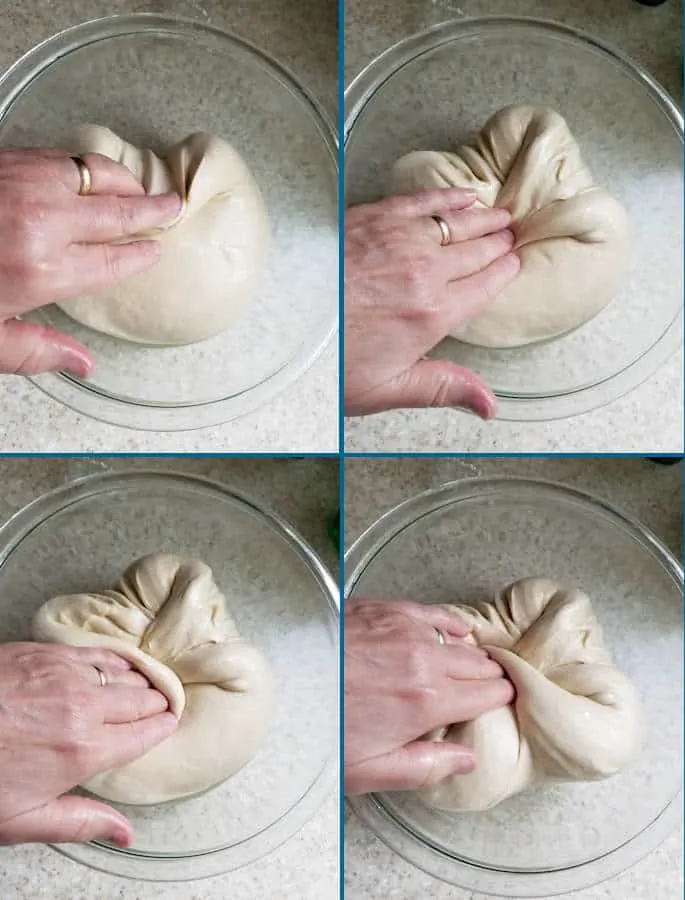
- As the dough ferments, it should be folded onto itself every hour or so to redistribute the yeast.
- Fold from each side into the middle, then flip the dough over.
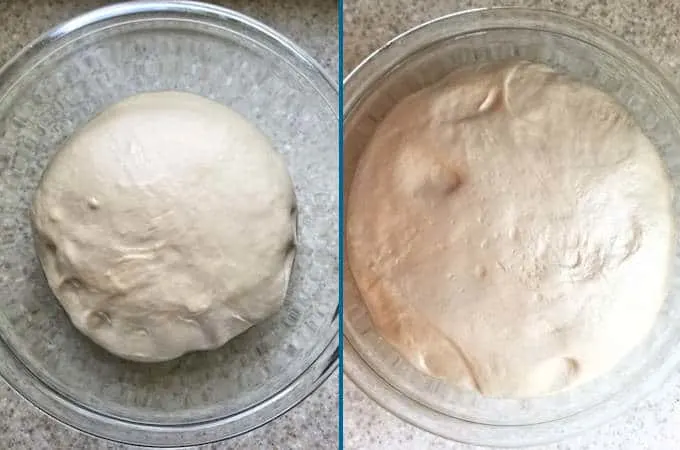
- After 30 minutes there’s not much activity in the dough (left).
- After 3 hours the dough should be active and nicely aerated (right).
- After fermentation it’s time to shape the bagels.
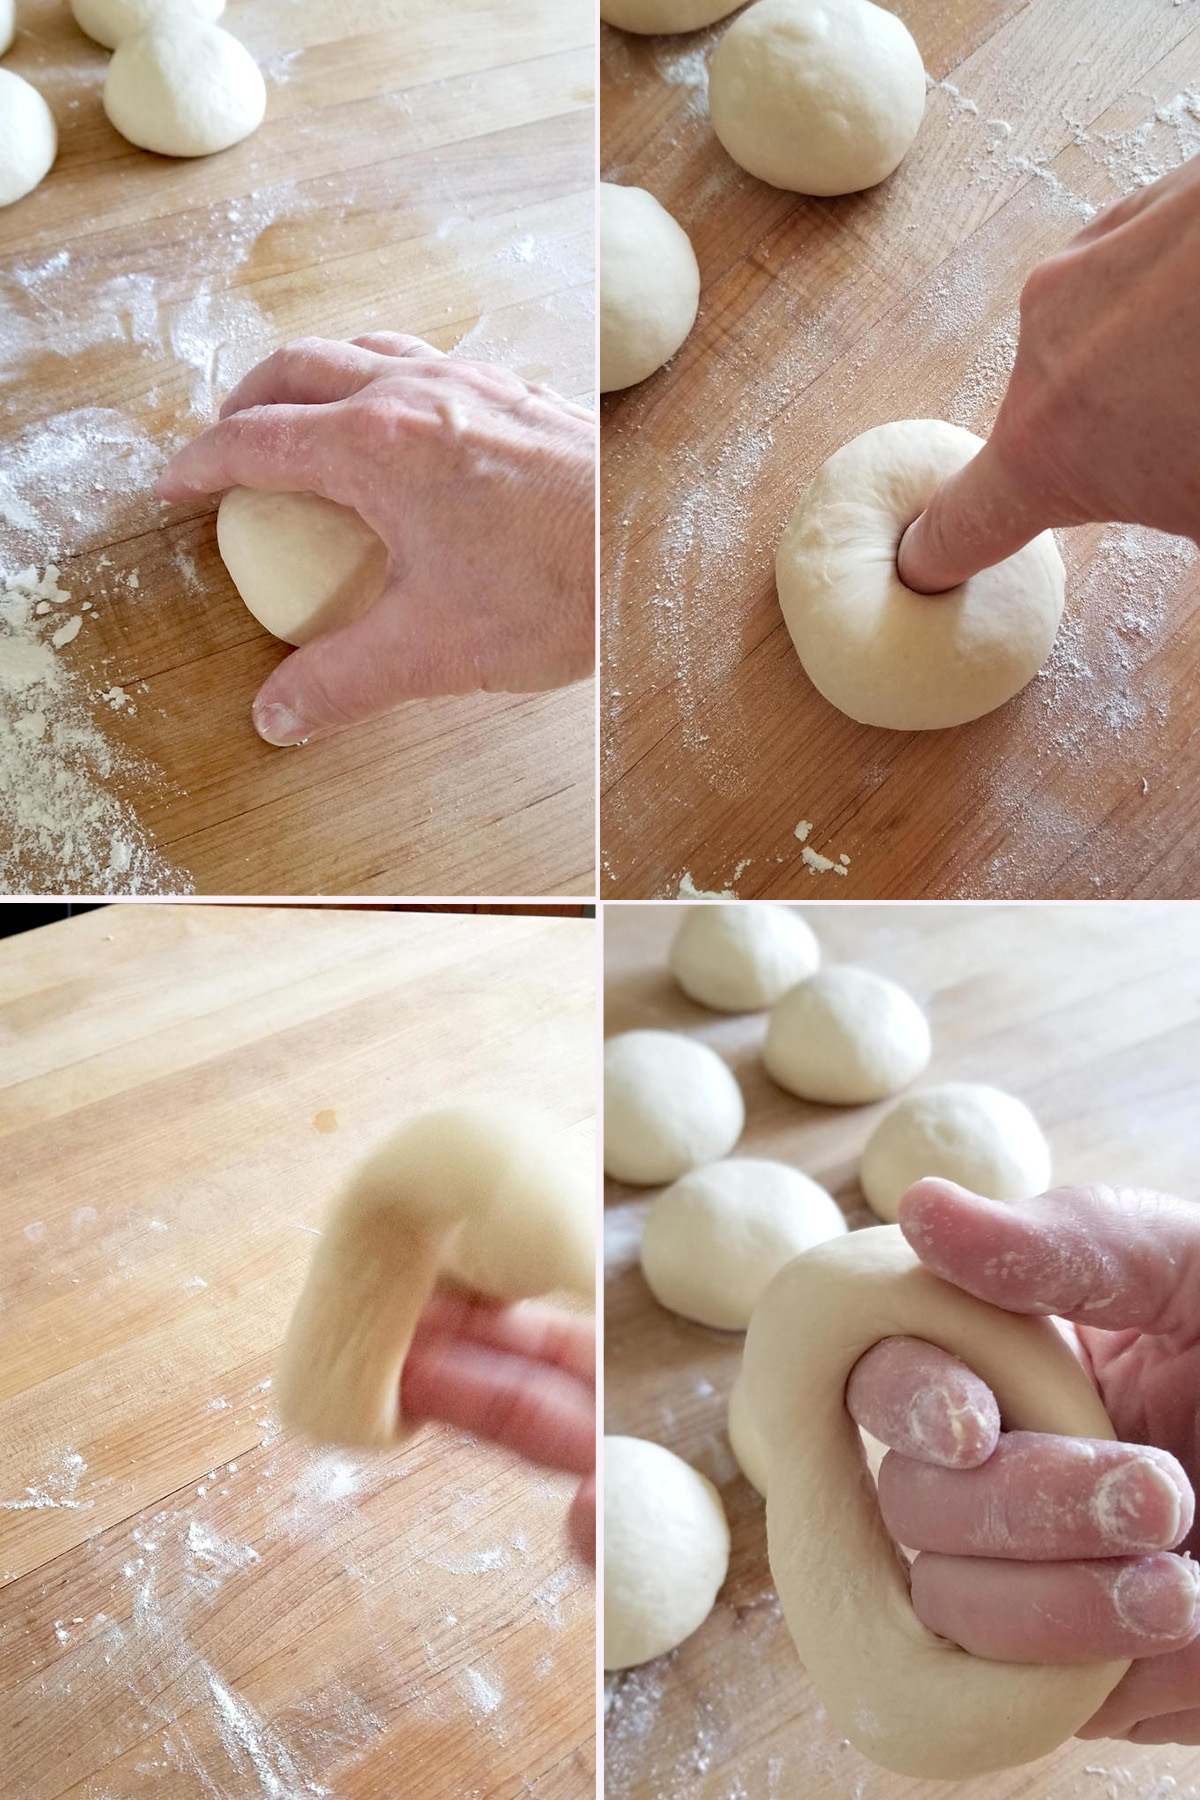
- Use a cupped hand to form the a piece of dough into a tight ball. Repeat with all the pieces of dough.
- Poke your finger all the way through the center of the ball to make a hole.
- Twirl the dough around your fingers to widen the center hole.
- Set the bagel onto the baking sheet and continue with the rest of the dough.
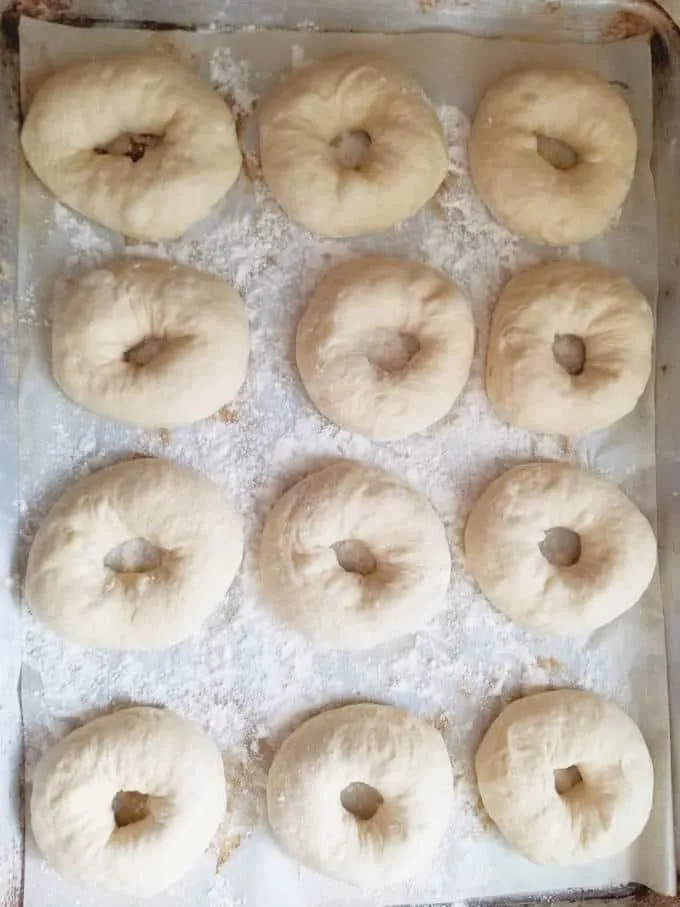
- Line the formed bagels onto a well-floured (or use cornmeal) sheet pan to prevent sticking.
- Cover the pan and place it in the refrigerator overnight.
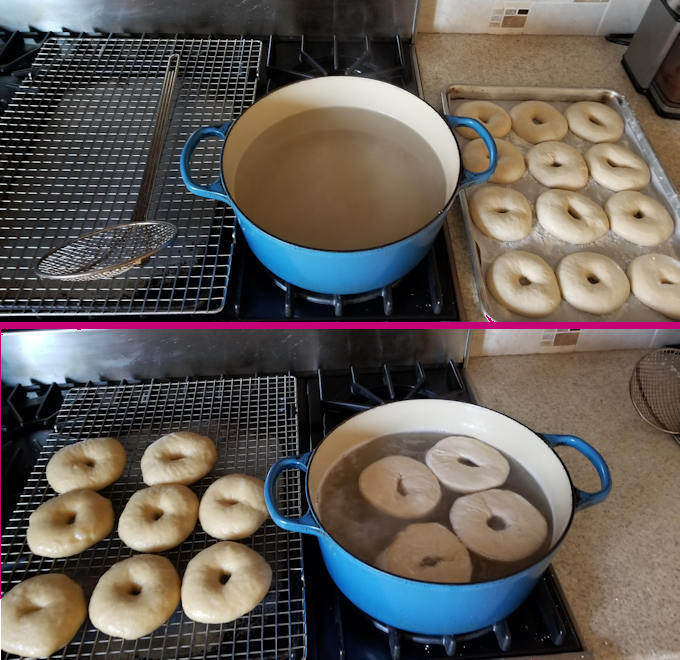
- Bring a pot of water with baking soda and sugar to a boil. Preheat the oven.
- Boil the bagels a few at a time, flipping them every thirty seconds. Boil each batch for 2 minutes.
- Transfer the bagels to a rack to drain while you finish boiling the rest of the bagels.
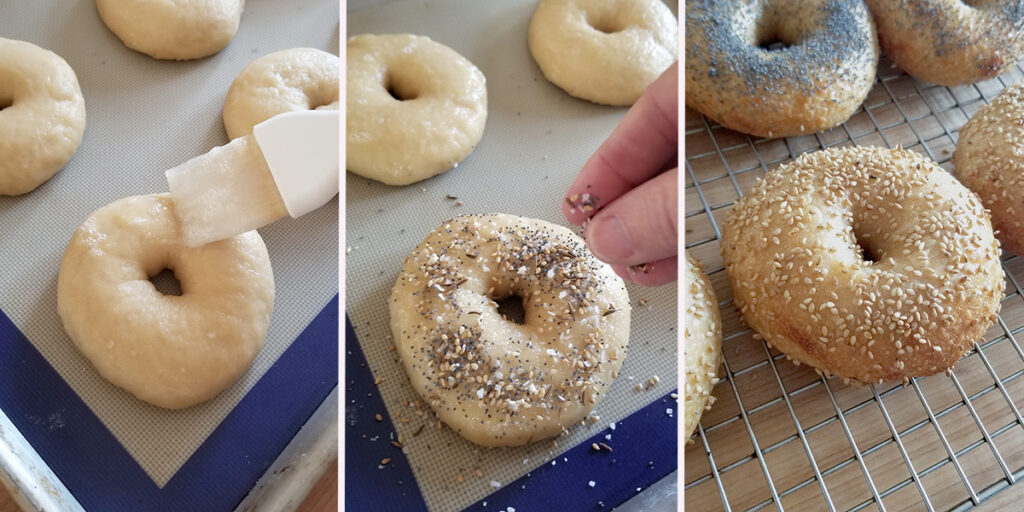
- Brush the boiled bagels with egg white.
- Sprinkle seeds or bagel topping if desired.
- Bake until the bagels are golden brown.
Recipe Tips
- Make sure your starter is very active and lively. I get the best results when I do two feedings in the days before making this dough. I keep several starters and use the Small Starter for this recipe because it requires two feedings before baking with it.
- To get a good bagel shape that will rise properly, you must create a tight ball of dough before making the ring. Use a cupped hand and surface friction to roll the dough into a ball. You can see how it’s done in the recipe video.
- Place the shaped bagels on sheet pan which has been sprinkled liberally with cornmeal or flour. If the bagels stick to the pan you will loose volume when transferring them to the water. I find cornmeal works best, but flour will work too.
- In the morning, take the bagels out of the fridge and leave them out until the dough comes to room temp.
- Don’t start boiling the bagels until the oven is preheated. They should go into the oven within minutes of coming out of the water.
Storage
- Bagels are best the day they are baked. For longer term storage, slice the bagels about 3/4 the way through and pack them into freezer bags.
- Previously frozen bagels are best if toasted before serving.
I know you hate to throw away that sourdough discard. Check out these recipes that use sourdough discard.
If you love this recipe as much as I do, please consider giving it a 5-star review.

Sourdough Bagel Recipe
Ingredients
- 8 oz active sourdough starter (1 cup (100% hydration))
- 12 oz warm water (1 ½ cups)
- 22 ½ oz bread flour (4 ½ cups, divided, see note)
- 1 ½ oz barley malt syrup (2 tablespoons (or honey + molasses))
- 1 tablespoon table salt
- 2 oz granulated sugar (¼ cup (for boiling))
- 2 teaspoons baking soda (for boiling)
- corn meal (for pan prep)
- 1 egg white (whisked lightly)
- Topping (sesame seeds, poppy seeds, caraway seeds or coarse salt)
Instructions
- Combine 8 oz active sourdough starter, 12 oz warm water and 2 cups (10 oz) of the flour in a mixing bowl. Mix to form a thick batter. Cover the bowl and set aside for 30-60 minutes.
- Add 1 ½ oz barley malt syrup and 1 tablespoon table salt. Switch to the dough hook. Add the remaining 2 ½ cups (12 ½ oz) flour and mix to combine. The dough should eventually cling to the hook and start to clear the sides of the bowl.
- Knead 5 minutes on medium speed. If working by hand, stir in as much of the flour as you can, then turn the dough out onto a lightly floured surface and knead in the remaining flour. Knead 5 minutes. Form the dough into a smooth ball.
- Put the dough into a lightly oiled bowl, turning once to coat the dough. Cover the bowl and set it aside at room temperature. After 30 minutes uncover the bowl, lift one side of the dough and fold it into the middle of the dough. Repeat with the other three sides of the dough then flip the dough over. You're basically turning the dough inside-out to redistribute the yeast. Cover the bowl and repeat the procedure every 60 minutes for a total fermentation time of about 3 hours. The dough should be lively, elastic and airy. If the dough is still sluggish give it another hour or two at room temperature.
- Line a baking pan with parchment paper then generously sprinkle the paper with cornmeal (or flour). Turn the dough out onto a lightly floured surface without kneading out the air. Divide the dough into 10 even pieces. Use a cupped hand to roll each piece into a smooth, tight ball.
- To form a bagel, poke your finger all the way through the center of a ball to make a hole. Use two fingers to gently open up the hole. Continue gently stretching to form the bagel or twirl the dough around your fingers to widen the center hole to 1 – 1½" wide.
- Place the bagel on the prepared sheet pan and continue to form the remaining bagels. The dough will probably spring back a bit so you can go back and re-stretch the holes once you're done forming all the bagels. Cover the pan with plastic wrap. If the dough and the ambient temperature is on the cooler side, leave the shaped bagels at room temperature for 30 minutes then place the pan in the refrigerator overnight. If the dough and ambient temp is warmer and the dough is quite active, place the bagels into the refrigerator without leaving them out for 30 minutes.
- In the morning take the bagels out of the refrigerator and bring them to room temperature.
- Preheat the oven to 450 °F. In a large pot combine 1 gallon of water with 2 oz granulated sugar and 2 teaspoons baking soda and bring it to a boil. Reduce the heat to keep the water at a rolling simmer. Set a cooling rack over a sheet pan or kitchen towel and place it next to the stove. Line two half-sheet pans with parchment paper or silicone baking mats and generously sprinkle with corn meal.
- Once the oven is preheated, you're ready to boil. Gently lift a bagel off the sheet pan and lower it into the water, bottom side down. Depending on the size of your pot, you can boil 3-4 bagels at a time. Boil the bagels for 30 seconds then flip them. Boil the other side for 30 seconds. Repeat the process again for a total of 2 minutes boiling time. Remove the boiled bagels from the water and set them on the cooling rack to drain.
- Place 5 of the boiled bagels on each sheet pan. You could fit them all on one pan but they may stick together as they bake.
- Brush the bagels with egg white. Add the topping(s) of your choice. To make "everything" bagels combine a tablespoon of each of sesame seeds, poppy seeds & salt with a 1/8 teaspoon garlic powder and onion powder. Bake until golden brown, about 20 minutes.


As an Amazon Associate and member of other affiliate programs, I earn from qualifying purchases.
Hi! I made these for the first time this weekend and they turned out great. Only issue I ran into was that the cornmeal started burning about 10 minutes into the bake. I was able to take them out, switch the parchement paper and continue baking without issue. Could my oven calibration be out? I didn’t see any other comments with people having this issue. Thanks!
I bake my bagels on cornmeal and it does create smoke in the oven. The cornmeal doesn’t actually burn, though. I keep my hood on and make sure it’s running. But it’s always a good idea to have an oven thermometer. My oven runs hot so I know I have to keep an eye on it.
Fantastic recipe! Though baking at 400 for 20min worked better for me.
Easy and perfect, I switch in some wholegrain flours occasionally and they’re still foolproof.
I love this recipe, have made it a bunch of times! Make sure your starter is very active – even when mine passes the float test, the bagels sometimes come out a bit dense. They’re still good, but I find if I let the starter activate for an extra hour or two, the bagels come out with a better crumb structure.
A note about the recipe clarity, Eileen – it looks like you updated it with weights since the last time I made it (a ~year ago). This is great, but under the first step in the instructions, it includes the total weight of flour. In the actual instruction it says 10 oz, but having 22.5 oz written immediately below is a little misleading. I was just moving quickly while making this, and I accidentally zeroed in on 22.5oz instead of 10oz, so I added all the flour at once. I have no clue how this will affect the final result, but I’m just going with it and hoping for the best since I don’t have more starter ready to go :/
I will update the card with the latest version of the instructions which gives them within the instruction itself. It should be clearer. Thanks. Eileen
Can I add frozen blueberries to this? I made the plain ones a few days ago and were my first successful bagels I have made! Now I’m hooked lol
I haven’t tried it so couldn’t say for sure. The frozen berries will defrost as the bagels go through the final rise and could give off quite a bit of moisture.
@Eileen Gray, I have mixed in freeze dried blueberry powder with success.
How much molasses tip honey do I use instead of barley malt? Barley is rare here I think can’t find it anywhere.
Replace the barley malt syrup with a tablespoon each of honey & molasses.
I love this recipe! It is so nice to have the bagels shaped and ready to go in the morning. I use about 50 g whole wheat flour (substitute for 50g of the bread) and they plump up nicely and are delicious. My grandkids love them with currants and cinnamon added also. Thanks, Eileen!
I follow this recipe all the time and my bagels never float in the boiling water even after flipping. Maybe 50% get some oven spring and plump up baking. Even so, I get told by a picky girlfriend they’re the best bagels she’s ever had. Great crumb throughout just not plump
Wondering if you have any suggestions. Both in the summer when it’s warm and in the winter when it’s cool same story so not sure if it’s an under/overproof story.
These bagels are denser than most commercial bagels and don’t have a big oven spring since they’re boiled before baking. Mine do float though since the bagels should puff as they hit the hot water. Do your bagels hang out at the bottom of the pot?
@Eileen Gray, I’d say 90% of all the bagels I’ve made following this recipe stay on the bottom while sometimes I do get an eventual floater. Not sure where to begin in the diagnosis
Hi. I’ve made your recipe several times with very good results .. nice even crumb, slight tang, crusty & super chewy. But lately the bagels are turning out flat rather than plumbed up. What could the reason? My sourdough was double fed, bubbly & active. Possible culprits:
— I used mixed flours: 85% bread flour, 15% sprouted spelt & 5% rye. Was hydration the problem as the dough was not very elastic during the stretch & folds?
— I counter rested the shaped bagels for 2hr (kit temp ~72F) before overnight in the fridge. Next morning the bagels had spread sideways rather than plumbed up. Was the dough over fermented?
What is your advise for more puffy bagels which will be more attractive & easier to slice. Thank you.
I make these bagels using all bread flour. If you change the mix of flours you’ll get a different result. Likely, you’ll get less gluten development with the sprouted spelt and rye flour. Weaker gluten can’t hold as much rise and stronger gluten and could be the reason the bagels are rising out rather than up.
These are amazing, and I make them all the time! They have become a staple in my household! Side note, why did all the metric measurements for this recipe disappear?! Please bring them back!
The metric measurements are still available. There’s a button at the top of the recipe card which allows you to switch between US customary and Metric measurement. The grams are slightly different than they were on the old recipe card. But the difference is negligible. You can ignore fractions and can round up or down to the nearest 5g is your scale doesn’t measure smaller than 5g (as mine doesn’t).
@Eileen Gray,
Thank you!
I’ve been baking these for about a year, usually every 2 weeks. My granddaughter will not eat any others. Thank you for such a fantastic and simple recipe. What is the minimum time these should be refrigerated. I try for 12 hours but sometimes fall short.
You can refrigerate for as long as is convenient. If it’s only 5-6 hours, that’s fine too.
Hi, Is it possible to leave the bagels in the fridge 36-48 hours? Thanks
I’ve left them as long as 18 hours with good results. If you’ve made the dough with a good healthy and active starter you’ve got a better chance of the yeast lasting for that long in the fridge. I think it should work, but with sourdough you can never know.
I’ve made these twice and they’re a big hit. My family likes bigger bagels, so I make 8 instead of 12 and up the oven baking time by 3-5 minutes.
I make Eileen’s sourdough rye regularly (we LOVE it), so Steps 1-4 here are comfortable and familiar.
This recipe calls for sprinkling either cornmeal or flour on the baking sheet parchment to prevent sticking (Step 5). I’ve tried both, and definitely prefer the cornmeal. I wonder if I’m using too much, though, since each time a fair amount of flour/cornmeal ends up caked & eventually baked onto the bottom of my bagels. Certainly better than than sticking to the paper, but just thought I’d ask — any suggestions on that?
FWIW, when it’s time to take the bagels off the baking sheet to go into the boiling water, lifting gently with a spatula instead of my hands works better for me to help the bagels keep their shape.
Thanks again for another great recipe! Trying your yeast version (Overnight Bagels) next!
Hi Eileen! Quick question. I started my dough a little later in the morning/afternoon so I just popped them in the fridge (5pm). How long is too long for them to be in the fridge before morning? If I cook them at 8am is 15 hours too long in the fridge?
I’ve left them in the fridge from early evening until the next morning with no problem. It should probably be fine.
Just baked my first batch. Followed your instructions and they look great. I haven’t tried one yet but I do have one question.
Prior to baking, there was one bagel that was perfectly shaped (IMHO, haha) and after the bake it came out with a crack in the finish. I’ve also noticed cracks/splits in a few other of the bagels. I know it’s just an aesthetic thing, but what would cause a crack/split in the finished surface?
Thanks.
Hmm, I’m not sure why they split. I generally don’t get splits or cracks in my bagels. Did you put them right into the oven after the boil? Usually with the moist exterior from the boil cracking isn’t a problem.
@Wil Wong, you should try preshaping them like you would sourdough. The method here of just cutting the portions for the bagels and then immediately punching the hole and shaping leads to cracks where the dough was cut. After you cut, fold in the edges of the dough to the center all the way around and create a little ball of dough. Flip it seam side down and do the rest of them. Then shape the bagels from there and there shouldn’t be any splits. You can look up the king Arthur’s preshaping bagels video
Actually, my method does not say to poke the hole in the bagel immediately after cutting the portions. In the recipe instructions it says to roll each portion into a tight ball before poking the hole and in the video you can see me do the same with the caption noting that rolling the dough into a tight ball develops the gluten to keep the bagel shape.
Love this recipe! My favorite part is poking the hole and spinning the bagel into shape. And then enjoying them fresh from the oven. THANK YOU!
I have tried this recipe twice, and the bagels are a little wet for great shaping. The taste is great, but what am I doing wrong that they are too wet for a great shape?
Are you weighing your ingredients? Is your sponge 100% hydration?
@Eileen Gray, Yes, I am trying again with feeding twice in 24 hours. Will let you know if it is any different.
I do get the best results with a very lively starter that’s had 2 feedings.
Could you use non-diastatic malt powder instead of 2 tablespoons (1.5 oz, 42g) barley malt syrup (or honey + molasses)? If so how would you hydrate it?
Yes, you could use malt powder. I would just add it at the same time you would add the syrup.
This is such a great recipe – My kids love them. They are fun and easy to make. I make them mostly with half and half white and wholemeal flour and they always turn out great. Even my husband has said how much my mood has changed taking the time to knead and make bread – not just these bagels but all of it. Thank you
Hi Eileen,
I made your Sourdough Bagel Recipe for the first time — they were amazing, bringing back sweet memories of the New York bagels of my childhood — many years before bagels grew to twice or three times their original size. Your recipe is perfect, even with a bit of white whole wheat added. I have a question about temperature. I now live in AZ where temperatures exceed 100F throughout most of the summer, and temps are mild during the winter. My house is a fairly constant 75 degrees in and 78 degrees in winter. Are these temps considered cooler or warmer?
I would consider mid 70s on the warmer side. My kitchen in the winter can easily be in the mid 60s and then the dough can be quite sluggish.
Hi Eileen, I made this recipe a few times for my family, and they are a huge hit! Thank you for sharing it with us.
I have family coming into town this weekend and they are begging for these bagels again, so I had a question: if I prep the bagels on a Friday and don’t cook until Sunday, is that okay? Should I alter the recipe in any way if the bagels are in the fridge for 36 hours instead of the usual 12 hours?
Thanks again!!
I wouldn’t hold the shaped bagels. I would make the dough ahead then maybe shape them on Saturday night or Sunday morning.
These were the first bagels I ever tried making, and they turned out amazing! Thank you! It’s so warm here now that I took the starter out of the fridge and started the sponge in the morning, and we were eating bagels warm from the oven by 4pm.
Even after adding a LOT more flour and kneading for extra time, my dough was very wet, but I continued with the recipe, keeping it sprinkled with more flour to prevent sticking. It was a new experience to figure out the whole boiling step, but now I know what to expect for next time. Absolutely beautiful and delicious bagels!
This has become my favorite bagel recipe. Everyone loves them. I do need to add about 50g more flour as my dough is very sticky otherwise. Thanks for sharing this recipe
Eileen, I wanted to clarify one thing: after 5 minutes in stand mixer, I have been kneading by hand for 5 minutes. Is this correct? Thanks,
Jim
There no need to continue kneading after kneading on the mixer for 5 minutes. The dough will continue to develop the gluten during the long fermentation.
Question: Instead of forming bagels then refrigerating overnight, can I refrigerate the dough overnight then form bagels. That’s easier for me in terms of available refrigerator space.
Yes. They will take longer to rise and be ready for boiling since you’ll knock out any air that formed overnight. But, otherwise, not a problem.
@Eileen Gray,
Thank you Eileen. Quick reply much appreciated. Simple, but critical info for this beginner!
Jim
@Jim Wintner, Eileen, where do I find a link to the video?
If you’re running an ad blocker the video won’t run since it is preceded by an ad. If you turn off your ad blocker you should see it. If you want to rewatch the sourdough bagel video you can reload the page and it will run again.
@Eileen Gray, Thank you, I was finally able to pick it up from the rotation of videos that show lower right of screen.
I just finished a batch. I measured the ingredients to be as close to yours as possible. At kneading, the dough was sticky and I had to flour my hands to work the dough. I then went through the sequence of folds/rises you indicated, plus one hour more. I put the dough in the fridge unshaped, as planned. In the morning it sat out for a couple of hours, then I shaped the bagels where I had a little concern that the surface of some was too rough (I have photos), but the dough handled fairly well and I could shape rings without feeling the dough might pull apart.
With the boiling I confronted my first real red flag: the bagels sank to the bottom and tool some coaxing to come up. They never did completely, instead they rolled around in the boiling water exposing all sides.
I baked them approx 25 min. I had a few where the holes closed up (I can fix that) but, otherwise they look good and I am about to cut into one ……
a few minutes later: tastes pretty good! Probably still a little too warm, but you know how hard it is to wait! Thanks for your advice. Any suggestions welcome.
@Eileen Gray, PS
I just read through several months of comments and see that both sticky dough and non floating are common and that you are in the same range. I wanted to add that I did not consider my bagels fragile when being transferred to boiling. And they did rise very well in the oven.
A remaining question: how do you identify your starter as highly active?
Thank you again!
I have found with this recipe that the quality and condition of your starter is extremely important. I keep a small starter, which needs 2 feedings before I can use it. I use that for bagels because the double feeding means my starter is fresh, well-fed and happy before I make the dough. The starter is highly active when it has just reached the peak of it’s rise, or just after it begins to recede. If you watch your starter you can see that when it’s first fed (equal weights of starter-flour-water) the texture is like a very thick pancake batter. After going several days or a week without feeding the same starter is probably more like a crepe batter. So you can imagine the stage at which you use that starter could make a big difference in the texture of the bagel dough. Older starter has weaker gluten and is more acidic. Both those things could make a wetter and heavier dough.
Hi Eileen – so excited to make these!! I wanted to see beforehand if there was any reason you don’t use barley malt syrup when boiling, instead of sugar?
I’ve made bagels just once before, but not sourdough, and used the syrup when boiling. I wanted to try that again but wanted to make sure there wasn’t a reason for just using the sugar. Thank you in advance!!
You can use syrup instead of sugar for boiling.
@Eileen Gray, thanks so much!
Inhave tried other sourdough bagel recipes but this is, hands down, the best one I’ve tried. This is my GO TO recipe!
I think the wetter dough is the secret!
I live with a bagel monster, and he does not want any other bagels, anymore. His friend (whose father was a baker) tried them last week and, now, also wants only these bagels. (You are to blame for this!!)
I don’t know why I feel I have to apologize for people who have no respect and manners whatsoever. I agree with everyone who posted about this rude person.
Obviously, he is perfect and any mistakes would not be due to anything he did. Hmmm…
I can only say thank you for sharing your recipe. It works for me. In fact, I’m just waiting to roll them and poke etc..
Fresh bagels tomorrow, yummy!!!
I made these bagels this morning and they turned out BEAUTIFULLY! It’s cold here, so I added all the 30-minute additions like you suggested. I was a little worried I pushed it too fast for the ambient temperature — I meant to start them around 3 pm and didn’t get to it until 5:30, but they still turned out great! When I boiled the bagels, they didn’t float, which was really weird — I’ve never had that issue with bagels before. I was worried they weren’t proofed long enough, but they still came out of the oven with good color, a great crumb, texture and hydration. I’ll just chalk it up to cold weather and leave a little more wiggle room for myself next time ;). I used honey/molasses in lieu of malt, and added a tiiiny bit more flour (the cup measurements in the recipe instructions made it difficult for me to tell if my measurements were correct – I always prefer grams!) because the dough was sticky when I kneaded by hand, and that helped a lot. Other than that, I stuck to the recipe exactly.
Your recipe is trash. The dough is too wet, your temp is too high and you’re clearly a moron.
You wasted my time and starter by acting like you know how to make sourdough bagels.
Wow! I know I should just roll my eyes and delete such a rude and personally offensive comment. But I do want to tell you that I make these bagels almost every week and they turn out beautifully every time. Apparently, I do know how to make sourdough bagels.
Eye roll indeed! So sorry people think it’s okay to speak to/about you like that. Knuckle-draggers…
Exactly, so sorry that people think it’s okay to just trash others with their words. I tried this recipe last weekend (baked Saturday morning for breakfast),my teenage sons enjoyed it. There were two left over, warmed them in the toaster and had on Monday. they were soft and tasted as good as freshly baked! I have tried quite a few of your recipes and have thoroughly enjoyed the outcomes. Thanks for all the efforts you put in to share your talents with amateur bakers like me.
I have made these bagels about 10 times and they have come out delicious every time. But that’s not really the point here–how sad must your life be if your default mode is to aggressively and rudely blame other people every time you make a mistake? You could have come here and done some troubleshooting with a helpful and generous blogger and left with a delectable bagel recipe to enjoy for years, but instead you just come here immediately spouting insults and vitriol. What a waste.
Hey Mark, it’s not Eileen’s fault you’re unable to read instructions, mine turned out great.
Hi Eileen. I am new to your site. I dehydrated some starter according to your instructions, and then decided I needed to test it out prior to sending the result to my sister. So, rehydrated according to your instructions. It took a bit longer than expected, but it is cold here these days. It came up really nice, I am pleased with that! So I made the bagels. The dough was beautiful to work with and it was a fun project. I do find them to be a bit flat and somewhat dense. Do you think I should have had them out of the fridge for longer than 30 minutes prior to boiling? I have also made the basic sourdough bread which turned out very well, and the pumpkin cranberry loaf with discard which was maybe a bit undercooked. My bad! I look forward to trying other recipes. Thank you. One thing I would like to see, is all measurements offered in grams as well as imperial. ie: both wet and dry ingredients. I like to weigh everything in Grams and was finding myself stumbling a bit with the math!
I do offer all the measurements in grams, except for the liquid measurements which I give in ml. I tend to measure my liquid ingredients in a measuring cup so that’s why I use ml instead of grams for liquid ingredients. As for the bagels, sourdough is so much fun because it does require us to use the recipe as a guide, but also adapt as the dough requires. I make the bagels quite often and will sometimes change the timing based on the temp in my kitchen. In the summer I put the bagels right into the fridge after shaping them and the next day they’re ready to boil by the time the water heats up. In cooler weather I always leave the bagels out for 30 minutes after shaping them, and then they go into the fridge for the night. If your bagels seem sluggish in the morning you can give them extra time before boiling. Just be careful not to wait too long because a very aerated dough can deflate when you pick up the bagels to transfer them to the water.
If they have measurements in ml you can convert use gram measurements. 1 ml = 1 gram, one of the many nice things about the metric system. For instance a liter (1000 ml) of water weighs a kilogram (1000 grams) or about 2.2 lbs. Hope that helps!
Hello. Thank you for sharing your recipes. I’ve tried this once already (good taste but flat), and in middle of trying again. Two things coming up: as others have pointed out, the gram measurement does not correspond to the cup measurement, and trying to figure out the 2.5 cups for the sponge doesn’t compute (puts the gram measurement WAY too high). I thought I’d check out the video to get a sense of hoe thick your “thick batter” is before letting the sponge rest (and measure by feel instead of grams), but cant find the video! (there are several commercial videos, and a video for other recipes — Caramel and fruit brandy something — but not the bagels…
A cup of bread flour weighs 5 oz. The conversion from oz to grams is 28.3g per ounce. The recipe calls for a total of 4.5 cups of bread flour, which weighs 22.5 oz. 22.5×28.3=636.75 grams. I rounded to 635g. I don’t know which 2.5 cups of flour you are referencing. The starter is mixed with the water and 2 cups of the flour to start. The video for the bagel recipe is the first video to run after an initial ad. After the bagel video is run, other recipes will run. If you re-load the page the bagel video will run again.
Thanks for responding! Sorry for confusion (I dont know where I got the 2.5 cups, either!). It is the one cup starter and 4.5 cup flour that dont compute in grams: 224g of 100% starter is 112g of flour (on the low side of cup-to-gram conversion for AP or bread flour), and 4.5 cups as 635g is 141g per cup (about average for AP or bread flour conversions). So I’m wondering if maybe the lower weight of starter, or higher percentage of flour is what is making these come out flat each time (still very tasty though!).
Sorry for the delayed response. I don’t always get notified of subsequent comments. I understand the confusion for the weight of the flour in the starter. I offer the volume for the starter for those who cannot weigh their ingredients, but it isn’t a perfect conversion since the weight of a cup of starter is approximate and can change based on how the cup is filled and how airy the starter is. This is why weighing ingredients for baking is always more accurate. By weight, the 4 oz of flour in the starter is 112g. I’m not sure what your question is about the 4.5 cups of flour. That conversion is correct as referenced in my previous comment. I would guess your flat bagels are due more to underdeveloped gluten or loss of air during transfer from the tray to the boiling water.
These are SO good and came out SO well that I’m nearly crying!!
Seriously, I just happened to find this website and I’m so glad I did!! Bagels, I feel, are the holy grail of sourdough baking (pun intended). I followed this recipe very closely and it did not disappoint!! I agree about having a strong starter. Mine was very sluggish coming out of the fridge, so I waited another day so I could squeeze in another feeding. I used it when it had tripled in volume.
THANK YOU!!
Also, do you think I can use dry malt powder in the water instead of barley malt syrup?
Hi! I’m wondering if you’ve ever used this recipe as the foundation for cinnamon raisin bagels? If so, what did you change? Thanks!
Yes, I have. I just added cinnamon to the dough and kneaded in raisins before shaping the bagels.
Hi Eileen-
First off this recipe has been SUCH a hit in our household. I’ve made it so many times throughout the past year.
However the last few batches I’ve made have fallen a bit flat. I do know a few steps I need to do differently, but I’m not sure if I’m getting the dough to the right texture when I’m kneading by hand. Should it be at all sticky still? I’m worried about over working it, so I knead it until it becomes a smooth ball, but it is normally still slightly sticky. And then it’s just not getting quite as air-y as it looks in your video. I’ve been trying to keep it in a warmer environment this go around to see if it helps!
Hi Adya, I find that with this recipe so much depends on the condition of my starter when I make the dough. I’ve started using my small starter for the bagels. That starter requires a double feeding before I can use it so it’s always really active when I mix the dough. I would worry less about kneading since a lot of the gluten development happens during the fermentation. In cooler weather the fermentation can take longer.
I tried again yesterday! I did a double feed, and it seemed very active when I first made the sponge. And I gave the fermentation quite a bit more time. The shape of the bagels seemed good when I let them sit out for 30/35 minutes before putting them in the fridge overnight. But they did seem to flatten overnight a bit.. there were still loads of air bubbles that appeared as I let them get to room temp and when I boiled them, but they never got a great raise.
Should I let them sit out longer before putting them in the fridge?
Also since I didn’t have cornflour I used oil to prevent them from sticking, wasn’t sure if that could cause the problem either?
I also just read your comment down below and realised that possibly my bagels are overproofed since they are quite soft, so they stretch a bit as I try to move them from the tray into the oven.
That sounds reasonable. Also, oiling the pan will probably make the bagels adhere just a bit as you lift them, which might cause them to deflate a little. If you don’t have cornmeal, flour would be the next best option instead of oil.
I made these today. They came out very good! Not perfect, but these are the best bagels I’ve made. I have been struggling with bagels. My goal is to replicate the excellent bagels from the bakery at my local whole foods. These had a nice crispy outer layer that the WF bagels don’t have, and I think I prefer it. They were a little more dense than I wanted, one thing I always struggle with is having the bagels collapse, either from transferring them to the boiling water, or after I take them out. I think that’s from overproofing (?). A few questions:
* Any suggestions for how to know when they’re proofed enough to retard in the fridge? I saw another recipe online that said to give them a “float test”. If a bagel floats within 10 seconds after putting in a pot of cold water, it’s ready to retard. Ever try that? Seems like a good idea. I need some kind of quantitative test, it’s impossible to exactly replicate the timing of a recipe because of differences in room temp and the healthiness of the starter.
* Ever try making them bigger? These are a bit too small. They came out to 85g each, the WF ones are 125g each. My concern is that they will be even more difficult to retain their shape if they’re bigger and heavier.
* Do you still do the egg wash if you’re not putting any toppings on?
* These sunk to the bottom of the pot when boiling. I’ve never had that happen before. Is that bad? Good? Indifferent?
* If they sink, do you still boil for the full minute? Since they’re not floating, both sides are getting boiled and there’s no need to flip them.
Hi Dave, sorry for the delayed response. I was making bagels this morning and realized I never answered your questions.
*I find that leaving them at room temperature for 30 minutes before putting them in the fridge for the night gives them a bit of a head start and they usually have a nice little rise by the next morning. With bagels I tend to error on the side of not overproofing since you will have the potential for them to collapse if they are too soft when you transfer them to water for boiling. What works best for me (and I just did this again this morning and got gorgeous bagels) it to take the bagels out of the fridge and leave them out to warm up while I boil the water and preheat the oven. They are still a bit cold when they go into the water, but puff nicely as they boil.
*You could make them bigger. I weigh my raw dough to 105g per bagel. You could weigh the dough and divide by 10 or 8 instead of 12 for bigger bagels.
*I like the shiny crust from the egg white. But I know folks who are vegan who skip the egg glaze.
*Mine do sink when I put them in the water. When they float to the top (after 10-15 seconds) I flip them and boil the other side. I give them another flip or two until they are nice and puffy.
*As I said, mine sink and then float. I like to flip them because I do want them to get even heat on both sides.
Hello, I’m planning on making these today but am confused at the other comments. I tried my first bagel this week and was blown away and decided I would make one and just so happened to have a starter I’ve been feeding. I am wondering if there is any difference to these and normal bagels and if so what. Sorry it’s a bit of a strange question
The difference between sourdough bagels and “normal” bagels is that the dough is leavened using the natural yeast in the starter rather than a commercial yeast. Natural yeast takes longer to rise the dough. The long and slow rise changes the texture and flavor of the dough.
Do you think I could half both recipes so do half this one and half your normal nyc bagels so I can compare them?If so that would be ideal!
Sure, no reason you couldn’t. Although they freeze really well so you could do a full batch of each and freeze leftover.
What are some alternatives to using malt syrup? Honey only, maple syrup, brown sugar, others? And quantities.
Thank you.
The best substitution would be a combination of molasses and honey, a tablespoon of each. Maple syrup would add a distinctive flavor that isn’t very bagelish.
Hi there, So I have a starter that I feed once a week and is kept in the fridge, what would you recommend me doing if I won’t to do this bagel recipe on the day it is due to be fed so 6-7 days after it’s last feeding. Also is black treacle okay to use instead of molasses. Thank you if you can help I’m looking forward to making this recipe!
This recipe gets the best results with a well-fed and very active starter. If your starter hasn’t been fed in a week I would take it out the night before and give it a feeding before making the bagels. If you plan to do the overnight refrigeration step you can feed the starter early in the morning and make the dough early in the afternoon. Here are some great recipes to use up the discard from feeding the starter.
Great recipe. This is my go to recipe since the beginning of quarantine and must have made these a dozen times. I am from NYC area and just moved to the west coast a year ago and these bagels are just like the NYC bagels I miss.
These look so good. I have made sourdough bagels using a different recipe but they have been coming out a bit dry so I’m excited to try these. Can you tell me what purpose the malt syrup serves? I don’t have any and I don’t like to bake with honey. Could I use maple syrup maybe? Thanks!
I have tried this recipe 3 times now and although the bagels taste good, they look nothing like a real bagel. The poof up to look like a good bagel but when they are being transported to the boiling water they go down in size (almost to be flat bread thickness). They do taste good still but can’t cut them in half to toast or add butter/cream cheese.
Hi Seth, sorry you haven’t had a good outcome. If you read through the comments you’ll see lots of advice from me and other readers as to how to get a good result.
Thank you Eileen for this recipe and the dozens of delicious bagels my family and friends have enjoyed as a result! I’m curious. Why do we add the baking soda and sugar to the water?
To help create a nice, shiny brown crust on the bagels. The sugar and baking soda help with browning in the oven and gives them that specific “bagel” flavor.
It works!
These are soooo good – much prefer it to my sourdough bread. Texture is perfect. Thank you for recipe.
You are welcome!
I’ve made this these twice and each time the bagels never floated in the water. They also seemed too sticky. The taste is very good though
I always put the bagels in the water with the bottom side (cornmeal side) down first. Sometimes the bagels can stick to the bottom of the pot if they sink all the way down. Give them a nudge after putting them in the water to make sure they’re not stuck. To avoid a sticky dough make sure your starter is well fed and at it’s most active phase when you mix the dough. Give the sponge 30-60 minutes. Give the dough a full 5 minutes of kneading and plenty of time for the fermentation.
Oh yum! They turned out perfectly!! Thank you for sharing your thoughtful step-by-step! Now I’m really stuck…. I want to share them so I can say “Look what I made!”, but they’re so darn good that I want to keep’em all for meeeee!! Bookmarking….
Ha, ha. I keep making them to “stock up” the freezer, but somehow each batch is gone before the next is made.
Hi in the middle of making these! Question re the gram measurement of flour – if 120g=one cup how does 630g = 4.5 cups? The number for 4.5 cups would be 540g I think. I am def a newer pandemic baker so not sure!. Worried about the ratio! I was so excited to make this – hope you can answer or I figure it out soon. No other questions about it so a little confused.
Hi in the middle of making these! Question re the gram measurement of flour – if 120g – one cup how does 630g = 4.5 cups? The number for 4.5 cups would be 540g. Worried about the ratio! I was so excited to make this – hope you can answer or I figure it out soon. No other questions about it so a little confused.
Where does the 120g measurement of flour come from? I use the weight of 5 oz per cup of bread flour. Assuming 28g per ounce, 1 cup would be 5ozx28=140g. 4.5 cups x 140=630g.
This is what I have been using all along, and I have weighed everythin
The bagels didn’t rise – very flat. I am sure they will taste good, but reciped didn’t work for me clearly.
I’m sure the King Arthur weight chart works for King Arthur recipes. But the weight of a cup of flour can vary based on how you fill the cup. I use the “dip and sweep” method which yields 5 oz per cup. If you always work with weights then you should use the weight listed in the recipe and not worry about the cup measure. Did the bagels not rise at all or did they loose volume when you moved them from the tray for boiling?
Eileen, are you measuring in oz or grams? When I made this recipe and finally decided to weigh out the flour, I weighed in grams. I also had the same problem as Joy, where they fell very flat. I think it’s because I didn’t use enough flour, as it seemed much stickier than the ones I had made in the past. For me, I got better results using a measuring cup, but I would prefer to weigh it.
I weigh everything in oz and then convert to grams for the convenience of readers outside the US or who prefer to use grams. Whether you use oz or grams shouldn’t make a difference. Using cup measure is less accurate since how you fill the cup can change the weight of the flour by as much as an ounce per cup. I think your bagels falling flat may be due to other issues. Most of the time the texture of the dough is affected by the condition of the starter. Bagels falling flat could be because the dough didn’t have good gluten development or they were over-proofed. Weak or over-proofed dough can deflate when you pick up the bagels to put them into the boiling water. I make these bagels almost every week and I find that I need a really active starter to have the best dough. The dough should be nice and tight when you are shaping the bagels.
Hi! I am new to sourdough baking and really want to make bagels as we don’t get good ones here in India. I was wondering if it was possible to make this recipe with whole-wheat flour? I was thinking maybe 500gm WW and 130gm APF? Also I do not have any malt syrup or molasses. I would have to use only honey. Do you think I could still have a good outcome or is it too many changes? Also what should I expect with these modifications? Thank you!
The honey will be a good substitute. Bagels need really strong gluten for the right texture. I’m afraid a combination of whole wheat and all purpose flour (I assume that’s what you mean by APF) wouldn’t develop a strong enough gluten, especially using mostly whole wheat flour. Do you have access to higher protein flour, like bread flour?
I could procure some bread flour. I just thought the WW with the AP might be healthier. There is something called T55 fine wheat bread flour available. Thanks!
Thank you for this recipe! I had an easy time following along and was impressed with the results. Also, I did not have any barley malt or molasses; a 1/4 cup of honey in the pot of boiling water worked just great. I also baked a bit longer, at a slightly higher temp and kept my eye on them for browning.
hi Eileen just wanted to ask if i can use honey plus brown sugar since I can’t find any molasses here for the malt barley syrup. Thank you
I guess that would work since there is molasses in brown sugar.
Thank you I’m on my 2nd feeding, can’t wait to try them and see the results will post photos if all goes well.
Made Sourdough Bagels for the first time. They were delicious, my husband really loved it! I only made half of the recipe to give it try. The Bagels turned puffy, looked like Burger buns because I didn’t stretch the hole big enough. We love the chewy crust & soft crumbs. As of this writing, I’m actually making another batch 🙂 This time it’s the whole recipe & i’ll make it bigger.
Hello, I’m looking everywhere on the page for the video, but I can’t seem to find it. Is the video still available? I plan to make them tomorrow. Thank you 🙂
If you’re running an ad blocker the video won’t run. You’ll have to turn off the ad blocker to see it.
This is the 3rd recipe I’ve tried for sourdough bagels and these turned out less flat than the others but still not puffy after baking. I halved the recipe so as not to waste too much in case I had poor results. BUT – they are delicious! I’m going to try the double feeding so how long after the 2nd feeding should I begin? Thanks.
I’m in the middle of making a batch of these right now. I fed my starter the second feeding about 8am and it was ready to go before noon. It’s hot here today so all my sourdoughs are going quickly. I find that in the warm weather the bagels are ready to go into the water bath fairly soon after coming out of the fridge. Tomorrow I plan to turn the water and oven on as soon as I take the bagels out of the fridge and might try boiling them when they are still slightly chilled.
Amazing Bagels!
Amazing recipe!!! Light chewy bagels. I used 1 tbsp molasses & 1 tbsp honey in place of the barley malt syrup which affected the colour but they taste incredible. My only adjustment will be my oven temperature as I think my oven runs hot! Thank you very much for great instructions & a fabulous recipe!! My teenagers thank you too!
Hi,
Made these today – in fact they are baking right now so I haven’t tried them yet. But I forgot to add the sugar and baking soda to the water – bummer. What do those ingredients do ?
Cheers
Dan
The sugar and baking soda will flavor the crust and help with browning.
Hello! These are wonderful bagels, I’ve made them several times now. I do have a question though. I have limited fridge space. Do you think letting the dough rise in a bowl in the fridge overnight, then shaping bagels in the morning would work?
Yes, I’ve done it that way. It will take longer for them to rise in the morning since you’ll will be losing some air as you shape the bagels. I’ve also made the dough later in the evening and then left it out overnight to ferment. Then shape and bake in the morning. That works best if your kitchen is not too warm. This works for me in the winter not in the summer months.
Baking them right now. So far doesn’t look good. I took them from fridge and left them outside for an hr. When I put them in the boiling water they sank which is never a good sign. I think it is all the molasses in the dough. I shouldn’t have kept it out and then add molasses in the water when boiling. I will try 1/2 the recipe again with my changes to see if it helps or not.
How much molasses did you use? Where they at room temp by the time you started boiling?
Made the 1/2 recipe but I omitted molasses in the dough option. Added little bit of diastatic malt powder. While boiling water I used the molasses as I didn’t have barley syrup. The bagels came out really good. Will be making these going forward with my twist.
Ellen,
When you say honey + molasses instead of barely malt syrup, do you mean 1 tbs each or 2 tbs honey+2tbs of molasses?
Thanks
1 tablespoon of each if you have them. If not, you can use 2 tablespoons of either honey or molasses.
Thank you for these wonderful recipes. Like so many, we recently jumped on the sour dough band wagon and your recipes have been great. We baked the bagels this morning using sesame seeds and the molasses and honey substitute. They were incredible. Your recipe and extended directions are spot on. My husband ordered #50 of bread flour, so with your recipes, we have become the bakery for the family. We love delivering our goods to our grown children. So far we have made your artisan bread, pretzels, English muffins, pita and sandwich bread as well as the bagels. Your recipes are straightforward and delicious. The answers to the comments are very useful. We may have to name our starter Eileen.
Ha, ha. That’s amazing. I would be honored.
These are so good!! Great taste and great texture! I didn’t have bread flour and didn’t feel like going to get some, so I used AP flour instead and they still worked out great! Other than that, I followed the recipe exactly. I’m baking my second batch today! Thanks for a great recipe – not only does it taste awesome, but your instructions are very thorough and easy to follow. I’m looking forward to trying more recipes from your site!
Hi,
I am very interested in your recipe because we love bagels and it’s complicated to find real ones in France. And also I prefer to use starter/surdough (I don’t know how you call it) instead of instant yeast.
I am going to try this recipe. But I have one question beforehand : When you say “unbleached bread flour” : is it whole grain / half whole grain / less than half whole grain ? I buy organic flour and we have different types, all of them are suitable to make bread.
Thank you for your site. I think I’m going to try some of you recipes.
If I’m not mistaken, there is no “bleached” flour in Europe. The flour I use is white flour, high protein bread flour. I’m not sure what the equivalent would be in France. The flour I use is 12.7 percent protein.
Thank you for your answer. I understand why I couldn’t figure out what a bleached flour is. I’m going to try with a regular but not too white flour (T65 defines how fine the grinding is). And it has 13% protein. It sounds like it’s a good replacement for yours.
Sounds about right.
Yes, I baked them today (I’m always unsure with my sourdough because it is very young). So all worked fine. Your instructions are really thorough. French organic T65 is exactly what is required in this recipe. Thanks again and l’m looking forward to testing more recipes on your site.
Can you use Maple syrup if you don’t have malt or molasses? Also can you double this recipe? or is it best to do one batch at a time.
It’s a pretty hefty dough. If you mixing on a stand mixer I’m not sure the mixer could handle it. If you’re mixing by hand it will be quite a workout. Maple syrup would work but would give the dough a different flavor. If you have honey that might be a better substitute.
Remade these again and double fed my starter – amazing results! Thanks so much for such a great recipe 🙂
Double feeding really seems to make a difference.
Another awesome recipe, thank you so much!!!
I have a question… if the bagels rise between the 30-50% ratio mentioned, I’m assuming I can skip leaving them overnight to rise right, and boil/bake them if risen enough on the same day?
I also agree with the double feed, however I did it in one day (morning/after lunch) which I’m thinking may have attributed to the dough turning out how it did (in a great way) – so a great tip!
You can bake them the same day, but the overnight in the fridge is for more than convenience. The long, cool rise enhances the flavor of the dough. But if you make and bake them the same stay they will still taste great. I’ve been making these every week to really nail down the process. The key is certainly to have a very active starter (double feeding works for me) and to let each stage of the process take the time needed. I’m also putting together a video so folks can see the process.
Hi Eileen,
Thanks for the great recipe. I made them today and they turned out fairly well. However I mess up a bit with the starter by adding a cup directly. In your notes you say you use 4oz starter, 4oz flour, 4oz water – do you leave this overnight? Or a few hours in the morning like a levain? Also can you elaborate on making the sponge 60 mins before? I just didn’t quite follow it.
Thank you for a great recipe looking forward to hearing your tips!
The 4 oz each of starter-water-flour is for feeding the starter. The cup of starter (8oz) does go directly into the bagel dough. The 60 minutes of the sponge is to get a head start on developing gluten.
I have made these three times now and love the flavour but they end up as pancakes every time, first time as the clingfilm got stuck, second time as the first rise was too long, and the third time, well, just because i touched them when they were going into the water and they went flat. So i think i’m ready to give up and try something that doesn’t involve having to do stuff with the bread after the final rise. They were also difficult to get off the baking sheet so even with large amount of flour they didn’t release that easily and ended up with a sticky flour layer on the bottom. I do so want to love them but they just don’t seem to work for me. 🙁
Hi Marie. Sorry you’re having trouble. I think the sticking point (no pun intended) for many people is the step where they have to transfer the bagels to the water. If the bagels stick to each other or the tray they can loose some volume. I make these bagels almost every week and I’ll tell you what has worked best for me. First and foremost, I find that if my starter is a little sluggish the whole process is more difficult. Last week I gave my starter two feedings before mixing the dough and the bagels turned out beautifully. I think the condition of your starter can make a huge difference. Also, I have been dusting the pan with cornmeal rather than flour lately. Both work, but the cornmeal seems to make the unbaked bagels stick less. I’m updating the post with some new tips to help folks that are having trouble.
Hi, I am new to using a starter but mine is ready to use and I’d really love to try these bagels. I don’t have a stand mixer. Would you have any advice regarding what I’m looking for when mixing and kneading? Thanks
Without a mixer you’ll have to mix in as much of the flour as you can my hand. Turn the dough out onto a well-floured surface to do a good 5-7 minutes of hand kneading. The dough is fairly wet so make sure to keep your hands and the dough floured. Then proceed with the recipe as written.
Hi Eileen,
Thank you for your recipe, my bagels didn’t rise as much as yours but they taste great and have a really good chewy bagel texture and flavour! I did have to add extra flour as did someone else in the UK to get in the dough the right consistency. These are amazing and I will definitely be making them regularly!
Just this morning I finished shooting a video of this recipe. It will be on the website in a few days. You can watch the video to see how the dough looks, etc.
These came out amazing! Definitely exceeded my expectations as a beginner with sourdough. The dough was very tough but smooth and took at least 10 mins to knead by hand. My starter isn’t super strong so I don’t trust it in the fridge, and my house is on the cool side, so I left these wrapped in plastic overnight on the counter and they rose just enough. We made garlic salt and cheese bagels, I will definitely double the recipe next time!
Garlic & Cheese, Yumm!
Hi
Thanks for the recipe…I am in the middle of it … as a total newbie to sour dough, I was wonder If you should add moisture to the oven while baking?
Not necessary. There’s a lot of moisture from boiling.
Thanks for the quick reply! These bagels turned out really well, thanks for the recipe and well thought out instructions!
Can I make these with a “mix in” like cinnamon and raisins or blueberries (as opposed to just putting something on top)? If so, at what point in the process would you recommend adding them? Thanks so much!
I do believe some folks have made cinnamon raisin bagels with this recipe. The cinnamon can go in while mixing the dough, with the malt syrup and salt. I would fold in the raisins just before shaping the dough. Since you’ll be knocking out more air by kneading in the raisins the rise might be a little slower.
Thanks so much for the recipe! I added a few tbsp more of flour (using King Arthur special patent – 12.7%) and used 1 1/4 Tbsp molasses to replace the 2 Tbsp barley malt syrup. They stayed in the fridge for a solid 8 hours, and about a 45-70 minute rest at room temp (worked in batches of 8). After boiling, sprinkles directly with toppings on a wire rack and then placed on a sheet tray with semolina. Baked directly on a preheated pizza stone at 450 (convection) for 15 minutes, they were perfect! Chewy, beautiful flavor.
I had an issue with these rising properly. Did the 30+ mins on the counter before proofing them overnight in the fridge and then allowed them to it on the counter for 2 hours in the morning as they had not risen in the fridge. When I boiled them, they were VERY delicate and hard to work with and did not rise very much (at all) in the oven. The taste is great but the appearance is lacking. Any suggestions about how to improve in the future? Does it sound like the dough was too wet?
Did the bagels begin to rise during that last 30 mins before refrigeration? Usually by that point my dough is active enough that I will see them beginning to puff during that 1/2 hour. The key to getting a good rise and proper structure for these bagels is the fermentation stage. The total time needed for fermentation will vary based on your starter, the temp in the room and the temp of the other ingredients. Was your dough nice and aerated and springy before you shaped the bagels? If not, give them more time. Did you weigh your ingredients or use cup measures? Is your starter a 100% hydration starter?
I’m making my second batch of these – first were delicious – and I’m curious about something. My starter was active, passing the float test, and I kneaded for about 8 minutes until dough was smooth and sprung back nicely.. However, I’ve now gone through the 3 hour fermentation and have had a difficult time during the stretch and fold. The dough is not very extensible so I’m having a hard time making the folds. It also drags a bit from my fingers due to the high tenacity. I’m going to let it ferment another 1-2 hours, but wondering why the dough is so hard to elongate during the stretch and fold phase. Also, how would I know how long is too long to ferment? Thank you!!!
I just made another batch of these yesterday and I will say that when I have given my starter a double feeding (2x in 2 days) I get a much better result.
Hello!
Thank you for this recipe.
All steps were very clear and by bagels turned out beautiful – wonderful aeration and a crisp/chewy crust that I love.
I kneaded for longer than 5 mins as I was doing it by hand and I needed to add another ~1/2 cup flour to get the nice smooth dough to form. I was slightly worried in the morning that maybe they hadn’t achieved the 50% rise but I left them out a bit longer and not much changed. I boiled them anyway and then they rose beautifully in the oven becoming rounded and shiny.
I also skipped the egg white as we are vegan but it still worked wonderfully with no sub.
Thanks for a great recipe will use again!
Great. If you’re in the UK I know that flour can be different so I’m glad the recipe worked out.
I made the dough today and have some pretty nice looking bagels sitting on the baking sheets in the refrigerator right now. We shall see in the morning how they turn out
Baked these this morning for the first time. Followed your recipe except I did substitute 25% whole wheat flour which worked out well. Great crust and crumb. I topped with everything topping on half and the other half sesame and poppy. Everyone loved them! Thanks
Sounds good with the whole wheat flour.
Many flaws to this recipe.
1. These completely stuck to the pan. Could not even pry them off. Need to be baked with parchment paper and the surface needs to be dusted with flour (per Peter Reinhart’s recipe)
2. The end product are not like bagels – just like bread in the shape of bagels.
Very disappointed overall, especially since the rise and everything on the first day went so well.
Step 5 and step 9 of the recipe clearly instruct you to line the sheet pans with parchment paper. If you prefer someone else’s recipe please feel free to use that recipe instead.
Oh my gosh, I am sorry – somehow I totally missed that. I was so bummed about the stickage that I lost my cool. I sincerely apologize. The bagel flavor ended up being really good too. Don’t know what came over me.
A couple recommendations I do have is to boil a bit longer on a rolling boil to increase chewiness and start the bake at 500 to make for a better golden brown color. The prep, rise, and flavor were all fantastic. Apologies again!
I have made these twice now and they have come out delicious. I don’t have molasses so I used an Amber coconut nectar/Honey combo which seamed to work fine. Also I used the everything bagel topping they sell at Trader Joe’s for the top of the bagels. I had a question though…my husband is vegan and for the first batch I made 3 without the egg white and he gobbled them up in a flash. So for the second batch I skipped the egg white for all of them. I have noticed that topping doesn’t stay on very well with out the egg white. Is there a Vegan substitute that would work for egg white?
Maybe aquafaba (the water from chickpeas)?
Hi Eileen, thanks for the recipe and instructions… they were super easy to follow and it’s great to have another use for the sourdough starter, I hate throwing out starter but now I make bread, pizza dough, breakfast pancakes and bagels as well as giving the starter to other friends…
Maybe I should start a bakery
Pictures on Instagram!! #apg479 and tagged with #eileen.bakingsense!!
I usually leave my sourdough outside to prove as I think the fridge is quite a ‘harsh’ temp, but summers are a bit warm here so the cool cellar will be used… I had to put the bagels in a 30degree C oven to do a final raise after the night in fridge.
Nice chewy texture and crisp crust… kids liked them too, unfortunately, now I’ll have to share them!!
Glad you enjoyed them. There’s a world of great baking in that container of starter.
I’ve made a few batches of these recently and it turned out great!
I did swap out the barley malt syrup for just honey and it was fine (but did lack the “malty” flavour), so if you only have honey on hand you can use it instead but it will have a slightly different end taste.
I also found that I had to add a few more tablespoons of flour (on top of the whole 4.5 cups) to really the dough to stop sticking to the sides of the bowl and get a nice smooth dough.
I experimented and made these both with an overnight fridge prove and a room temperature prove. I found proving them at room temperature (approx 23c/74f) took approx 2 hours before I pre-heated the oven and boiled them. They weren’t as “sour” (as they lacked the time to develop that flavour overnight), but still turned out great and were delicious!
With the overnight fridge prove, I still gave them the 30 minute head start at room temperature before putting them in the fridge overnight. In the morning I found they were no where near 50% risen they should have been. I then had them at room temperature for approx another 2 hours in the morning before I started to see that 50% rise in the bagels. I then started the oven pre-heat and boiling the bagels.
To anyone making these who doesn’t see the 50% rise in your bagels overnight in the fridge make sure you leave them at room temperature for a few hours in the morning to give them that 50% rise before baking them. If you don’t you have life-less flat bagels (much like my very first batch!)
Well worth the effort once you get it right!
Thanks for all the tips and feedback. Sourdough baking does require a bit of flexibility.
Hi! I love this recipe and I’ve made it several times. Thank you for sharing it with us! I usually do your overnight in the fridge method but tomorrow I’d like to make them all in one day. How long do you think the last rise should take if you don’t put them in the fridge? Thanks again!
Hi Jessi. I don’t think that last rise will take long at all. I just made these again the other day and after leaving them for 1/2 hour at room temp before putting them in the fridge they were already rising nicely. Depending, as always, on how active your starter/dough are, I would think an hour or so would be enough.
When you say “2 tablespoons (1.5 oz, 42g) barley malt syrup (or honey + molasses)” is the substitute equal parts honey and molasses, eg 1tbsp honey, 1 tbsp molasses?
Yes!
Do you think of a sub of just honey for the barley malt syrup would work? I don’t have barley malt syrup or molasses and am trying not to venture out if I don’t absolutely have to.
Yes, the flavor will be slightly different, but still delicious.
These look great. My starter is active, I have non-diastatic malt powder. Can I use that to substitute for the malt syrup or do I need both?
The non-diastatic malt powder will add some flavor to the dough, but it’s not the same as the malt syrup. The malt powder has more of a cereal flavor and the syrup has a sweeter flavor. I think the best substitute for the malt syrup is a combination of honey and molasses.
Hi I’m having a problem with these rising over night. The dough did rise when I was fermenting but it just never rises over night. This is my second time trying to make them. How do I know if I need to knead the dough more? I timed it 5 minutes and the dough is still a bit sticky. The dough springs back but does not create a window pane. Idk if that’s what it needs to do but I’ve seen other bagel videos and that’s what is suggested to know when the dough is ready. Trying to revive this dough now. Please help.
Did you leave the formed bagels at room temp for 30 minutes before refrigerating for the night? I find that makes a big difference in giving them a head start on rising. If they don’t look like they’ve risen much in the fridge, give them more time at room temp in the morning. Even if the dough starts out a bit sticky, after the long fermentation it should become quite cohesive. Make sure your starter is a 100% starter and not wetter since that can affect the texture. Also be sure to use unbleached bread flour. I even added half ap flour the other day by mistake and still got a nice dough that was not overly sticky. I don’t do the window pane test, I just knead for 5 minutes. This dough does behave a little differently than a simple bread dough since it has sugar (malt syrup) and a good amount of salt.
How do I know if it’s 100% starter? I just have a normal sourdough starter and measured 1 cup of that. I do let it rest 30 minutes before putting it in the fridge. Even after the 3 hour fermentation, the dough is still kinda sticky. I use King Arthur bread flour.
100% starter means that you feed the starter with equal parts starter-water-flour. So I use 4 oz of starter (discard or use the rest) and feed it with 4 oz of water and 4 oz of flour.
Hi There – thank you so much for these wonderful recipes. I have been making the instant=yeast version of this recipe for a little while now, and decided to finally venture into the sourdough variant. Unfortunately, it didn’t work out too well. I tried to follow the recipe closely, but I had to make a few deviations: 1) added more flour because the dough was very sticky. 2) let the bagels sit longer before putting them in the fridge overnight. 3) Bagels didn’t seem to rise at all over night, so I left them at room temperature for a while. After a couple of hours with very little rise, I put them in the oven on “proof” setting (I believe it’s ~ 100F). After being out of the fridge for multiple hours, I was close to throwing the whole batch in the garbage. But then I decided to boil+bake them. When I dropped them in the pot they sunk to the bottom. After a while of boiling they floated. Then I did the bake. They are edible, but not very good. There are a few bubbles of air in the dough.
A couple places where I wasn’t sure what to do: 1) how sticky should the dough be before I place it in the bowl for the fermentation? Maybe I didn’t knead the dough enough? It’s kind of hard to time the 5 minutes because initially the dough’s just sticking to my fingers. Eventually when I get enough flour added, I can actually knead. 2) Maybe my starter wasn’t ready? I have a whole-rye starter that I used to create the AP-starter for this recipe. I fed it for about 3 days with AP flour until it seemed to get sort of bubbly. I did the float test, and it passed. 3) I am baking at altitude (~5k feet).
Sorry about the long-winded comment. Thanks so much!
Is the amount of salt a typo? I’ve tried making these twice and had next to no rise. Salt retards yeast and most recipes call for a TEAspoon or two. You have a tablespoon. I think it’s too much salt because my starter has no issues with any other bread recipe.
Hi Wendy, no that is not a typo. I like my bagels with a good amount of salt. I’ve made this recipe countless times and haven’t had trouble with the salt. The 30-60 rest after mixing the starter/water/flour should give the yeast a head start before the salt is added. Also, this recipe has 5 cups of flour (1/2 cup in the starter) so it is a larger total batch of dough than many other bread recipes. All that being said, if you prefer to use less salt, feel free to adapt the recipe.
Made these yesterday/today with my son and they are delicious. I didn’t have the barley malt syrup so I substituted black strap molasses… also I only had AP flour and it worked out well too. They are really beautiful and tasty and were fun to make! Thank you for the detailed recipe.
Hi, do you HAVE to put them in the fridge overnight ?
Hi Lea, You don’t have to. The longer, cooler rise in the refrigerator does good things for the flavor and texture of the bagels. I also like the convenience of working the day before to have hot bagels for breakfast. That being said, you can skip the refrigerator step and just leave them at room temp to rise, then boil and bake.
Wish I could post a photo of these bagels! They are wonderful! My family was beyond thrilled as we recently moved from Brooklyn to CT and can’t find a decent bagel around. This recipe is a keeper for sure! I used a combo of molasses and honey in place of barley malt.
Thanks, Kasum. Please feel free to post a photo on social media, if you do social media. You can tag @bakingsenseblog on Facebook or eileen.bakingsense on Instagram.
Great chewy bagels. Great flavor. They all were eaten the first night.
Mine rose more horizonrtally than vertically. Any suggestions?
Hi Andrea. Did you use bread flour and knead the full 5 minutes? If they spread out more than up I would guess the gluten wasn’t quite strong enough. This dough should be pretty elastic by the time you’re forming the bagels. If you start forming the bagels and the dough isn’t springing back a bit I would try rolling each bagel into a rope and then bring the ends together to form the loop. The extra work on the dough might give it that extra strength.
Tried making these for the first time. After sitting overnight in the fridge they had not risen at all in fact they looked flat. So I put them in my oven with a pot of boiling water to help them rise. I got my water ready and went to pick them up to put them in the water and they deflated. Wondering what i can do to prevent this from happening. I had placed the dough on parchment paper. Should it be heavily floured or oiled to keep the dough from sticking?
Hi Amy. Did you let the shaped bagels sit at room temperature for 30 minutes before putting the tray in the fridge for the night? This gives them a bit of a head-start on rising over night. But I’ve also put the shaped bagels immediately in the refrigerator and they still rose during the night. Was your starter very active and was the dough active during fermentation? What I do to jump start the cold dough in the morning is I turn on the oven just long enough to get it barely warm. Then I put the tray in the oven. If you warmed the oven with a pot of boiling water you probably created a very moist environment. I’m guessing this made the shaped bagels more sticky so they stuck to the pan and deflated when you picked them up. Yes, as instructed in the recipe you should flour the parchment paper to prevent the bagels from sticking as they rise. In the future I would try creating a warm oven by briefly turning it on instead of using the boiling water. Also, as with any bread dough, if you find that it’s over-risen and/or deflated you can reshape and re-rise the dough. It’s a bit of a set-back but it can save a deflated bread.
Hi Amy in her instructions she forgot to say when to add sugar and baking soda. That may have been the reason.
Hi Shawna. The sugar and baking soda are not added to the dough. They go into the water as instructed in step #9. I did add a comment “for boiling” on those ingredients to help alleviate any confusion.
I made these 2 days ago and they’re almost gone!! I followed the recipe pretty well but I had to add more flour for my dough to pick up off the bowl at the beginning. Also I had to leave the shaped circles out longer than 30 minutes for them to rise. The result was a very delicious bread however it wasn’t dense like a bagel. Also I think because it sat at room temperature for a while before I boiled the dough I couldn’t keep the shape nice so it was very irregular. Not sure how I can improve in the future. I’ll definitely try again.
These turned out perfect!! A great quarantine distraction. I put cheddar cheese on one to bake in the oven and made the rest everything bagels and they all look and taste amazing.
Sorry didn’t mean for that to be a reply, just a separate comment 🙂
I had the same problem, tasty, but not the right texture. The dough stayed sticky, even with added flour and never seemed elastic enough. I bake a couple times a week with my starter and never have this issue. Usually sourdough is wonderfully bouncy and chewy.
Did you watch the video? You can see how the texture of the dough changes during fermentation. I make these bagels almost every week and they are very elastic and have a great texture. If you bake sourdough bread with just flour, water and salt it will be quite a different texture than this recipe with malt syrup added.
Where is the video? I have read through this post several times and cannot find it. My dough is incredibly sticky, even with added flour, and I can’t figure out what went wrong since I bake with sourdough every week.
If you are using an ad blocker the video won’t play. If you turn off the ad blocker you should see the video. The dough still start out quite sticky but will become more cohesive during the fermentation.